


In practical applications, we need to manage a customer category and implement operations such as adding, deleting, and modifying customer categories. How to make these operations more humane and make it more convenient for users to operate has become what we must study. subject.
Preparation Phase
You need to have front-end knowledge such as HTML and Jquery, as well as basic PHP program and MySql database related knowledge. To implement the DEMO example in this article, you first need a mysql database:
CREATE TABLE `catalist` (
 `cid` int(11) NOT NULL auto_increment,
 `title` varchar(100) NOT NULL,
 `sort` mediumint(6) NOT NULL default '0',
 PRIMARY KEY (`cid`)
) ENGINE=MyISAM DEFAULT CHARSET=utf8;
Secondly, introduce the jquery library into the page, as well as the operation result prompt plug-in jNotify and the deletion confirmation plug-in hiAlert. The latter two plug-ins are explained in detail on this site. Readers can learn more through the link:
Add the files that need to be prepared to the
<script type="text/javascript" src="js/jquery.js"></script>
<script type="text/javascript" src="js/jNotify.jquery.js"></script>
<script type="text/javascript" src="js/jquery.alert.js"></script>
<script type="text/javascript" src="js/global.js"></script>
<link rel="stylesheet" type="text/css" href="css/alert.css" />
After preparation, let’s enter the topic.
index.php
index.php is the main page, which reads the classified data in the database, displays it in a list, and provides function buttons for adding, deleting, and modifying.
<?php
include_once('connect.php'); //连接数据库
$query = mysql_query("select * from catalist order by cid asc");
while($row=mysql_fetch_array($query)){
$list .= "<li rel='".$row['cid']."'><span class='del' title='删除'></span>
<span class='edit' title='编辑'></span><span class='txt'>".$row['title']."</span></li>";
}
?>
The above code returns a list string by reading the data in the data table. Then we need to output the string to the corresponding list, the code is as follows:
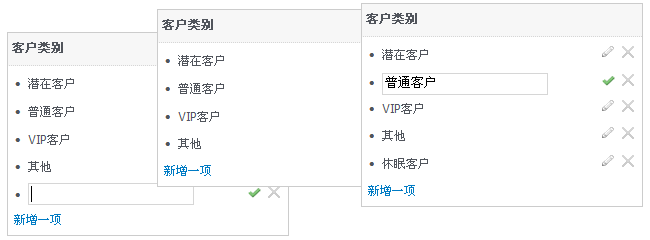
<div class="selectlist"> <h3>客户类别</h3> <ul id="catalist"> <?php echo $list;?> </ul> <p><a href="javascript:;" onclick="addOpt()">新增一项</a></p> </div>
Try to add a few pieces of data to the data table and you will see a category list.
CSS
.input{width:160px; padding:2px; border:1px solid #d3d3d3}
.cur_tr{background:#ffc}
.selectlist{width:280px; margin:30px auto; border:1px solid #ccc;}
.selectlist h3{height:32px; line-height:32px; padding:0 4px; border-bottom:1px dotted #d3d3d3;
 background:#f7f7f7}
.selectlist h3 span{float:right; font-weight:500}
.selectlist ul{margin-top:4px; margin-left:20px; list-style-type: disc}
.selectlist ul li{line-height:26px}
.selectlist p{line-height:28px; padding-left:6px}
.selectlist ul li span{width:20px; height:20px}
.selectlist ul li span.edit{ float:right;background:url(images/edits.gif) no-repeat 0 5px;
cursor:pointer}
.selectlist ul li span.del,.selectlist ul li span.dels,.selectlist ul li span.cancer{
 float:right;background:url(images/del.gif) no-repeat 0 5px; cursor:pointer}
.selectlist ul li span.ok,.selectlist ul li span.oks{float:right;background:url(images/ok.gif)
no-repeat 0 5px; cursor:pointer}
I won’t explain CSS in detail, just take a look and you’ll understand. The final display effect is as shown below:

Add item operation
Add the addOpt() function to global.js:
function addOpt(){
 var str = "<li><span class='dels' title='取消'></span><span class='ok' title='保存'></span>
 <input type='text' class='input' /></li>";
 $("#catalist").append(str);
}
Adds an input box for a new item to the DOM by clicking the "Add an item" link.
When the user enters content and clicks "Save", an ajax operation will be triggered. Let's look at the code first:
$(function(){
 //保存新增项
 $(".ok").live('click',function(){
  var btn = $(this);
  var input_str = btn.parent().find('input').val();
  if(input_str==""){
   jNotify("请输入类别!");
   return false;
  }
  var str = escape(input_str);
  $.getJSON("post.php?action=add&title="+str,function(json){
   if(json.success==1){
    var li = "<li rel='"+json.id+"'><span class='del' title='删除'>
    </span><span class='edit' title='编辑'></span><span class='txt'>"+
    json.title+"</span></li>";
    $("#catalist").append(li);
    btn.parent().remove();
    jSuccess("恭喜,操作成功!");
   }else{
    jNotify("出错了!");
    return false;
   }
  });
 });
});
First get the content input by the user. If no content is entered, the user is prompted to enter content. Then the content input by the user is escape-encoded to ensure that Chinese characters can be correctly transmitted to the background program for recognition. Then initiate an asynchronous Ajax request to the background post.php through the $.getJSON method. The background post.php receives parameter values and performs related processing. The front-end code responds to the JSON data returned by the background. If the addition is successful, an item is appended to the back of the list and the user is prompted "Operation successful". If it fails, the user is prompted "Error" ”.
If you want to cancel the new item operation, just execute the following code when you click the "Cancel" button:
//取消新增项
$(".dels").live('click',function(){
  $(this).parent().remove(); //将新增项移除
});
Backend post.php needs to process the new content, the code is as follows:
include_once('connect.php'); //连接数据库
$action = $_GET['action'];
switch($action){
 case 'add': //新增项
  $title = uniDecode($_GET['title'],'utf-8');
  $title = htmlspecialchars($title,ENT_QUOTES);
  $query = mysql_query("insert into catalist (cid,title) values (NULL,'$title')");
  if($query){
   $insertid = mysql_insert_id($link);
   $arr = array('id'=>$insertid,'title'=>$title,'success'=>1);
  }else{
   $arr = array('success'=>2);
  }
  echo json_encode($arr);
  break;
  case '':
  break;
}
By receiving the content submitted by the front-end, decoding it, writing it into the data table, and outputting JSON data format for front-end processing. Regarding the uniDecode() function, readers can download the source code to learn more about it, mainly to correctly read and parse the Chinese string submitted asynchronously by jquery.
The operation of adding items has been completed. Please see the operation of deleting items below. Delete item operation
Go back to global.js and add the following code to $(function(){}):
//删除项
 $(".del").live('click',function(){
  var btn = $(this);
  var id = btn.parent().attr('rel');
  var URL = "post.php?action=del";
  hiConfirm('您确定要删除吗?', '提示',function(r){
   if(r){
    $.ajax({
    type: "POST",
    url: URL,
    data: "id="+id,
    success: function(msg){
     if(msg==1){
      jSuccess("删除成功!");
      btn.parent().remove();
     }else{
      jNotify("操作失败!");
      return false;
     }
    }
    });
   }
  });
 });
Obviously, by clicking the "Delete" button, an ajax request is also sent to the background post.php, and the parameter ID corresponding to the deleted item is sent to the background and responds to the background processing result. If successful, the user is prompted "Delete successfully" ", and remove the data item through remove(). If it fails, it will prompt "Operation failed".
The background post.php receives parameters and handles them accordingly:
case 'del': //删除项
 $id = $_POST['id'];
 $query = mysql_query("delete from catalist where cid=".$id);
 if($query){
  echo '1';
 }else{
  echo '2';
 }
 break;
The above code snippet is added to the switch statement of post.php to execute the delete statement and output the execution results for front-end processing.
Due to space limitations, the modification operation will be explained in the following article, so please pay attention and don’t miss it.


![[Web front-end] Node.js quick start](https://img.php.cn/upload/course/000/000/067/662b5d34ba7c0227.png)


