In this article, we will learn how to build a restful API in Laravel using JWT authentication. JWT stands for JSON Web Tokens. We will also use the API to create a fully functional CRUD application for the user product.
API is a very good choice when using cross-platform applications. In addition to a website, your product may also have Android and iOS apps. In this case, the API is equally great because you can write different frontends without changing any backend code. When using the API, just hit a GET, POST or other type of request with some parameters, and the server will return some data in JSON (JavaScript Object Notation) format, which is processed by the client application.
Instructions
Let’s start by writing down our application details and features. We will build a basic user product list using restful API in laravel using JWT authentication.
A User will use the following functions
Register and create a new account
Log in Go to their account
Logout and discard token and leave the app
Get logged in user details
Retrieve the list of products available to the user
Find a specific product by ID
Add a new product to the user's product list
Edit existing product details
Remove existing product from user list
A User Required
name
password
A Product Required
composer create-project --prefer-dist laravel/laravel jwt
This will create a new Laravel project in a directory named jwt.
Configuring the JWT extension packageWe will use the tymondesigns/jwt-auth extension package to allow us to use JWT in Laravel.
Install the tymon/jwt-auth extension packageLet us install this extension package in this Laravel application. If you are using Laravel 5.5 or above, please run the following command to get the dev-develop version of the JWT package:
composer require tymon/jwt-auth:dev-develop --prefer-source
If you are using Laravel 5.4 or below, then run the following command:
composer require tymon/jwt-auth
For applications with Laravel versions lower than 5.5, you also need to set the service provider and alias in the config/app.php file.
'providers' => [
    ....
    Tymon\JWTAuth\Providers\JWTAuthServiceProvider::class,
    ....
],
'aliases' => [
    ....
    'JWTAuth' => Tymon\JWTAuth\Facades\JWTAuth::class,
    'JWTFactory' => 'Tymon\JWTAuth\Facades\JWTFactory',
    ....
],If your Laravel version is 5.5 or above, Laravel will perform "package automatic discovery".
Publish the configuration fileFor Laravel version 5.5 or above, please use the following command to publish the configuration file:
php artisan vendor:publish --provider="Tymon\JWTAuth\Providers\LaravelServiceProvider"
For previous versions of Laravel, you should run the following command:
php artisan vendor:publish --provider="Tymon\JWTAuth\Providers\JWTAuthServiceProvider"
The above command will generate the config/jwt.php configuration file. Without the comments, the configuration file would look like this:
<?php
return [
'secret' => env('JWT_SECRET'),
'keys' => [
'public' => env('JWT_PUBLIC_KEY'),
'private' => env('JWT_PRIVATE_KEY'),
'passphrase' => env('JWT_PASSPHRASE'),
],
'ttl' => env('JWT_TTL', 60),
'refresh_ttl' => env('JWT_REFRESH_TTL', 20160),
'algo' => env('JWT_ALGO', 'HS256'),
'required_claims' => [
'iss',
'iat',
'exp',
'nbf',
'sub',
'jti',
],
'persistent_claims' => [
// 'foo',
// 'bar',
],
'lock_subject' => true,
'leeway' => env('JWT_LEEWAY', 0),
'blacklist_enabled' => env('JWT_BLACKLIST_ENABLED', true),
'blacklist_grace_period' => env('JWT_BLACKLIST_GRACE_PERIOD', 0),
'decrypt_cookies' => false,
'providers' => [
'jwt' => Tymon\JWTAuth\Providers\JWT\Lcobucci::class,
'auth' => Tymon\JWTAuth\Providers\Auth\Illuminate::class,
'storage' => Tymon\JWTAuth\Providers\Storage\Illuminate::class,
],
];Generate JWT keyJWT tokens are issued using an encrypted key . For Laravel 5.5 or above, run the following command to generate a key for issuing tokens.
php artisan jwt:secret
If the Laravel version is lower than 5.5, run:
php artisan jwt:generate
This tutorial uses Laravel 5.6. The next steps in the tutorial have only been tested in 5.5 and 5.6. May not work with Laravel 5.4 or below. You can read documentation for older versions of Laravel.
Registration MiddlewareThe JWT Authentication extension package comes with middleware that allows us to use it. Register auth.jwt middleware in app/Http/Kernel.php:
protected $routeMiddleware = [
    ....
    'auth.jwt' => \Tymon\JWTAuth\Http\Middleware\Authenticate::class,
];This middleware will verify the user's authentication by checking the token attached to the request. If the user is not authenticated, this middleware will throw an UnauthorizedHttpException exception.
Set up routingBefore we begin, we will set up routing for all the points discussed in this tutorial. Open routes/api.php and copy the following routes into your file.
Route::post('login', 'ApiController@login');
Route::post('register', 'ApiController@register');
Route::group(['middleware' => 'auth.jwt'], function () {
    Route::get('logout', 'ApiController@logout');
    Route::get('user', 'ApiController@getAuthUser');
    Route::get('products', 'ProductController@index');
    Route::get('products/{id}', 'ProductController@show');
    Route::post('products', 'ProductController@store');
    Route::put('products/{id}', 'ProductController@update');
    Route::delete('products/{id}', 'ProductController@destroy');
});Update User modelJWT needs to implement the Tymon\JWTAuth\Contracts\JWTSubject interface in the User model. This interface needs to implement two methods getJWTIdentifier and getJWTCustomClaims. Update app/User.php with the following content.
<?php
namespace App;
use Illuminate\Foundation\Auth\User as Authenticatable;
use Illuminate\Notifications\Notifiable;
use Tymon\JWTAuth\Contracts\JWTSubject;
class User extends Authenticatable implements JWTSubject
{
use Notifiable;
/**
* The attributes that are mass assignable.
*
* @var array
*/
protected $fillable = [
'name', 'email', 'password',
];
/**
* The attributes that should be hidden for arrays.
*
* @var array
*/
protected $hidden = [
'password', 'remember_token',
];
/**
* Get the identifier that will be stored in the subject claim of the JWT.
*
* @return mixed
*/
public function getJWTIdentifier()
{
return $this->getKey();
}
/**
* Return a key value array, containing any custom claims to be added to the JWT.
*
* @return array
*/
public function getJWTCustomClaims()
{
return [];
}
}JWT Authentication LogicLet us write the logic of Restful API in laravel using JWT authentication.
用户注册时需要姓名,邮箱和密码。那么,让我们创建一个表单请求来验证数据。通过运行以下命令创建名为 RegisterAuthRequest 的表单请求:
php artisan make:request RegisterAuthRequest
它将在 app/Http/Requests 目录下创建 RegisterAuthRequest.php 文件。将下面的代码黏贴至该文件中。
<?php
namespace App\Http\Requests;
use Illuminate\Foundation\Http\FormRequest;
class RegisterAuthRequest extends FormRequest
{
/**
* 确定是否授权用户发出此请求
*
* @return bool
*/
public function authorize()
{
return true;
}
/**
* 获取应用于请求的验证规则
*
* @return array
*/
public function rules()
{
return [
'name' => 'required|string',
'email' => 'required|email|unique:users',
'password' => 'required|string|min:6|max:10'
];
}
}运行以下命令创建一个新的 ApiController :
php artisan make:controller ApiController
这将会在 app/Http/Controllers 目录下创建 ApiController.php 文件。将下面的代码黏贴至该文件中。
<?php
namespace App\Http\Controllers;
use App\Http\Requests\RegisterAuthRequest;
use App\User;
use Illuminate\Http\Request;
use JWTAuth;
use Tymon\JWTAuth\Exceptions\JWTException;
class ApiController extends Controller
{
public $loginAfterSignUp = true;
public function register(RegisterAuthRequest $request)
{
$user = new User();
$user->name = $request->name;
$user->email = $request->email;
$user->password = bcrypt($request->password);
$user->save();
if ($this->loginAfterSignUp) {
return $this->login($request);
}
return response()->json([
'success' => true,
'data' => $user
], 200);
}
public function login(Request $request)
{
$input = $request->only('email', 'password');
$jwt_token = null;
if (!$jwt_token = JWTAuth::attempt($input)) {
return response()->json([
'success' => false,
'message' => 'Invalid Email or Password',
], 401);
}
return response()->json([
'success' => true,
'token' => $jwt_token,
]);
}
public function logout(Request $request)
{
$this->validate($request, [
'token' => 'required'
]);
try {
JWTAuth::invalidate($request->token);
return response()->json([
'success' => true,
'message' => 'User logged out successfully'
]);
} catch (JWTException $exception) {
return response()->json([
'success' => false,
'message' => 'Sorry, the user cannot be logged out'
], 500);
}
}
public function getAuthUser(Request $request)
{
$this->validate($request, [
'token' => 'required'
]);
$user = JWTAuth::authenticate($request->token);
return response()->json(['user' => $user]);
}
}让我解释下上面的代码发生了什么。
在 register 方法中,我们接收了 RegisterAuthRequest 。使用请求中的数据创建用户。如果 loginAfterSignUp 属性为 true ,则注册后通过调用 login 方法为用户登录。否则,成功的响应则将伴随用户数据一起返回。
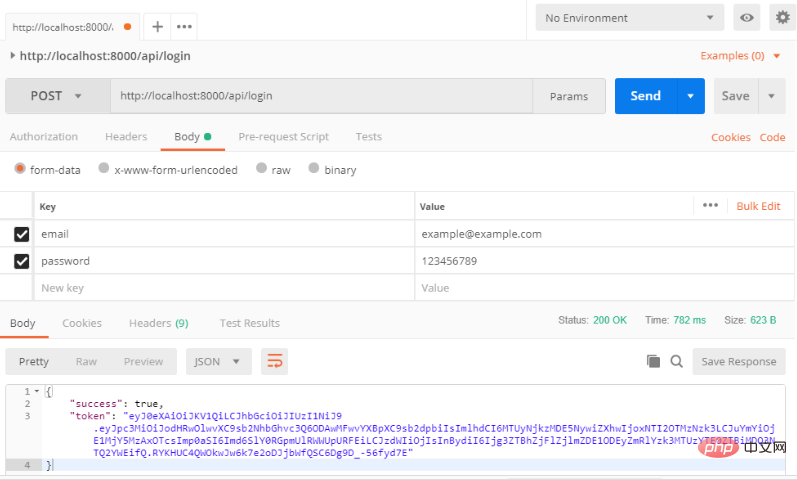
在 login 方法中,我们得到了请求的子集,其中只包含电子邮件和密码。以输入的值作为参数调用 JWTAuth::attempt() ,响应保存在一个变量中。如果从 attempt 方法中返回 false ,则返回一个失败响应。否则,将返回一个成功的响应。
在 logout 方法中,验证请求是否包含令牌验证。通过调用 invalidate 方法使令牌无效,并返回一个成功的响应。如果捕获到 JWTException 异常,则返回一个失败的响应。
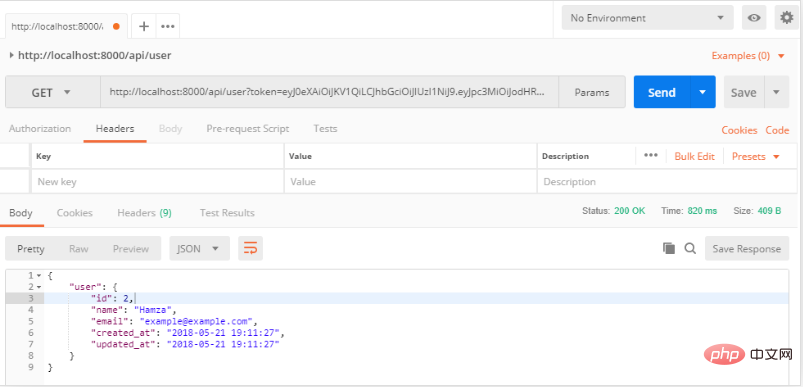
在 getAuthUser 方法中,验证请求是否包含令牌字段。然后调用 authenticate 方法,该方法返回经过身份验证的用户。最后,返回带有用户的响应。
身份验证部分现在已经完成。
构建产品部分
要创建产品部分,我们需要 Product 模型,控制器和迁移文件。运行以下命令来创建 Product 模型,控制器和迁移文件。
php artisan make:model Product -mc
它会在 database/migrations 目录下创建一个新的数据库迁移文件 create_products_table.php,更改 up 方法。
public function up()
{
    Schema::create('products', function (Blueprint $table) {
        $table->increments('id');
        $table->integer('user_id');
        $table->string('name');
        $table->integer('price');
        $table->integer('quantity');
        $table->timestamps();
        $table->foreign('user_id')
            ->references('id')
            ->on('users')
            ->onDelete('cascade');
    });
}向 Product 模型中添加 fillable 属性。在 app 目录下打开 Product.php 文件并添加属性。
protected $fillable = [
    'name', 'price', 'quantity'
];现在在 .env 文件中设置数据库凭证,并通过运行以下命令迁移数据库。
php artisan migrate
现在,我们必须在 User 模型中添加一个关系来检索相关产品。在 app/User.php 中添加以下方法。
public function products()
{
    return $this->hasMany(Product::class);
}在 app/Http/Controllers 目录下打开 ProductController.php 文件。在文件开头添加 use 指令覆盖上一个。
use App\Product;
use Illuminate\Http\Request;
use JWTAuth;
现在我们将实现五个方法。
index, 为经过身份认证的用户获取所有产品列表
show, 根据 ID 获取特定的产品
store, 将新产品存储到产品列表中
update, 根据 ID 更新产品详情
destroy, 根据 ID 从列表中删除产品
添加一个构造函数来获取经过身份认证的用户,并将其保存在 user 属性中。
protected $user;
public function __construct()
{
    $this->user = JWTAuth::parseToken()->authenticate();
}parseToken 将解析来自请求的令牌, authenticate 通过令牌对用户进行身份验证。
让我们添加 index 方法。
public function index()
{
    return $this->user
        ->products()
        ->get(['name', 'price', 'quantity'])
        ->toArray();
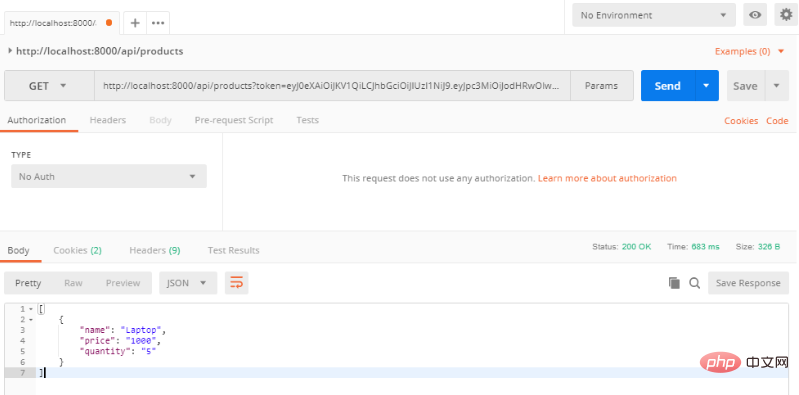
}上面的代码非常简单,我们只是使用 Eloquent 的方法获取所有的产品,然后将结果组成一个数组。最后,我们返回这个数组。Laravel 将自动将其转换为 JSON ,并创建一个为 200 成功的响应码。
继续实现 show 方法。
public function show($id)
{
    $product = $this->user->products()->find($id);
    if (!$product) {
        return response()->json([
            'success' => false,
            'message' => 'Sorry, product with id ' . $id . ' cannot be found'
        ], 400);
    }
    return $product;
}这个也非常容易理解。我们只需要根据 ID 找到该产品。如果产品不存在,则返回 400 故障响应。否则,将返回产品数组。
接下来是 store 方法
public function store(Request $request)
{
    $this->validate($request, [
        'name' => 'required',
        'price' => 'required|integer',
        'quantity' => 'required|integer'
    ]);
    $product = new Product();
    $product->name = $request->name;
    $product->price = $request->price;
    $product->quantity = $request->quantity;
    if ($this->user->products()->save($product))
        return response()->json([
            'success' => true,
            'product' => $product
        ]);
    else
        return response()->json([
            'success' => false,
            'message' => 'Sorry, product could not be added'
        ], 500);
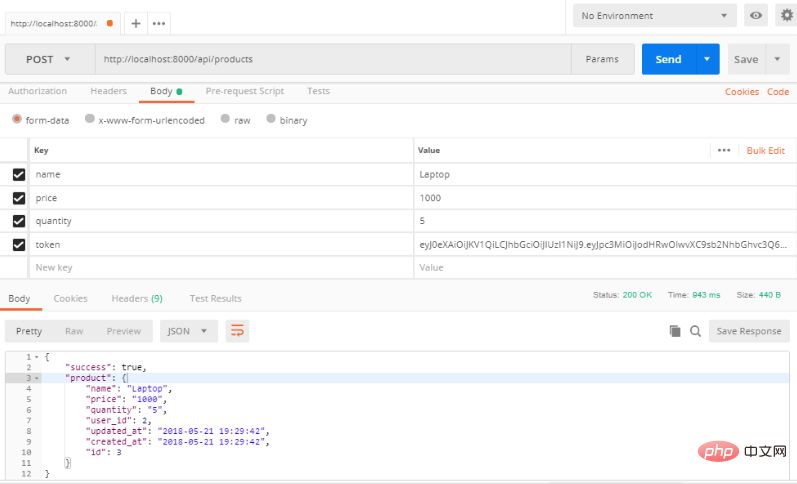
}在 store 方法中,验证请求中是否包含名称,价格和数量。然后,使用请求中的数据去创建一个新的产品模型。如果,产品成功的写入数据库,会返回成功响应,否则返回自定义的 500 失败响应。
实现 update 方法
public function update(Request $request, $id)
{
    $product = $this->user->products()->find($id);
    if (!$product) {
        return response()->json([
            'success' => false,
            'message' => 'Sorry, product with id ' . $id . ' cannot be found'
        ], 400);
    }
    $updated = $product->fill($request->all())
        ->save();
    if ($updated) {
        return response()->json([
            'success' => true
        ]);
    } else {
        return response()->json([
            'success' => false,
            'message' => 'Sorry, product could not be updated'
        ], 500);
    }
}在 update 方法中,我们通过 id 取得产品。如果产品不存在,返回一个 400 响应。然后,我们把请求中的数据使用 fill 方法填充到产品详情。更新产品模型并保存到数据库,如果记录成功更新,返回一个 200 成功响应,否则返回 500 内部服务器错误响应给客户端。
现在,让我们实现 destroy 方法。
public function destroy($id)
{
    $product = $this->user->products()->find($id);
    if (!$product) {
        return response()->json([
            'success' => false,
            'message' => 'Sorry, product with id ' . $id . ' cannot be found'
        ], 400);
    }
    if ($product->delete()) {
        return response()->json([
            'success' => true
        ]);
    } else {
        return response()->json([
            'success' => false,
            'message' => 'Product could not be deleted'
        ], 500);
    }
}在 destroy 方法中,我们根据 ID 获取产品,如果产品不存在,则返回 400 响应。然后我们删除产品后并根据删除操作的成功状态返回适当的响应。
控制器代码现在已经完成,完整的控制器代码在这。
测试
我们首先来测试身份认证。我们将使用 serve 命令在开发机上启动 Web 服务,你也可以使用虚拟主机代替。运行以下命令启动 Web 服务。
php artisan serve
它将监听 localhost:8000
为了测试 restful API's,我们使用 Postman。填写好请求体之后,我们请求一下 register 路由。

Send the request and you will get the token.

Our user is now registered and authenticated. We can send another request to detect the login route, which will return a 200 and token.

Get user details

Test identity authentication has been completed. Next, test the product part, first create a product.

Now, get the product by requesting the index method.

You can test other routes and they will all work fine.
Recommended tutorial: "Laravel Tutorial"
The above is the detailed content of Using Laravel to integrate JWT authentication to develop RestfulApi. For more information, please follow other related articles on the PHP Chinese website!