The following is theLaravel Getting Startedtutorial column to introduce you to the Laravel 7 extension development tutorial. I hope it will be helpful to friends who need it!
#Step 1. Create a new project
I prefer to use the Laravel installer.
laravel new lara-dg
I prefer using SQLite for testing and package development. Modify your .env file:
DB_CONNECTION=sqlite DB_DATABASE=/Users/ivan/code/packages/test-project/database/database.sqlite
Then let’s create the package skeleton. We will use the CLI tool. It will generate all the necessary files:
composer require jeroen-g/laravel-packager
Then you can run the build command. Webkid represents the vendor name (your namespace) and LaravelDiagnostic represents your project name:
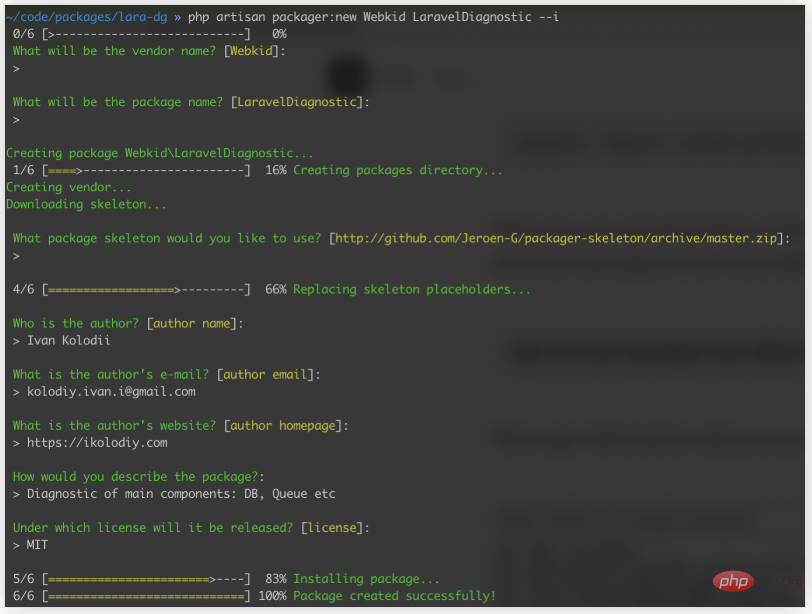
php artisan packager:new Webkid LaravelDiagnostic --i
Then enter the information about you and your package. It should now look like this:

Console Output
Now you have the packages folder in your project, which has the Webkid directory and all the required document.
This package is automatically loaded through composer. I prefer using relative paths:
"repositories": { "webkid/laraveldiagnostic": { "type": "path", "url": "../../packages/lara-dg/packages/Webkid/LaravelDiagnostic" } }
Also, if your require section doesn't update automatically, please update it manually. It will create a symbolic link to the package directory in your vendor directory.
"require": { "webkid/laraveldiagnostic": "*" },
Now you can create classes in the src folder, but they should have the appropriate namespace Webkid\LaravelDiagnostic.
For example, I have a Commands directory with a RunDiagnostic.php in it class file. So it should have a namespace like this:
namespace Webkid\LaravelDiagnostic\Commands;
If you want to use migrations, routes, configuration files, views or even resource files (js, CSS, images), you need to load them in the service provider. You can learn about it in the official documentation. In this example I just used commands. Take a look at the bootForConsole() method in my LaravelDiagnosticServiceProvider:
public function bootForConsole() { if ($this->app->runningInConsole()) { $this->commands([ RunDiagnostic::class ]); } }
I ran into trouble the first time I tried to construct my package, so I wanted to share my personal experience with you. I prefer to put all PHP classes into the src folder and put all other files outside. For example:
assets—Used to store all CSS, js, images files
config—Used to store all configuration files
migrations—Used to store all migration files
resources — used to store all view files, lang files, etc.
src — used to store all PHP classes, including service providers
If you need to reference other software packages, then You must edit the composer.json file in the package to add it.
"require": { "cviebrock/eloquent-sluggable": "^4.3" }
A more useful tip: when you need to test changed resources simultaneously, you can use symlinks to avoid repeating vendor releases all the time. It will create symbolic links instead of copying files. This trick saves me a lot of time
ln -s /path/to/your/project/webkid-cms/packages/webkid/cms/assets /path/to/your/project/webkid-cms/ public/vendor/cms
Then update Composer's autoloader to add the new file:
composer dump-autoload
Step 2. Put your project on GitHub
When your code base is ready, you can go to the package directory to initialize a Git repository.
cd packages/Webkid/LaravelDiagnostic git init git add . git commit -m "first commit"
Create a new GitHub repository and add origin.
git remote add origin git@github.com:yourusername/yourrepository.git git push -u origin master git tag -a 1.0.0 -m "release: First version" git push --tags
Step 3. Put your project on Packagist
First, on Packagist .org website registration. I prefer to sign up using my GitHub account.
Then use this URL to submit a new package. Enter your package's GitHub URL and click Check. If any errors occur, follow the on-screen instructions.
After completing the previous step, you will be redirected to your package's packagist page, where you may receive the following notification:
This package will not be updated automatically. Please set up a GitHub Service Hook for Packagist to update it every time you push!
Let’s set it up. Get the API token on this page, then visit your package's GitHub page and find the Settings / Webhooks and Services / Add New Service interface. Search Packagist, enter your name and token, and click Submit. The error displayed on the Packagist page should disappear within 5–10 minutes.
Congratulations, you have a valid package online and you can now reference it through composer.
Step 5. Continue in the packages folder
If your sole purpose of developing this software package is to help you develop software packages, then the development of this package finished.
However, if you developed the package in a larger project and now need it, you can keep the code in the packages folder and use it.
Whenever you are done with your work, you can remove this code from your composer.json file
"repositories": { "webkid/laraveldiagnostic": { "type": "path", "url": "../../packages/lara-dg/packages/Webkid/LaravelDiagnostic" } }
and then pull your package from packagist.
Thank you for reading. Hope this article is helpful to everyone.
Let's contribute to open source!
Recommended tutorial: "Laravel"
The above is the detailed content of Laravel 7 extension development tutorial. For more information, please follow other related articles on the PHP Chinese website!