
The content of this article is about the method (code example) of implementing Touch sliding rebound on the mobile terminal with native js. It has certain reference value. Friends in need can refer to it. I hope it will be helpful to you. helped.
Mobile Touch Slide Rebound
What is Touch Slide? It is similar to the scrolling event on the PC side, but there is no scrolling event on the mobile side, so it is necessary to use the Touch event combined with js to implement it. The effect is as follows: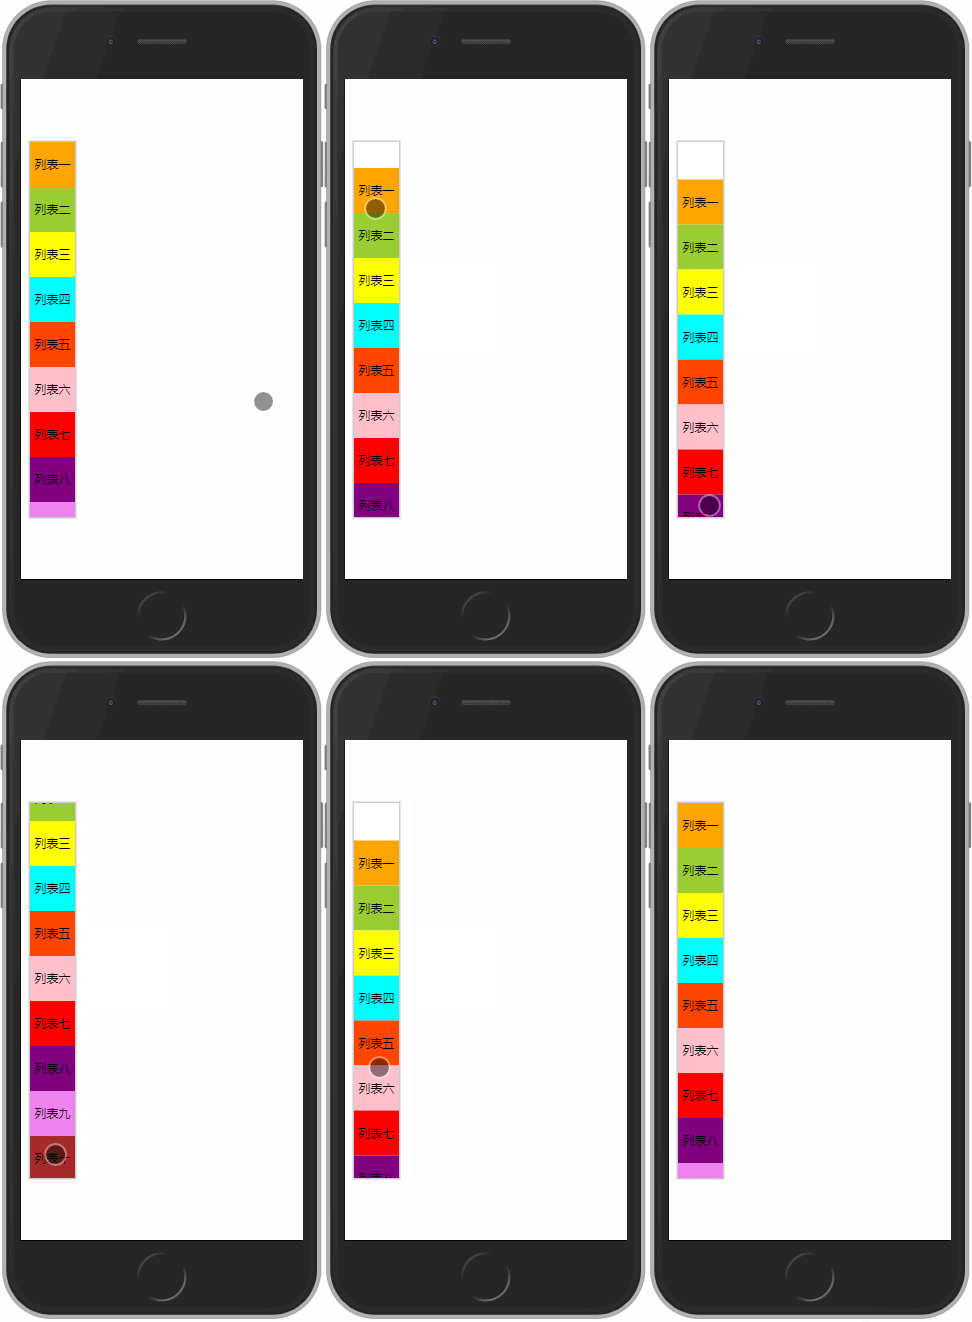
1. Preparation
What is the Touch event on the mobile terminal? Touch events on the mobile side can be subdivided into three types: touchstart, touchmove and touchend, and touch events must be monitored with addEventListener.touchStart is triggered when the finger touches the screen
touchmove is triggered when the finger keeps moving on the screen
touchend is triggered when the finger leaves the screen
Event object triggered by Touch event:
// 手指触碰到屏幕时触发
element.addEventListener('touchstart', function (e) {
    // 打印的事件对象
    console.log(e);
})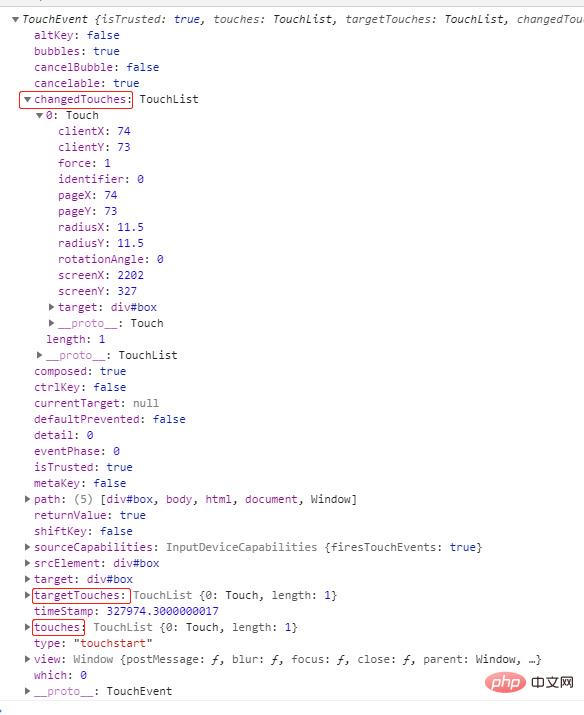
The difference between the three returned objects:In fact, these three returned objects all represent the finger information when the user touches the event. The reason why it is a pseudo array is Because it is possible for multiple fingers to touch at the same time, but in actual work, the situation of multiple fingers is generally not considered. The only difference between them is that during the touchstart and touchmove events, changedTouches, targetTouches, and touches can all obtain finger information. However, during the touchend event, the targetTouches and touches objects cannot return the finger information when leaving the screen. Only changedTouches The object can be returned.
What finger information is there? We can look at the picture above. In changedTouche[0], some values are:
clientX:74    // 触摸点相对于浏览器的 viewport 左边缘的 x 坐标,不会包括左边的滚动距离。
clientY:73    // 触摸点相对于浏览器的 viewport 上边缘的 Y 坐标,不会包括上边的滚动距离。
screenX:2202  // 触摸点相对于屏幕左边缘的 x 坐标。
screenY:327   // 触摸点相对于屏幕上边缘的 Y 坐标。
pageX:65      // 触摸点相对于 document 的左边缘的 x 坐标,包括左边的滚动距离
pageY:18      // 触摸点相对于 document 的上边缘的 Y 坐标,包括左边的滚动距离
HTML部分:
<aside>
  <div>
    <ul>
      <li>列表一</li>
      <li>列表二</li>
      <li>列表三</li>
      <li>列表四</li>
      <li>列表五</li>
      <li>列表六</li>
      <li>列表七</li>
      <li>列表八</li>
      <li>列表九</li>
      <li>列表十</li>
    </ul>
  </div>
</aside>
css部分:
在列表的父盒子上设定一个overflow: hidden属性,使超出盒子部分的列表暂时隐藏掉,后面会通过js去实现滑动。
/* 样式初始化 */
* {
  margin: 0;
  padding: 0;
}

html,
body {
  width: 100%;

}

aside {
  height: 100%;
  width: 100%;
}
/* 列表的父盒子,限制宽高 */
/* 注意设置overflow: hidden;样式后,超出这个盒子的ul将不会显示 */
.draw {
  width: 60px;
  height: 500px;
  border: 2px solid #ccc;
  overflow: hidden;
  position: fixed;
  left: 10px;
  top: 50%;
  transform: translateY(-50%);
}

/* li 设置了浮动, 所以 ul 要清除浮动 */
ul:after {
  content: "";
  display: block;
  visibility: hidden;
  height: 0;
  clear: both;
}

ul {
  zoom: 1;
}

li {
  list-style: none;
  float: left;
  width: 60px;
  height: 60px;
  line-height: 60px;
  text-align: center;
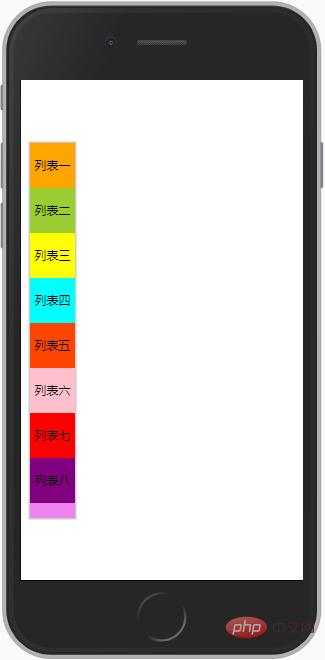
}效果图:
3. 首次滑动
手指触摸到列表向下滑动的时候,列表应该跟着向下滑动,当手指离开屏幕的时候,列表应该停在滑动的位置。这里就会用到上面准备阶段的知识点了,不明白的可以参考上面的概念。实现原理:
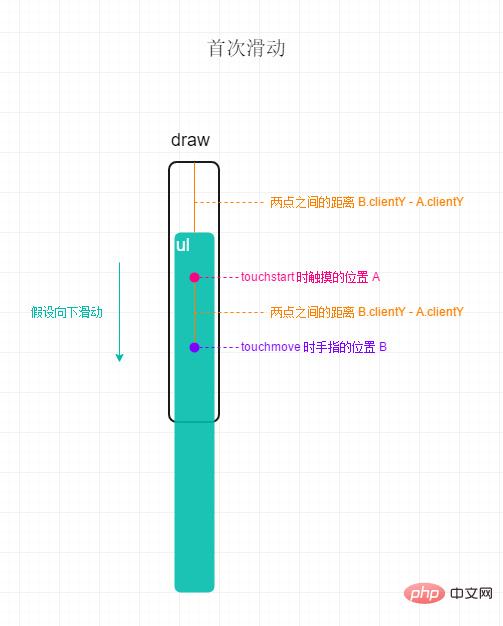
1、touchstart的时候,获取手指触摸的落点A,通过这个点对象里面的clientY属性,获取距离顶部可视区的距离;
2、touchmove的时候,获取手指的点B,同样的获取移动时距离顶部可视区的距离;
3、touchmove的时候,还要做另一件事情,就是获取两点的差值(B.clientY-A.clientY),将这个差值动态赋值给ul,ul只需要设置向Y轴方向偏移这个距离,就能实现列表随手指滑动
先来张示意图,怎么通过 js 让列表滑动起来:
示例代码:
var draw = document.querySelector('#draw');
var ul = draw.children[0];

// touchstart 时,记录手指在 Y 轴上的落点距离可视顶部距离
var startY = 0
ul.addEventListener('touchstart', function (e) {
  startY = e.changedTouches[0].clientY;
})
// touchmove 时,记录此时手指在 Y 轴上的落点距离可视顶部距离
ul.addEventListener('touchmove', function (e) {
  // 获取差值
  var dy = e.changedTouches[0].clientY - startY;
  // 设置 ul 在 Y 轴上的偏移
  ul.style.transform = 'translateY(' + dy + 'px)';
})效果图:
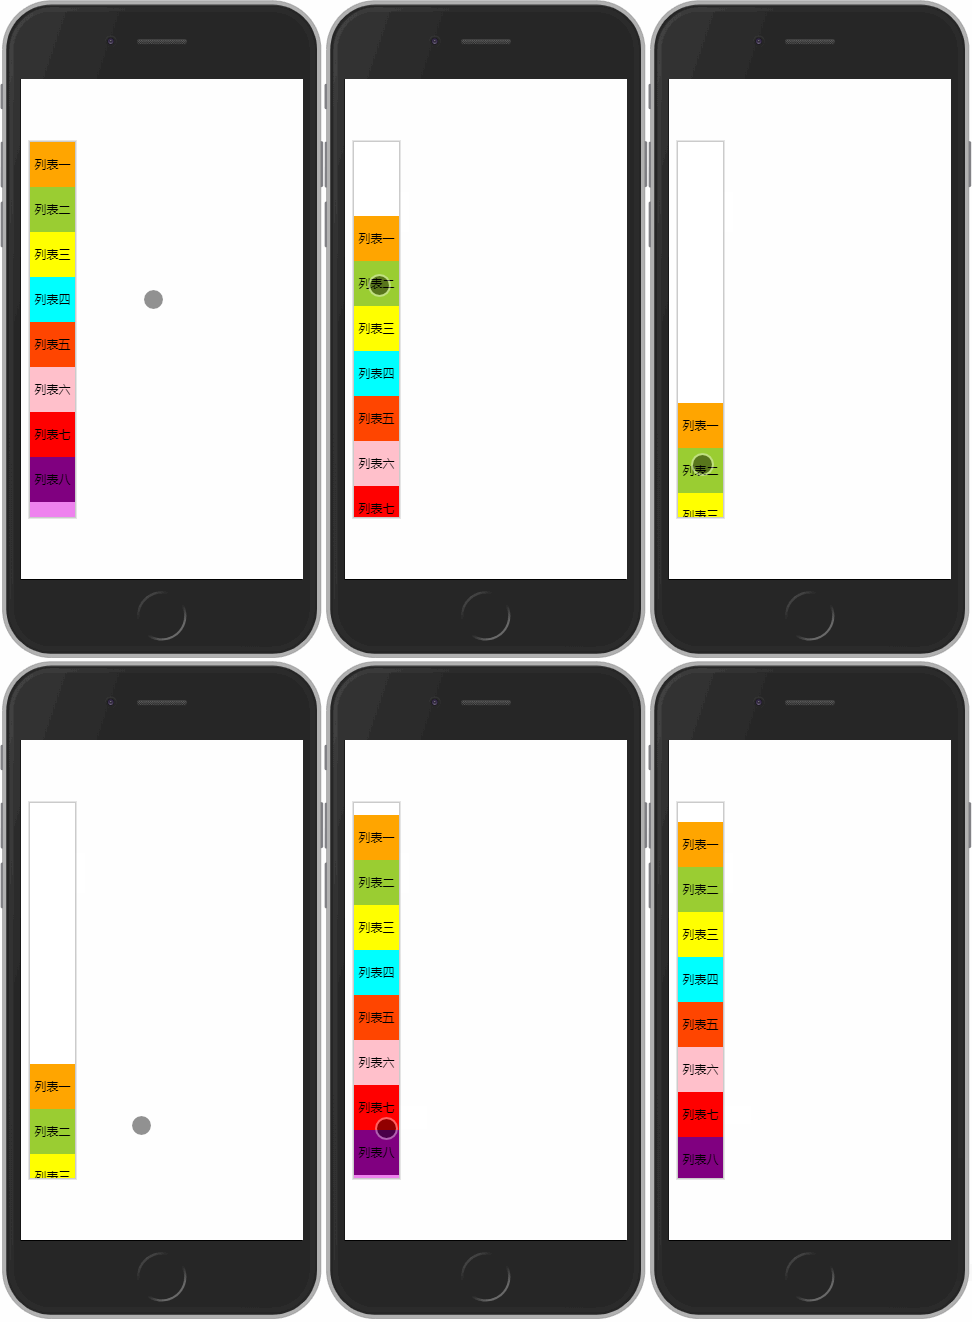
4. 再次滑动
上面的效果图,细心的朋友可能已经发现了问题,在第一次的时候,得到了我们想要的效果,但是在第二次的时候,我们继续向下移动了一段距离,但是ul并没有接着第一次的位置继续向下,而是瞬间跳了上去。问题分析:
虽然第二次是继续向下移动了一段距离,但是触摸结束后,最终是将此时的差值,重新赋值给了ul的Y轴偏移,所以视觉上“跳了上去”。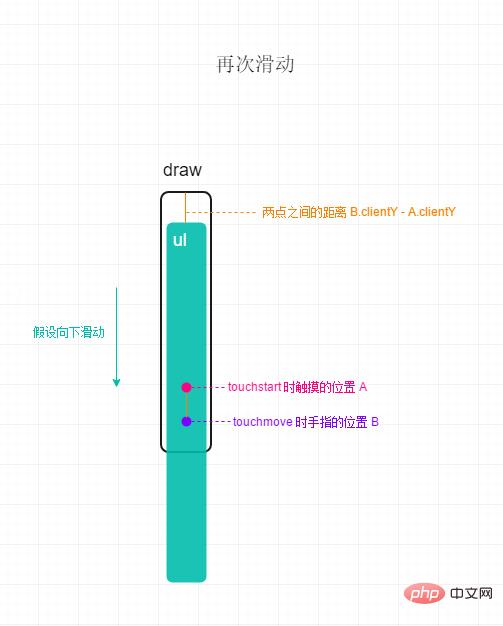
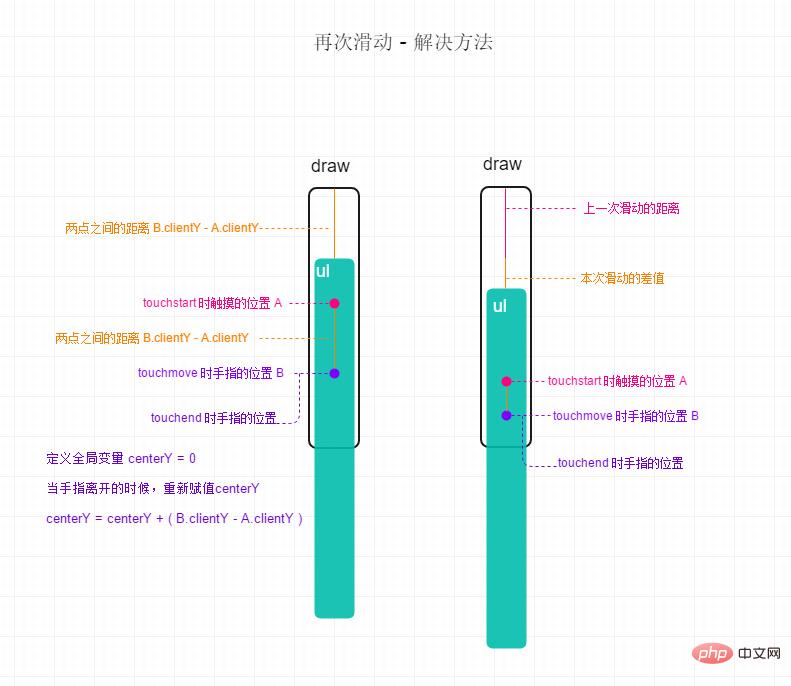
解决方法:
每一次滑动结束之后,都应该记录下此次滑动的距离,与之前的进行累加,待下一次滑动的时候,ul在Y轴的偏移值应该是之前的距离加上本次滑动的距离。新增touchend事件,在该事件里同样的可以获取到本次滑动的距离,将它与上一次的距离相加,赋值给一个全局变量;
在touchmove事件里有点小改动,就是在给ul设置偏移值的时候,除了本次滑动的差值还要加上这个上一次的值;
示意图:
示例代码:
var draw = document.querySelector('#draw');
var ul = draw.children[0];

var startY = 0 // 刚触碰到屏幕的时的手指信息
var centerY = 0 // 用来记录每次触摸时上一次的偏移距离

// touchstart 时,记录手指在 Y 轴上的落点距离可视顶部距离
ul.addEventListener('touchstart', function (e) {
  startY = e.changedTouches[0].clientY;
})

// touchmove 时,记录此时手指在 Y 轴上的落点距离可视顶部距离
ul.addEventListener('touchmove', function (e) {
  // 获取差值
  var dy = e.changedTouches[0].clientY - startY;
  // 上次的滑动距离加上本次的滑动距离
  var tempY = centerY + dy;
  // 设置 ul 在 Y 轴上的偏移
  ul.style.transform = 'translateY(' + tempY + 'px)';
})

// touchend 时,记录此时手指在 Y 轴上的落点距离可视顶部距离
ul.addEventListener('touchend', function (e) {
  // 获取差值
  var dy = e.changedTouches[0].clientY - startY;
  // 记录移动的距离
  centerY = centerY + dy;
})效果图:
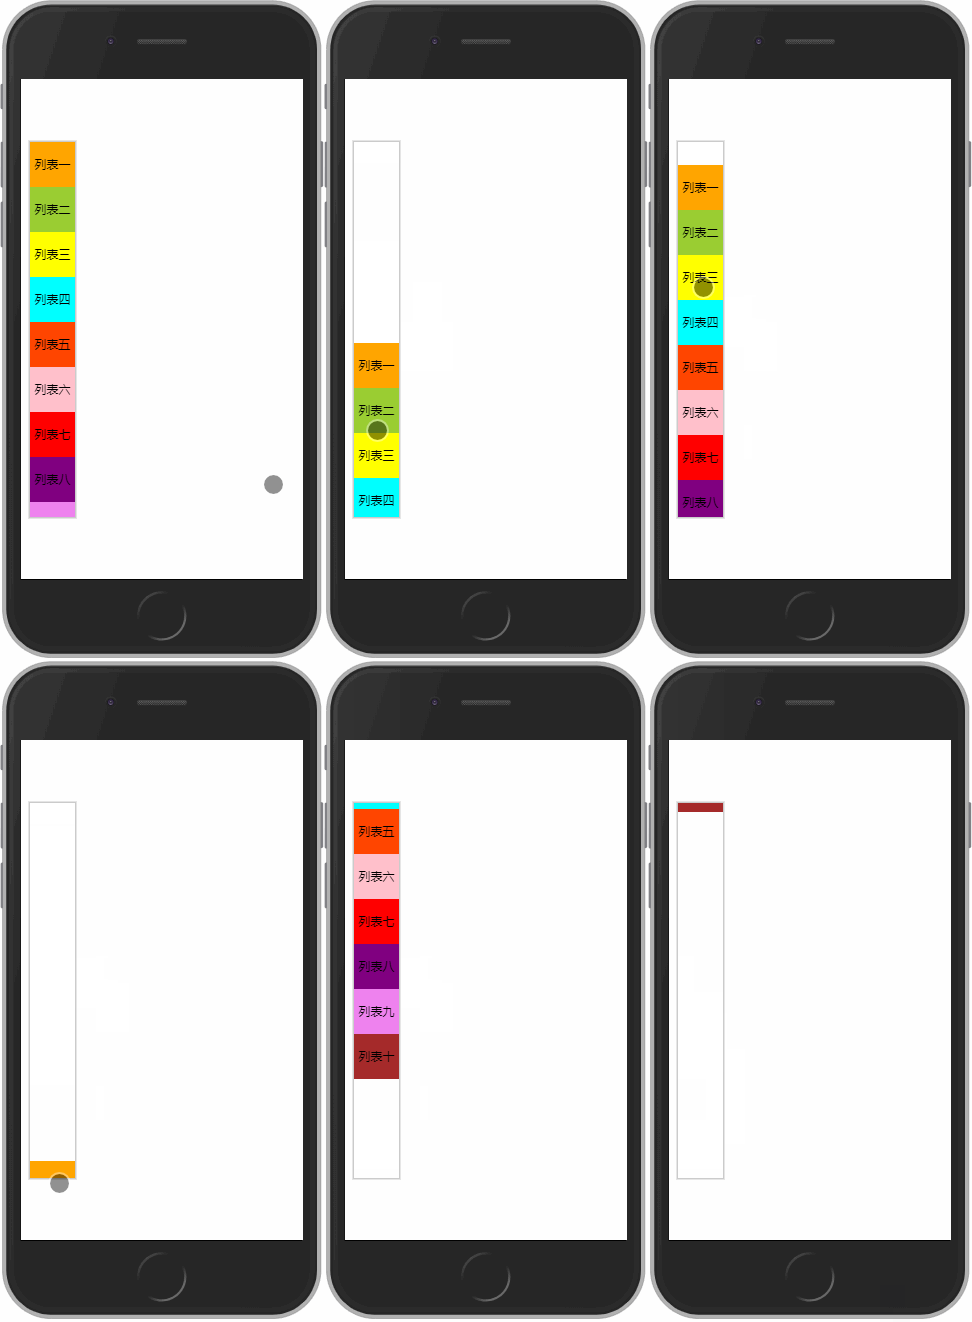
到上面一步,我们已经可以实现列表的滑动了,但是也存在一个问题,就是向上或者向下的时候没有限制,上下可以无限的滑动,甚至再用点力,就看不到列表了。为了美观和实用,这样肯定不行的,需要给它设定一个区间,设定向上或者向下最多只能留白多少。
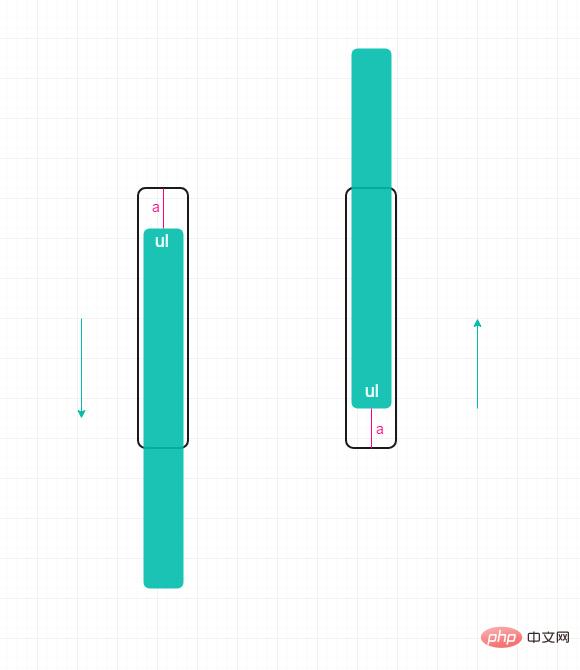
限制向下滑动最大区间:
设定向下最大区间的值比较简单,直接设定一个值,当上一次滑动的距离加上本次滑动的距离大于这个值的时候,就不让它再继续往下滑了,让他直接等于这个设定的值。
示例代码:
var maxDown = 50; // 设定一个最大向下滑动的距离

// touchmove 时,记录此时手指在 Y 轴上的落点距离可视顶部距离
ul.addEventListener('touchmove', function (e) {
  // 获取差值
  var dy = e.changedTouches[0].clientY - startY;

  // 上次的滑动距离加上本次的滑动距离
  var tempY = centerY + dy;

  // 当上次滑动的距离加上本次滑动的距离 大于 设定的最大向下距离的时候
  if (tempY > maxDown) {
    // 直接让偏移的值 等于这个设定值
    tempY = maxDown;
  }

  // 设置 ul 在 Y 轴上的偏移
  ul.style.transform = 'translateY(' + tempY + 'px)';
})限制向上滑动最大区间:
向上滑动时,当ul的底部距盒子底部的距离大于设定值的时候,不让其继续向上滑动,关键是这个值怎么去判断?
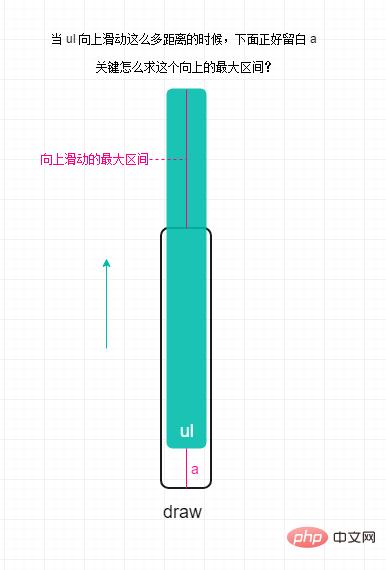
求出向上滑动最大值:
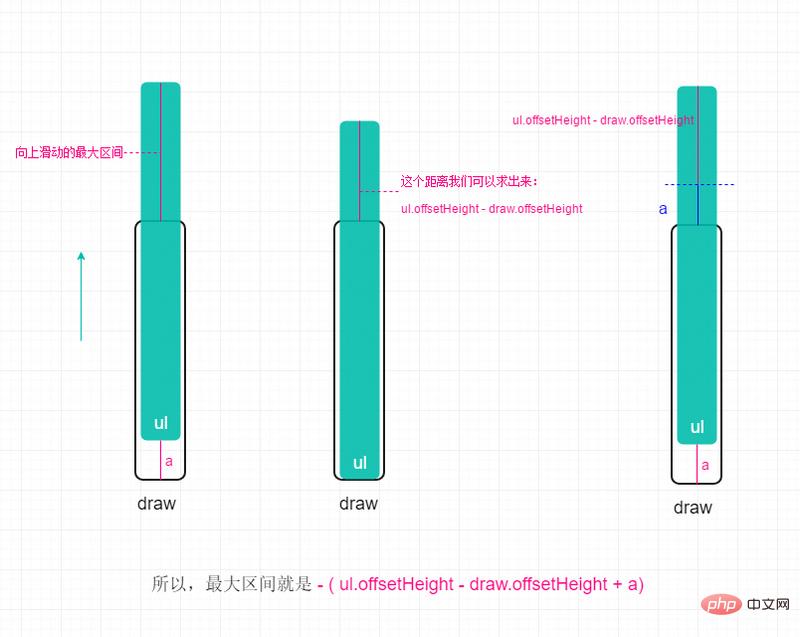
注意:因为ul是向上滑动的,所以求得的距离前面要加上一个负号(-)
示例代码:
// 设定一个最大向下滑动的距离
var maxDown = 50;
// 求得一个最大向上滑动的距离
var maxUp = -(ul.offsetHeight - draw.offsetHeight + maxDown);

// touchmove 时,记录此时手指在 Y 轴上的落点距离可视顶部距离
ul.addEventListener('touchmove', function (e) {
  // 获取差值
  var dy = e.changedTouches[0].clientY - startY;

  // 上次的滑动距离加上本次的滑动距离
  var tempY = centerY + dy;

  // 当上次滑动的距离加上本次滑动的距离 大于 设定的最大向下距离的时候
  if (tempY > maxDown) {
    tempY = maxDown;
  }
  // 当上次滑动的距离加上本次滑动的距离 小于 设定的最大向上距离的时候
  else if (tempY <p><strong>效果图:</strong></p><p><span class="img-wrap"><img src="https://img.php.cn//upload/image/937/124/609/1547174327646668.gif" title="1547174327646668.gif" alt="How to implement touch sliding rebound on mobile terminal using native js (code example)"></span></p><p><em>认真观察上图,虽然成功的设置了最大滑动区间,但是你有没有发现,一直往一个方向滑动的时候,虽然列表不会继续往下滑动,但是接着往相反方向滑动的时候,感觉列表滑不动,需要滑一段距离后,列表才会跟着走,这是为什么呢?因为滑动的过程<code>centerY</code>是一直变的,列表虽然视觉上不动了,但是在<code>touchend</code>事件的时候,它的<code>centerY</code>值一直在累加。解决方法请往下看:</em></p><h3>6. 设定反弹区间</h3><blockquote>“滑动反弹”,这里的反弹是本篇文章的最后一步,上面说到的问题,就在这里解决。因为每一次触发<code>touchend</code>事件的时候,<code>centerY</code>值就累加一次,所以需要在<code>touchend</code>事件里做判断。我们设定一个反弹区间,就是当<code>centerY</code>的值大于或者小于某个值的时候,让它触发反弹。</blockquote><p><strong>设定向上反弹值:</strong></p><blockquote>向上的值比较简单,设置成“<code>0</code>”。为什么是“<code>0</code>”呢?我们限定只要手指离开时,上一次的滑动距离加上本次的距离<code>> 0</code>的时候,就让它触发反弹,并且反弹回<code>0</code>点的位置,也就是两次滑动的距离和<code>= 0</code>。</blockquote><p><span class="img-wrap"><img src="https://img.php.cn//upload/image/328/173/328/1547174343276403.jpg" title="1547174343276403.jpg" alt="How to implement touch sliding rebound on mobile terminal using native js (code example)"></span></p><p><strong><em>示例代码:</em></strong></p><pre class="brush:php;toolbar:false">// 向上反弹
var maxUpBounce = 0;

// touchend 时,记录此时手指在 Y 轴上的落点距离可视顶部距离
ul.addEventListener('touchend', function (e) {
  // 获取差值
  var dy = e.changedTouches[0].clientY - startY;
  // 记录移动的距离
  centerY = centerY + dy;

  // 两次滑动的距离 大于 设定的 向上 反弹值时
  if (centerY > maxUpBounce) {
    // 让两次滑动的距离 等于 设置的值
    centerY = maxUpBounce;
    // 添加过渡
    ul.style.transition = 'transform .5s';
    ul.style.transform = 'translateY(' + centerY + 'px)';
  }
})设定向下反弹值:
向下的值其实跟之前求滑动区间差不多,我们参考下图,当列表向上滑动,滑动到列表底部的时候,只要此时再向上滑动,就让它向下反弹。向下反弹值就是-(ul.offsetHeight - draw.offsetHeight),只要滑动的差值小于这个设定值,就让它向下反弹,并且反弹回设定值的位置。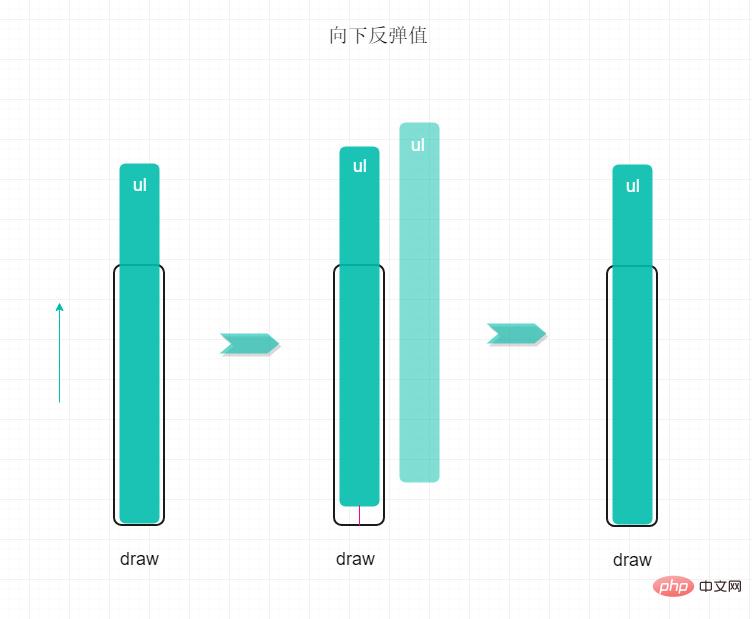
示例代码:
// 向上反弹值
var maxUpBounce = 0;
// 向下反弹值
var maxDownBounce = -(ul.offsetHeight - draw.offsetHeight);
// touchend 时,记录此时手指在 Y 轴上的落点距离可视顶部距离
ul.addEventListener('touchend', function (e) {
// 获取差值
var dy = e.changedTouches[0].clientY - startY;
// 记录移动的距离
centerY = centerY + dy;
// 两次滑动的距离 大于 设定的 向上 反弹值时
if (centerY > maxUpBounce) {
// 让两次滑动的距离 等于 设置的值
centerY = maxUpBounce;
// 添加过渡
ul.style.transition = 'transform .5s';
ul.style.transform = 'translateY(' + centerY + 'px)';
}
// 两次滑动的距离 小于 设定的 向下 反弹值时
else if (centerY 注意: 在touchend事件的时候,给列表添加了transition属性才会有反弹的效果,但是,下一次滑动的时候,touchmove事件的时候,这个属性还存在,所以就会出现滑动的时候有顿挫感,所以在touchmove事件的时候,一进来就清一下过渡ul.style.transition = 'none';。
完成后效果图:
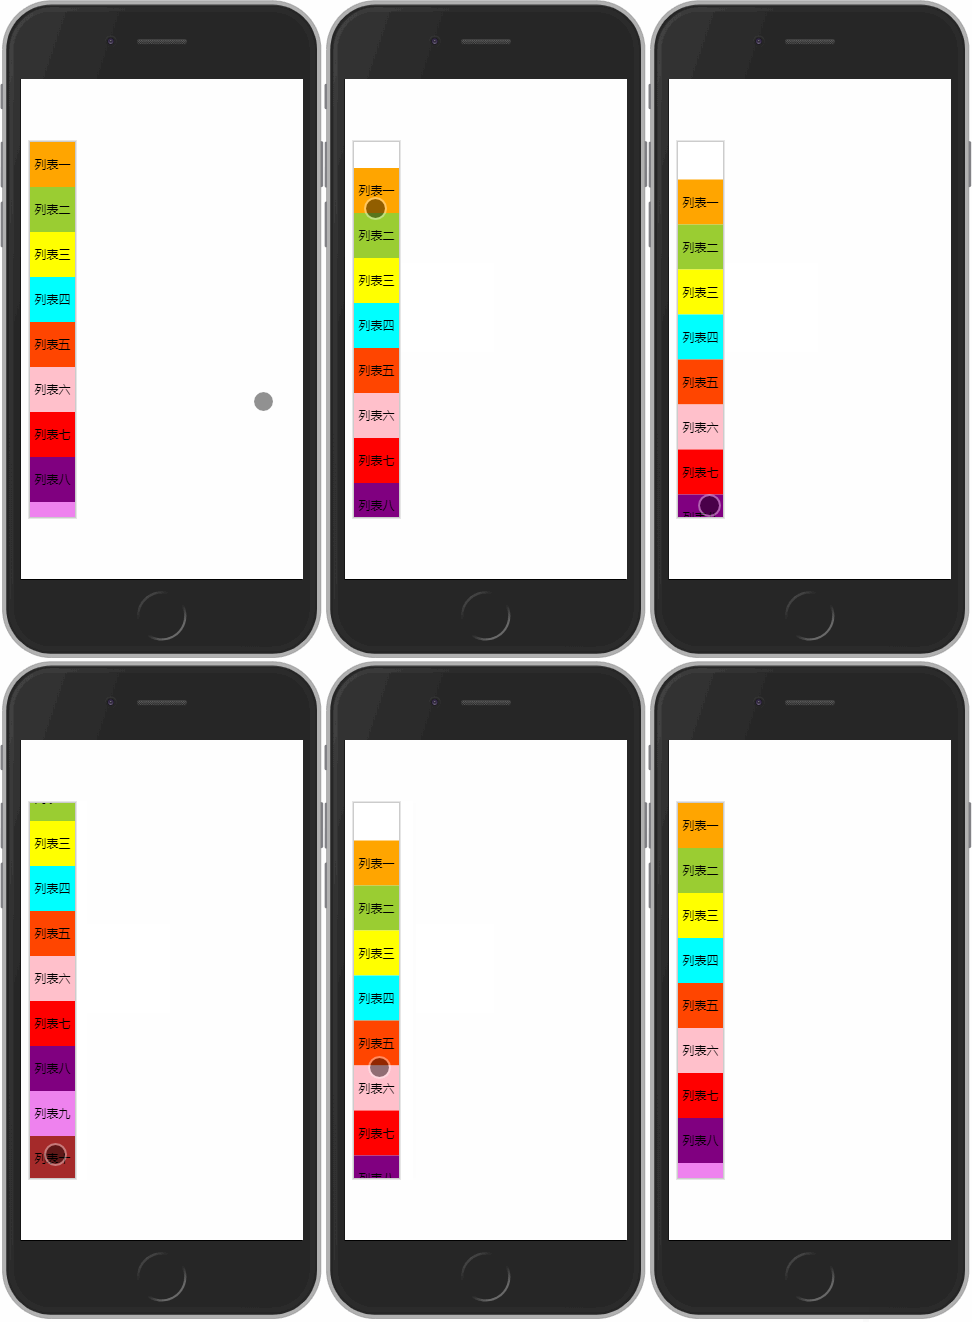
7. 完整代码
nbsp;html>
移动端 Touch 滑动反弹
<aside>
<div>
<ul>
<li>列表一</li>
<li>列表二</li>
<li>列表三</li>
<li>列表四</li>
<li>列表五</li>
<li>列表六</li>
<li>列表七</li>
<li>列表八</li>
<li>列表九</li>
<li>列表十</li>
</ul>
</div>
</aside>
<script>
var draw = document.querySelector('#draw');
var ul = draw.children[0];
var startY = 0; // 刚触碰到屏幕的时的手指信息
var centerY = 0; // 用来记录每次触摸时上一次的偏移距离
var maxDown = 50; // 设定一个最大向下滑动的距离
var maxUp = -(ul.offsetHeight - draw.offsetHeight + maxDown); // 求得一个最大向上滑动的距离
var maxUpBounce = 0; // 向上反弹值
var maxDownBounce = -(ul.offsetHeight - draw.offsetHeight); // 向下反弹值
// touchstart 时,记录手指在 Y 轴上的落点距离可视顶部距离
ul.addEventListener('touchstart', function (e) {
startY = e.changedTouches[0].clientY;
})
// touchmove 时,记录此时手指在 Y 轴上的落点距离可视顶部距离
ul.addEventListener('touchmove', function (e) {
// 清除过渡
ul.style.transition = 'none';
// 获取差值
var dy = e.changedTouches[0].clientY - startY;
// 上次的滑动距离加上本次的滑动距离
var tempY = centerY + dy;
// 当上次滑动的距离加上本次滑动的距离 大于 设定的最大向下距离的时候
if (tempY > maxDown) {
tempY = maxDown;
}
// 当上次滑动的距离加上本次滑动的距离 小于 设定的最大向上距离的时候
else if (tempY < maxUp) {
tempY = maxUp;
}
// 设置 ul 在 Y 轴上的偏移
ul.style.transform = 'translateY(' + tempY + 'px)';
})
// touchend 时,记录此时手指在 Y 轴上的落点距离可视顶部距离
ul.addEventListener('touchend', function (e) {
// 获取差值
var dy = e.changedTouches[0].clientY - startY;
// 记录移动的距离
centerY = centerY + dy;
// 两次滑动的距离 大于 设定的 向上 反弹值时
if (centerY > maxUpBounce) {
// 让两次滑动的距离 等于 设置的值
centerY = maxUpBounce;
// 添加过渡
ul.style.transition = 'transform .5s';
ul.style.transform = 'translateY(' + centerY + 'px)';
}
// 两次滑动的距离 小于 设定的 向下 反弹值时
else if (centerY < maxDownBounce) {
// 让两次滑动的距离 等于 设置的值
centerY = maxDownBounce;
// 添加过渡
ul.style.transition = 'transform .5s';
ul.style.transform = 'translateY(' + centerY + 'px)';
}
})
</script>
Copy after loginThe above is the detailed content of How to implement touch sliding rebound on mobile terminal using native js (code example). For more information, please follow other related articles on the PHP Chinese website!
