This article introduces the implementation of a simple DrawerLayout (similar to Android's DrawerLayout) layout component. Let's learn the implementation code based on the Vue.js side sliding menu component through this article.
This article introduces a simple DrawerLayout ( Implementation of layout components similar to Android's DrawerLayout, based on Vue.js. The introduced content has been made into vue-drawer-layout component.
Preface
If you are interested, please scan this QR code with your mobile phone first, or click on my
and then click Open the drawer or drag the avatar in the upper left corner of the page to the right or left, and you can see the effect of the following gif. Open your own mobile QQ, doesn't it look like it? :)

Google officially calls this layout DrawerLayout (drawer navigation bar). So how do we achieve it? Let’s start the main movie!
HTML structure
The page structure is very simple, with a drawer and a main container. The content can be customized externally using slots.
<p class="drawer-layout">
  <!--抽屉-->
  <p class="drawer-wrap">
    <slot name="drawer"></slot>
  </p>
  <!--主容器-->
  <p class="content-wrap">
    <!--遮罩-->
    <p class="drawer-mask"></p>
    <slot name="content"></slot>
  </p>
</p>The drawer is initially hidden outside the left screen, so set left:-100% to hide the entire drawer outside.
Use Touch
First, determine whether the browser supports touchEvent
let isTouch = 'ontouchstart' in window;
  let mouseEvents = isTouch ?
    {
      down: 'touchstart',
      move: 'touchmove',
      up: 'touchend',
      over: 'touchstart',
      out: 'touchend'
    } :
    {
      down: 'mousedown',
      move: 'mousemove',
      up: 'mouseup',
      over: 'mouseover',
      out: 'mouseout'
};Bind the touchdown event
document.addEventListener(mouseEvents.down, initDrag, false);
First define some Variable, the x-coordinate of the finger pressed is marked as startX, the x-coordinate of the finger during sliding is marked as nowX, and the x-coordinate offset of the drawer is marked as startPos
let startX, nowX, startPos;
When touchstart is triggered, the starting position is recorded and bound Determine touchmove, note: If it is a mouseEvent, get the current x coordinate through e.clientX. If it is a touchEvent, get the x coordinate through e.changedTouches[0].clientX
const initDrag = function (e) {
  startX = e.clientX || e.changedTouches[0].clientX; //记录手指按下的位置
  startPos = this.pos; //记录drawer的上次位置
  document.addEventListener(mouseEvents.move, drag, false);
  document.addEventListener(mouseEvents.up, removeDrag, false);
}.bind(this);
const drag = function (e) {
  nowX = e.clientX || e.changedTouches[0].clientX; //滑动中手指的位置x坐标
  let pos = startPos + nowX - startX;
  pos = Math.min(width, pos); //不能超过滑动最大值
  pos = Math.max(0, pos); //不能小于0
  this.pos = pos; //设置滚动距离为拖动的距离
}.bind(this);Then, the finger slides The distance is nowX - startX, and the current drawer position is startPos nowX - startX, so that the drawer has followed the finger to move to the right, and will not exceed the maximum drag value we set.
Distinguish between vertical sliding and horizontal sliding
Next you will find a problem, when your finger scrolls the main content vertically, slide your finger to the right It will also drag out the drawer. At this time, you should do one thing: distinguish between vertical sliding and horizontal sliding.
Of course, there are many ways. Here is a method that uses trigonometric functions to determine.

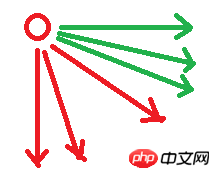
Assume that each arrow in the above picture is the direction of the finger sliding. The green arrow means that the drawer can be dragged out, and the red arrow means that it cannot be dragged out (note that the red arrow also has the offset of the x coordinate). displacement). That is, when the drawer cannot be dragged out, default events should be triggered, such as vertical scrolling, etc.
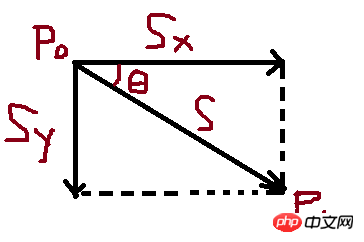
When the finger presses to trigger touchstart, the initial position P 0 is recorded; when the finger is slid, the first touchmove is triggered, the position P 1 is recorded, and we record the vector from P 0 to P 1 as S (Forgive me for being a soul painter)

It is easy to see at this time that when ∠θ is greater than a certain value, such as 30 degrees, it may be a vertical scrolling operation Instead of dragging the drawer. Therefore, the judgment condition can be obtained based on y/x>tan30°
:
if (isVerticle === undefined) isVerticle = Math.abs(nowY - startY) / Math.abs(nowX - startX) > (Math.sqrt(3) / 3);
When isVerticle is true, dragging of the drawer will not be performed
Let the Drawer move
We use the transition attribute of css3 to make the drawer have a transition animation effect. Here we write a moving class
.moving
  transition transform .3s ease
Don’t forget to add class binding. There is no need for transition animation when dragging (required Follow your finger), and the transition animation is only needed when you release your finger.
<p class="drawer-wrap" :class="{'moving':moving,'will-change':willChange}"
:style="{width:`${width}px`,left:`-${width)}px`,transform:`translate3d(${pos}px,0,0)`}">
<slot name="drawer"></slot>
</p>So you need to do these steps when binding the touchend event method
const removeDrag = function (e) {
  if (isVerticle !== undefined) {
    if (!isVerticle) {//当判定为抽屉拖动才进入
      let pos = this.pos;
      this.visible = pos > width * 3 / 5 //当前位置如果大于总宽度的3/5就判定为全部展开抽屉,否则将抽屉弹回隐藏
      if (this.pos > 0 && this.pos < width) this.moving = true;//如果位置已经处于最小值或最大值处,不需要有动画效果了
    }
    this.pos = this.visible ? width : 0;
  }
  if (!this.moving) {
    this.willChange = false; //留个悬念
  }
  isVerticle = undefined;
  //取消touchmove和touchend事件绑定
  document.removeEventListener(mouseEvents.move, drag, false);
  document.removeEventListener(mouseEvents.up, removeDrag, false);
}.bind(this);You may find this.willChange = false in the code above. What does it do? Below we ask the will-change method of css
.will-change
will-change transform
The CSS attribute will-change provides web developers with a way to tell the browser that How the elements will change, so that the browser can make corresponding optimization preparations in advance before the element attributes actually change. This kind of optimization can prepare part of the complex calculation work in advance, making the page response faster and more sensitive.
In fact, we can inform the browser drawer in touchstart that the displacement may occur
const initDrag = function (e) {
  //...
  this.willChange = true;
}.bind(this);Of course, don’t forget to remove the transition and will-change after the transitionend event and let the browser rest for a while ~
What else can be optimized?
The main functions mentioned above have basically been implemented, but is there anything else that can be optimized?

Huh? What the hell is passive
?
网站使用被动事件侦听器以提升滚动性能,在您的触摸和滚轮事件侦听器上设置 passive 选项可提升滚动性能具体看这里
原来这是现代浏览器的一个新特性,我们需要以新的方式来绑定我们的touch事件,当然首先先检测一下是否支持 passive
const supportsPassive = (() => {
  let supportsPassive = false;
  try {
    const opts = Object.defineProperty({}, 'passive', {
      get: function () {
        supportsPassive = true;
      }
    });
    window.addEventListener("test", null, opts);
  } catch (e) {
  }
  return supportsPassive;
})();于是我们的绑定事件代码变成这样
document.addEventListener(mouseEvents.move, drag, supportsPassive ? {passive: true} : false);上面是我整理给大家的,希望今后会对大家有帮助。
相关文章:
在React Native中使用prop-types如何实现属性确认
The above is the detailed content of How to implement a side-sliding menu component in Vue. For more information, please follow other related articles on the PHP Chinese website!


