
The content shared with you in this article is about JavaScript's prototypal inheritance, which has certain reference value. Friends in need can refer to it
ECMAScript has two types of attributes: data attributes and accessor attributes.
Data attributes have 4 characteristics that describe their behavior: Configurable, Enumerable, Writable, and Value.
Configurable: Indicates whether the attribute can be redefined by deleting the attribute through delete, whether the characteristics of the attribute can be modified, and whether the attribute can be modified into an accessor attribute. For attributes defined directly on the object, the default is true.
Enumerable: Indicates whether the attribute can be returned through a for-in loop.
Writable: Indicates whether the value of the attribute can be modified.
Value: Contains the data value of this attribute.
To modify the default properties of a property, you can use the Object.defineProperty() method of ECMAScript5. Receives three parameters: the object where the attribute is located, the name of the attribute, and a descriptor object. As follows:
var person = {};
Object.defineProperty(person,"name",{
    writable:false;
    value:"nichols";
    Configurable:false;
});
alert(person.name);//"nichols"
person.name = "greg";//严格模式下会抛错.非严格模式下忽略。
delete person.name;//严格模式下会抛错
alert(person.name);//nichols Contains a pair of getter and setter functions. There are four properties: Configurable, Enumerable, Get, Set.
Configurable: Indicates whether the attribute can be redefined by deleting the attribute through delete, whether the characteristics of the attribute can be modified, and whether the attribute can be modified into an accessor attribute. For attributes defined directly on the object, the default is true.
Enumerable: Indicates whether the attribute can be returned through a for-in loop.
Get: Function called when reading attributes. The default value is undefined.
Set: Function called when writing properties. The default is undefined.
Accessor properties cannot be defined directly and must be defined by calling Object.defineProperty().
var book = {
    _year:2004,
    edition:1
};
Object.defineProperty(book,"year",{
    get:function(){
        return this._year;
    },
    set:function(newValue){
        if(newValue>2004){
            this._year = newValue;
            this.edition +=newValue-2004;
        }
    }
});
book.year = 2005;
alert(book.edition);//2 It is not necessary to specify getter and setter at the same time. Specifying only getter means that it cannot be written.
Two methods left over from history:
var book = {
    _year:2004,
    edition:1
};
book.__defineGetter__("year",function{return this._year});
book.__defineSetter__("year",function{.....});Object.defineProperties(): Receive two object parameters, to add or modify properties The object and the corresponding properties to be added or modified.
var book = {};
Object.defineProperties(book,{
    _year:{
        value:2004
    },
    edition:{
        value:1
    },
    year:{
        get:function(){
            return this._year;
        },
        set:function(newValue){
        if(newValue>2004){
            this._year = newValue;
            this.edition +=newValue-2004;
          }
        }
    }
}); Use the Object.getOwnPropertyDescriptor() method of ECMAScript5 to obtain the descriptor of a given object. This method accepts two parameters: the object where the property resides and the name of the property whose descriptor is to be read. The return value is an object.
var descriptor = Object.getOwnPropertyDescrptor(book,"_year");
alert(descriptor.value);//2004
alert(descriptor.configurable);//false
alert(typeof descriptor.get);//undefined
var descriptor = Object.getOwnPropertyDescrptor(book,"year");
alert(descriptor.value);//undefined
alert(descriptor.enumerable);//false
alert(typeof descriptor.get);//function
Objects are created through functions.
function Fn() {
            this.name = 'yzh';
            this.year = 1996;
        }
var fn1 = new Fn();Someone may cite the following counterexample
var obj = { a: 10, b: 20 };
var arr = [5, 'x', true];This approach belongs to the use of "shortcuts", which are generally called "syntactic sugar" in programming languages.
In fact, the essence of the above code is:
//var obj = { a: 10, b: 20 };
//var arr = [5, 'x', true];
        var obj = new Object();
        obj.a = 10;
        obj.b = 20;
        var arr = new Array();
        arr[0] = 5;
        arr[1] = 'x';
arr[2] = true;And the Object and Array are both functions:
console.log(typeof (Object));  // function
console.log(typeof (Array));  // function
Use functions to encapsulate the details of creating objects with specific interfaces.
function createPerson(name,age,job){
    var o = new Object();
    o.name = name;
    o.age = age;
    o.job = job;
    o.sayName = function(){
        alert(this.name);
    };
    return o;
}
var person1 = createPerson("nichils",29,"softward engineer");function Person(name, age, job){
this.name = name;
this.age = age;
this.job = job;
this.sayName = function(){
alert(this.name);
};
}
var person1 = new Person("Nicholas", 29, "Software Engineer");
var person2 = new Person("Nicholas", 29, "Software Engineer");
alert(person1.sayName == person2.sayName)//false
alert(person1 instanceof Object); //true
alert(person1 instanceof Person); //true
alert(person1.constructor == Person); //trueTo create a new instance of person, the new operator must be used. Calling the constructor in this way actually goes through the following 4 steps:
1. Create a new object
2. Assign the scope of the constructor to the new object.
3. Execute the code in the constructor
4. Return the new object.
The person above has a constructor attribute, which points to Person.
Summary: Creating a custom constructor means that its instance can be identified as a specific type in the future. Any function can be used as a constructor as long as it is called through the new operator. Without new, it is no different from an ordinary function.
Problems with constructors: The main problem with using constructors is that each method must be recreated on each instance.
You can solve this problem by moving the function definition outside the constructor.
 function Person(name, age, job){
            this.name = name;
            this.age = age;
            this.job = job;
            this.sayName = sayName;
        }
        function sayName(){
            alert(this.name);
} And this will bring new problems: if the object needs to define many methods, then many global functions must be defined. This can be solved through prototype mode.
Every function we create has a prototype attribute. This attribute is a pointer pointing to an object. This object contains all instances that can be represented by a specific type. Shared properties and methods.
Advantages of using prototype objects: You don’t have to define the object instance information in the constructor, you can add this information directly to the prototype object.
function Person(){
        }
        Person.prototype.name = "Nicholas";
        Person.prototype.age = 29;
        Person.prototype.job = "Software Engineer";
        Person.prototype.sayName = function(){
            alert(this.name);
        };
        var person1 = new Person();
        person1.sayName();   //"Nicholas"
        var person2 = new Person();
        person2.sayName();   //"Nicholas"
alert(person1.sayName == person2.sayName); //true原型对象的这些属性和方法是由所有实例共享的。 所有原型对象都会自动获得一个constructor属性,这个属性包含一个指向prototype所在函数的指针。所以 Person.prototype.constructor = Person. 当调用构造函数的新实例后,该实例的内部也会有一个指针叫[[Prototype]]指向构造函数的原型对象而非构造函数。虽然在脚本中没有标准的方式访问[[Prototype]],但Firefox、Safari和Chrome在每个对象上都支持一个属性_proto_;而在其他实现中,这个属性对脚本则是完全不可见的。不过,要明确的真正重要的一点就是,这个连接存在于实例和构造函数的原型对象之间,而不是存在于实例与构造函数之间。
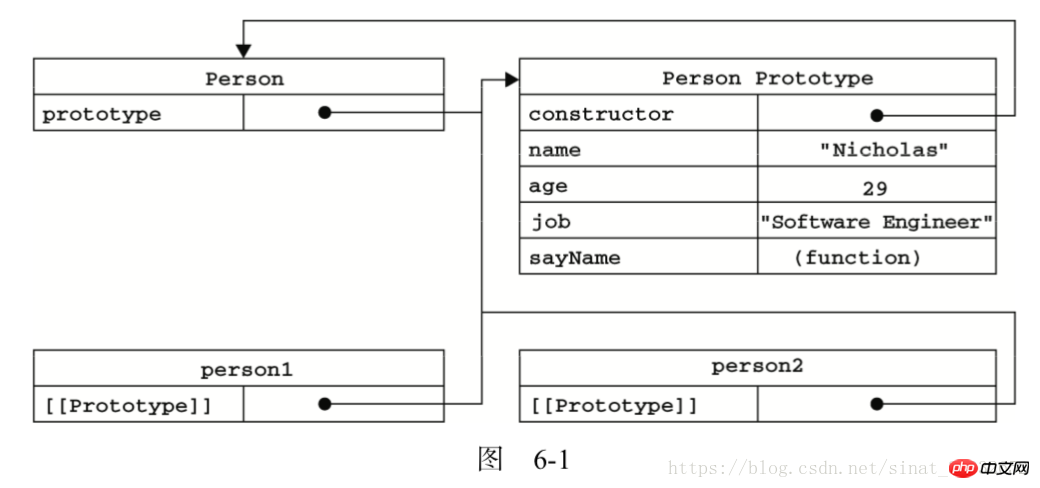
所有实现中都无法访问 [[Prototype]],但可以调用isPrototypeOf()方法来判断这种关系。
alert(person1.prototype.isPrototypeOf(person1));//true
或者通过Object.getPropertyOf()来得到[Prototype]的值。即这个对象的原型。
alert(Object.getPrototypeOf(person1)==Person.prototype);//true
每当读取一个对象的属性时,首先先搜索对象实例本身的属性,找到了就返回。找不到再去搜索原型对象的属性。找到了就返回。 原型最初只包含constructor属性,而该属性也是共享的。因此可以通过对象实例访问。
如果在实例中添加了一个与对象原型中的属性同名的属性,则在实例中创建该属性,并且屏蔽原型中的那个属性。
function Person(){
        }
        Person.prototype.name = "Nicholas";
        var person1 = new Person();
        var person2 = new Person();
        person1.name = "Greg";
        alert(person1.name);   //"Greg" ?from instance
alert(person2.name); //"Nicholas" ?from prototype 使用delete操作符可以完全删除实例属性,从而让我们能够重新访问原型中的属性。
使用hasOwnProerty()可以检测一个属性是存在于实例中还是存在于原型中。如果存在于对象实例中则返回true.
  var person1 = new Person();
  var person2 = new Person();
  alert(person1.hasOwnProperty("name"));  //false
  person1.name = 'Greg';
  alert(person1.name); //"Greg"——来自实例
  alert(person1.hasOwnProperty("name"));  //true
  alert(person2.name); //"Nicholas"——来自原型
  alert(person2.hasOwnProperty("name")); //false
  delete person1.name;
  alert(person1.name); //"Nicholas"——来自原型
  alert(person1.hasOwnProperty("name")); //false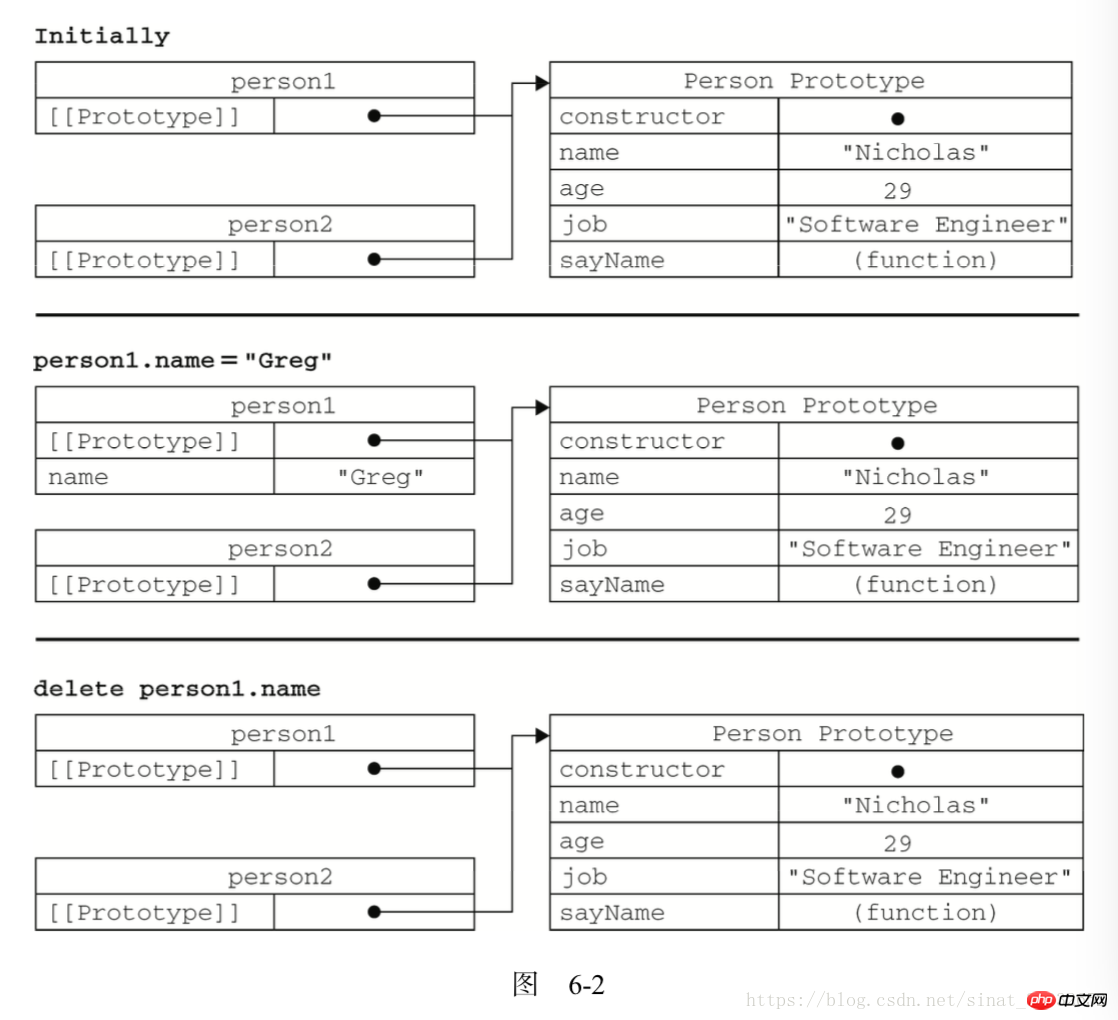
两种使用方法:单独使用和在for-in循环中使用。单独使用时,如果通过对象访问能够给定属性,in操作符会返回true,无论该对象存在于实例中还是原型中。
alert("name" in person1);//true
person1.name = "kke";
alert("name" in person1);//true 使用for-in循环返回的是所有能够通过对象访问的、可枚举的属性。不管该属性是在实例中还是在原型中。所有开发人员定义的属性都是可枚举的。
注:IE8及更早版本的实现中存在一个bug,及屏蔽不可枚举属性的实例属性不会出现在for-in循环中。
 var o = {
            toString : function(){
                return "My Object";
            }
        }
        for (var prop in o){
            if (prop == "toString"){
                alert("Found toString");//ie中中不显示
            }
} 可以通过ECMAScript5的Object.keys()方法来取得对象上所有可枚举的实例属性。接收一个对象参数,返回一个包含该对象所有可枚举属性的字符串数组。
function Person(){
        }
        Person.prototype.name = "Nicholas";
        Person.prototype.age = 29;
        Person.prototype.job = "Software Engineer";
        Person.prototype.sayName = function(){
            alert(this.name);
        };
var keys = Object.keys(Person.prototype);
alert(keys);   //"name,age,job,sayName"
var p1 = new Person();
p1.name = 'rob';
pa.age=13;
alert(Object.keys(p1));//name,age. getOwnPropertyNames():得到所有的实例属性无论是否可枚举。
 var keys = Object.getOwnPropertyNames(Person.prototype);
alert(keys);   //"constructor,name,age,job,sayName"
 function Person(){
        }
Person.prototype = {
            name : "Nicholas",
            age : 29,
            job: "Software Engineer",
            sayName : function () {
                alert(this.name);
            }
}; 但此时原型对象的constructor属性不再指向Person,而是指向Object构造函数。尽管通过instanceof还能返回正确的结果。
 var friend = new Person();
        alert(friend instanceof Object);  //true
        alert(friend instanceof Person);  //true
        alert(friend.constructor == Person);  //false
alert(friend.constructor == Object); //true对原型对象的任何修改都能够立即从实例上反映出来。
 var friend = new Person();
  Person.prototype.sayHi = function(){
         alert("hi");
        };
friend.sayHi(); //hi 而如果是把原型改为另外一个对象,就等同于切断构造函数与最初原型之间的联系。而实例中的指针是指向最初原型的。因此会出错。
 function Person(){
        }
        var friend = new Person();
        Person.prototype = {
            constructor: Person,
            name : "Nicholas",
            age : 29,
            job : "Software Engineer",
            sayName : function () {
                alert(this.name);
            }
        };
        friend.sayName();   //error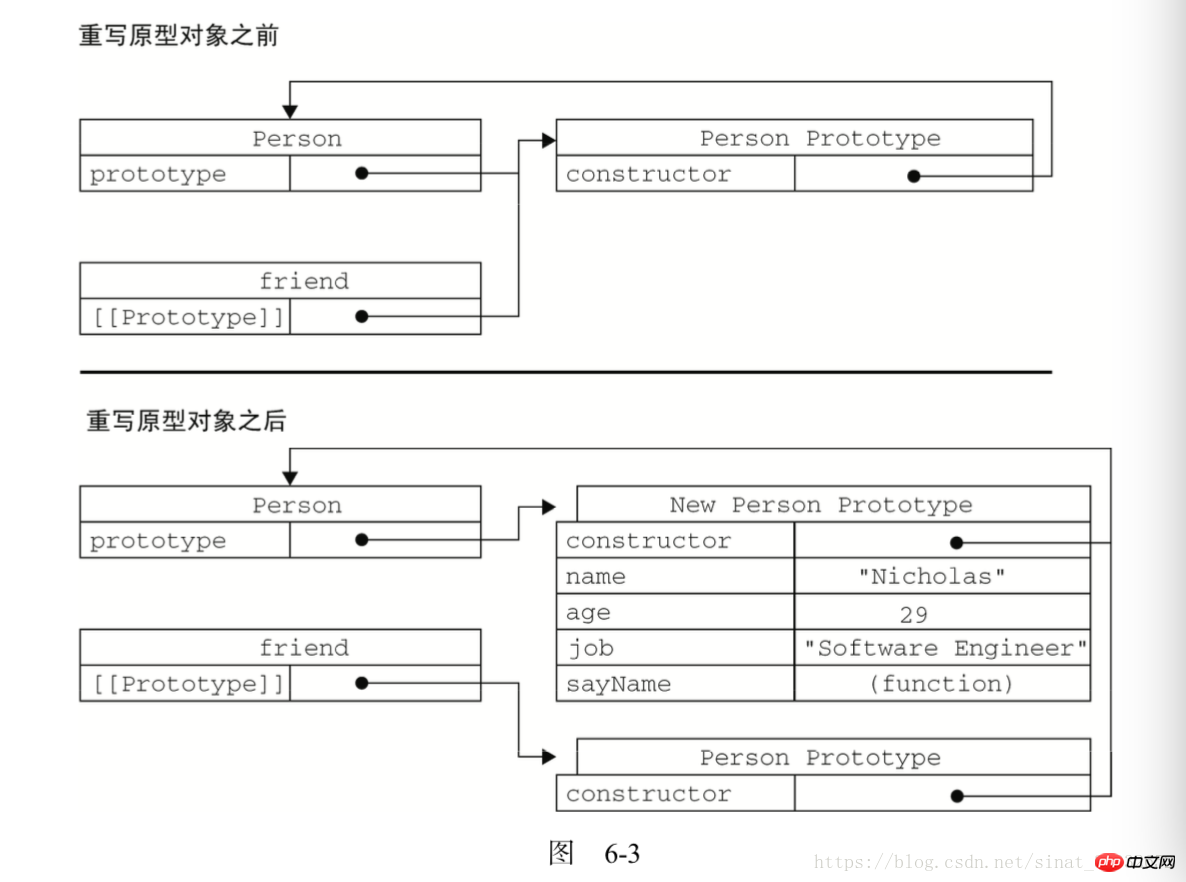
对于包含引用类型的属性的原型对象,所有实例共享的都是同一个引用类型。
function Person(){
        }
        Person.prototype = {
            constructor: Person,
            name : "Nicholas",
            age : 29,
            job : "Software Engineer",
            friends : ["Shelby", "Court"],
            sayName : function () {
                alert(this.name);
            }
        };
var person1 = new Person();
var person2 = new Person();
person1.friends.push("Van");
alert(person1.friends);    //"Shelby,Court,Van"
alert(person2.friends);    //"Shelby,Court,Van"
alert(person1.friends === person2.friends); //true实例一般都会有自己全部的属性的,因此这个问题是很少有人单独使用原型模式的原因所在。
创建自定义类型最常见的方式就是组合使用构造函数模式和原型模式。构造函数模式用于定义实力属性,而原型模式用于定义方法和共享的属性。结果,每个实例都会有自己的一份实例属性的副本,但同时又共享着对方法的引用,最大限度地节省了内存。另外,这种混成模式还支持向构造函数传递参数。
function Person(name ,age,job){
    this.name = name;
    this.age = age;
    this.job = job;
    this.friends = ["Shelby", "Court"];
}
Person.ptototype = {
    constructor:Person,
    sayName:function(){
    alert(this.name);
    }
}
var person1 = new Person("hah",32,"doctor");
var person2 = new Person("hah",32,"doctor");
person1.friends.push("van");
alert(person1.friends);Shelby,Court,van
alert(person2.friends);Shelby,Court
alert(person1.sayName = person2.sayName);//true把所有信息封装在构造函数中,在构造函数中初始化原型。既可以通过检查某个应该存在的方法是否有效来决定师傅需要初始化原型。
function Person(name ,age,job){
    this.name = name;
    this.age = age;
    this.job = job;
    //方法
    if(typeof this.sayName != "function"){
        Person.prototype.sayName = function(){
            alert(this.name);
        };
    }
} 只在sayName方法不存在的情况下,才会将它添加到原型中。即只在初次调用构造函数时才会执行。if语句检查的可以是初始化之后应该存在的任何属性或方法。只需检查一个就行。若不存在则初始化原型的所有属性或方法。
注:使用动态原型模式不能使用对象字面量来重写原型,因为如果在已经创建了实例的情况下重写原型,就会切断现有实例与原型之间的联系。
在函数中创建一个新对象,然后返回新对象。
function SpecialArray(){
    var values = new Array();
    values.push.apply(values,argument);
    values.toPipedString = function(){
        return this.join("|");
    }
    return values;
}
var colors = new SpecialArray("red","blue","green");
alert(colors.topipedString());//red|blue|green注:使用这种方式不能使用instaneof来确定对象类型。可以使用其他模式的情况下建议不要使用这种模式。
稳妥对象指的是没有公共属性,而且其方法也不引用this的对象。适合在一些安全的环境中或者防止数据被其他应用程序改动时使用。两个特点:
1. 新创建对象的实例方法不引用this
2. 不使用new擦操作符调用构造函数。
function Person(name,age,job){
    var 0 = new Object();
    //定义私有变量和函数
    //添加方法
    o.sayName = function(){
        alert(name);
    }
    return o;
}
var friends = Person("hdkl",23,"dlksl");
friends.sayName();//hdkl方法 | 细节 |
工厂模式 | 用函数来封装以特定接口创建对象的细节。 |
优点:可以无数次调用函数。 | |
缺点:但没有解决对象识别的问题。 | |
构造函数模式 | 没有显示地创建对象; 直接将属性和方法赋给了this对象; 没有return语句。 构造函数始终都以一个大写字母开头,而非构造函数应该以一个小写字母开头。 要创建构造函数的新实例,必须使用new操作符。 |
优点:构造函数模式胜过工厂模式的地方在于:可以将它的实例标识为一种特定的类型。 | |
缺点:每个方法都要在每个实例上重新创建一遍。 | |
原型模式 | 每个函数都有一个prototype(原型)属性,此属性是一个指针,指向一个对象,此对象的用途是包含可以由特定类型的所有实例共享的属性和方法。 当为对象实例添加一个属性时,这个属性就会屏蔽原型对象中保存的同名属性,但不会修改那个属性。使用delete操作符则可以完全删除实例属性,能够重新访问原型中的属性。 hasOwnProperty( )方法可以检测一个属性是存在于实例中,还是存在于原型中。只有存在于对象实例中,才会返回true。 单独使用时,in操作符会在通过对象能够访问给定属性时返回true,无论该属性存在于实例中还是原型中。只要in操作符返回true,而hasOwnProperty( )返回false,就可以确定属性时原型中的属性。 hasPrototypeProperty( )方法,当原型属性存在时,返回true,当原型属性被实例重写时,返回false。 在使用for-in循环时,返回的是所有能够通过对象访问的、可枚举的属性,其中既包括存在于实例中的属性,也包括存在于原型中的属性。 重写原型对象切断了现有原型与任何之前已经存在的对象实例之间的联系,他们引用的仍然是最初的原型。 |
优点:可以让所有对象实例共享它所包含的属性和方法,即不必再构造函数中定义对象实例的信息,而是可以将这些信息直接添加到原型对象中。 | |
缺点:由共享本质,对于包含引用类型值的属性而言问题突出。 | |
组合使用构造函数模式和原型模式 | The most common way to create a custom, and also the default form used to define reference types. Instance properties are defined in the constructor, and all instance-shared properties constructor and methods are defined in the prototype. |
#Advantages: The advantages of set constructor and prototype pattern. | |
Dynamic Prototype Pattern | Use an if statement to check for any properties or methods that should exist after initialization. The type of an object created using this mode can be determined using the instanceof operator. |
Parasite constructor pattern | In addition to using the new operator and calling the wrapping function a constructor , this mode is the same as factory mode. If the constructor does not return a value, it will return a new object instance by default. By adding a return statement at the end of the constructor, you can override the value returned by calling the constructor. The returned object has no direct relationship with the constructor or the prototype properties of the constructor. Cannot rely on the instanceof operator to determine the object type. You can use other modes, try not to use this mode |
Safe constructor mode | Safe object: An object that has no public properties and whose methods do not reference this. There are two differences from the parasitic construction pattern: first, the instance method of the newly created object does not reference this; second, the constructor is not called using the new operator. |
ECMAScript只支持实现继承,而且依靠原型链实现
ECMAScript中描述了原型链的概念,并将原型链作为实现继承的主要方法。其基本思想是利用原型让一个引用类型继承另一个引用类型的属性和方法。简单回顾一下构造函数、原型和实例的关系:每个构造函数都有一个原型对象,原型对象都包含一个指向构造函数的指针,而实例都包含一个指向原型对象的内部指针。那么,假如我们让原型对象等于另一个类型的实例,结果会怎么样呢?显然,此时的原型对象将包含一个指向另一个原型的指针,相应地,另一个原型中也包含着一个指向另一个构造函数的指针。假如另一个原型又是另一个类型的实例,那么上述关系依然成立,如此层层递进,就构成了实例与原型的链条。这就是所谓原型链的基本概念。
让原型对象等于另一个类型的实例,而这个原型对象又指向另一个原型,如此层层递进构成了原型链。 实现原型链有一种基本模式:
function SuperType(){
    this.property = true;
}
SuperType.prototype.getSuperValue = function(){
    return this.property;
}
function SubType(){
    this.subproperty = false;
}
//继承了SuperType
SubType.prototype = new SuperType();
SubType.protoType.getSubValue = function(){
    return this.subproperty;
};
var instance = new SubType();
alert(instance.getSuperValue());//true 该继承的本质是重写原型对象,代之以一个新类型的实例。intance指向SubType的原型,SubType的原型又指向SuperType的原型。此时instance.constructor现在指向的是SuperType。现在的搜索过程是沿着原型链向上查找。上面的例子是这样的:
1. 搜索实例
2. 搜索SubType.prototype
3. 搜索SuperType.protoType
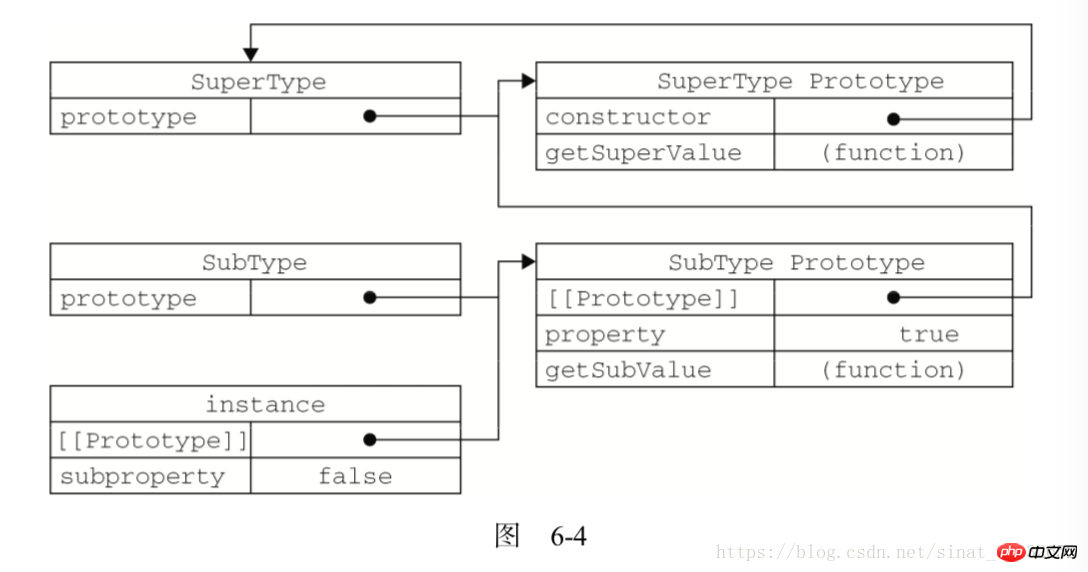
所有引用类型都默认继承了Object,而这个继承也是通过原型链实现的。所有函数的默认原型都是Object的实例,因此默认原型都会包含一个指向Object.prototype的内部指针。
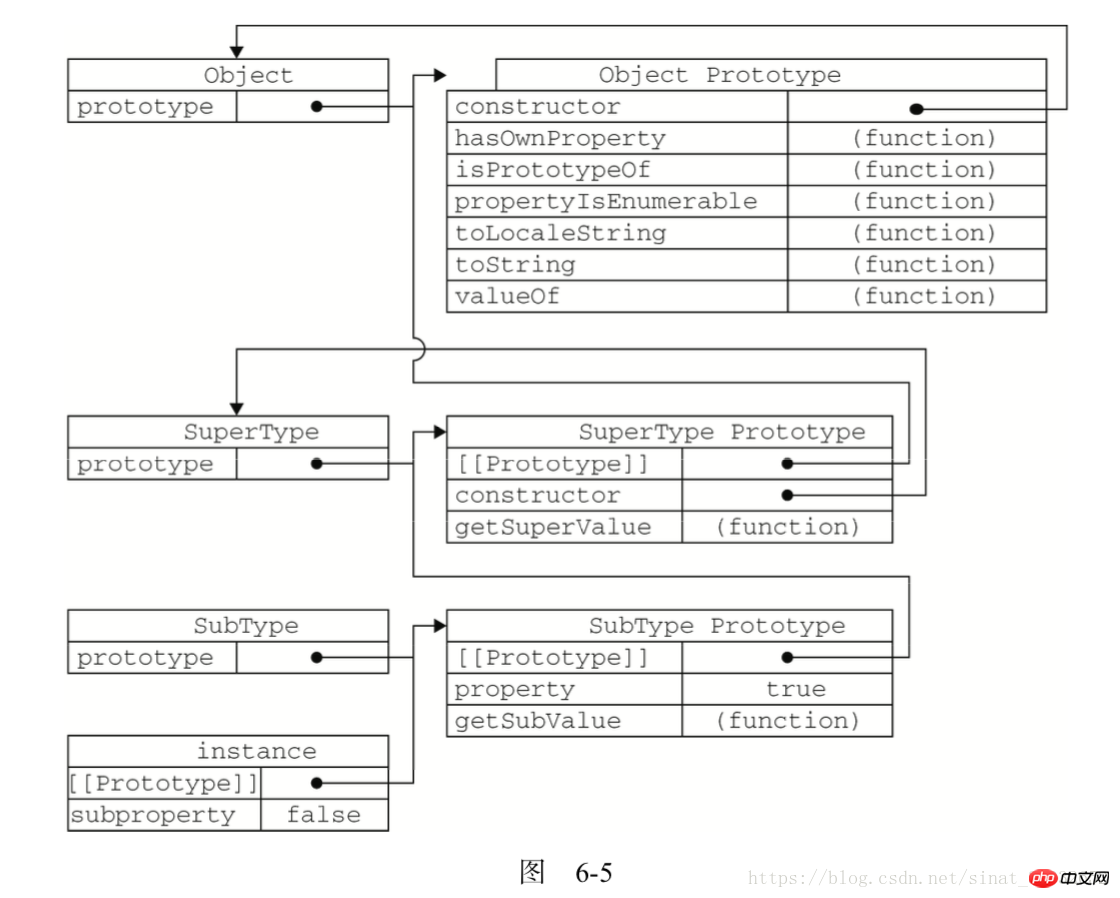
使用instanceof操作符,只要用这个操作符来测试实例与原型链中出现过得构造函数,结果就会返回true.
alert(instance instanceof Object);//true;
alert(instance instanceof SuperType);//true;
alert(instance instanceof SubType);//true;
使用isPrototypeOf()方法,只要原型链中出现过的原型,都可以说是该原型链所派生的实例的原型,都会返回true.
alert(Object.prototype.isPrototypeOf(instance));    //true
        alert(SuperType.prototype.isPrototypeOf(instance)); //true
alert(SubType.prototype.isPrototypeOf(instance)); //true在重写超类中的方法或添加方法时要注意,给原型添加方法的代码一定要放在替换原型的语句之后。 还有就是在通过原型链实现继承时,不能使用对象字面量创建原型方法,因为会重写原型链。
function SuperType(){
    this.property = true;
}
SuperType.prototype.getSuperValue = function(){
    return this.property;
};
function SubType(){
    this.subproperty=false;
}
//继承了SuperType
SubType.prototype = new SuperType();
//添加新方法
SubType.prototype.getSubValue=function(){
    return this.subproperty;
};
//重写超类型中的方法
SubType.prototype.getSuperValue=function(){
    return false;
};
var instance = new SubType();
alert(instance.getSuperValue()); //false; 重写的方法getSuperValue()是原型链中已经存在的一个方法,但重写这个方法将会屏蔽原来的那个方法。换句话说,当通过SubType的实例调用getSuperValue()时,调用的就是这个重新定义的方法;但通过SuperType的实例调用getSuperValue()时,还会继续调用原来的那个方法。这里要格外注意的是,必须在用SuperType的实例替换原型之后,再定义这两个方法。
还有一点需要注意,即在通过原型链实现继承时,不能使用对象字面量创建原型方法。因为这样做就会重写原型链。
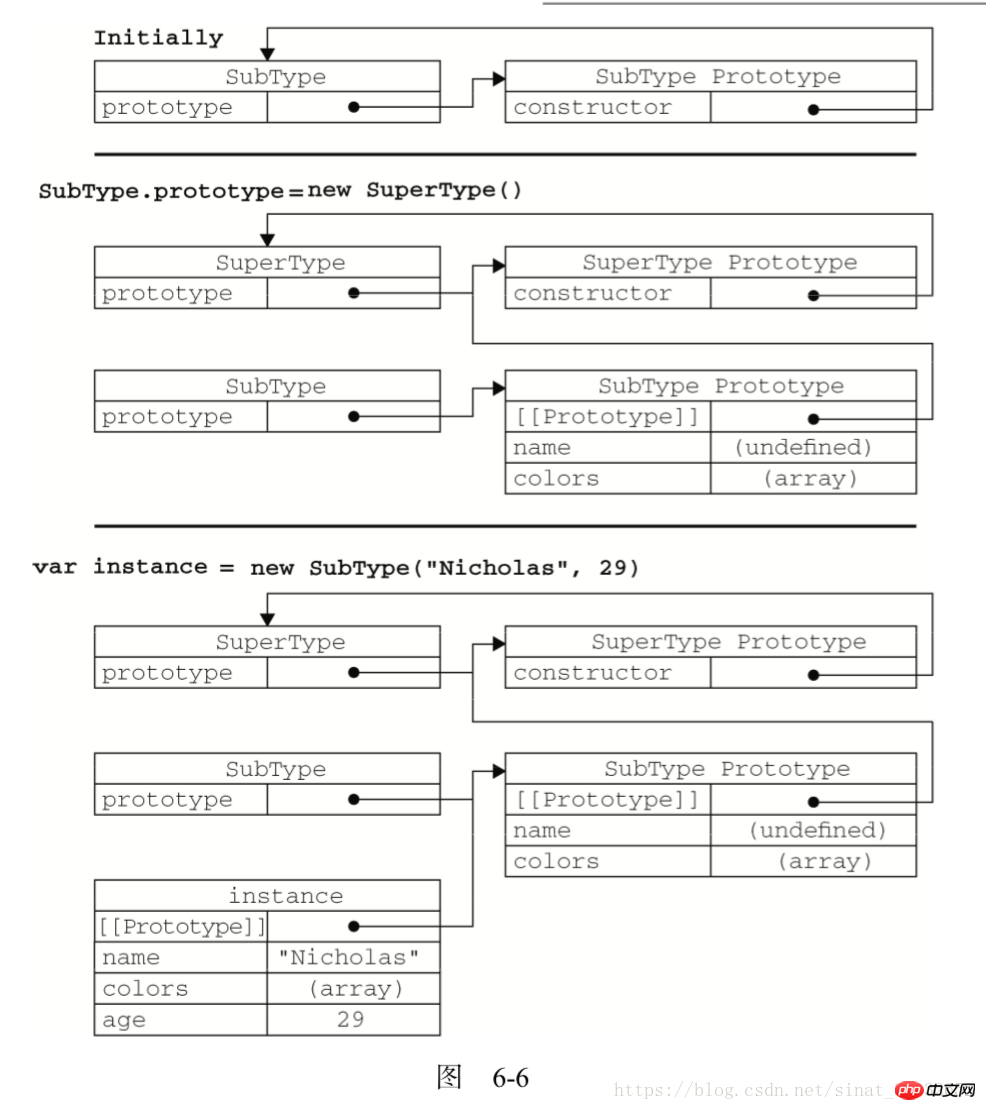
原型链虽然很强大,可以用它来实现继承,但它也存在一些问题。其中,最主要的问题来自包含引用类型值的原型。想必大家还记得,我们前面介绍过包含引用类型值的原型属性会被所有实例共享;而这也正是为什么要在构造函数中,而不是在原型对象中定义属性的原因。在通过原型来实现继承时,原型实际上会变成另一个类型的实例。于是,原先的实例属性也就顺理成章地变成了现在的原型属性了。
下列代码可以说明这个问题
function SuperType(){
    this.colors={"red","blue","green"};
}
function SubType(){
}
//继承了SuperTYpe
SubType.prototype=new SuperType();
var instance1 = new SubType();
instance1.colors.push("black");
alert(instance1.colors; //"red,blue,green.black"
var instance2 = new SubType();
alert(instance1.colors; //"red,blue,green.black"这个例子中的SuperType构造函数定义了一个colors属性,该属性包含一个数组(引用类型值)。SuperType的每个实例都会有各自包含自己数组的colors属性。当SubType通过原型链继承了SuperType之后,SubType之后,SubTYpe.prototype就变成SuperType的一个实例,因此它也拥有了一个它自己的colors属性——就跟专门创建了一个SubType.prototype.colors属性一样。但结果是什么呢?结果是SubType的所有实例都会共享这一个colors属性。而我们对instance1.colors的修改能够通过instance2.colors反映出来,就已经充分证明了这一点。
原型链的第二个问题是:在创建子类型的实例时,不能向超类型的构造函数中传递参数。实际上,应该说是没有办法在不影响所有对象实例的情况下,给超类型的构造函数传递参数。
在子类型构造函数的内部调用超类型构造函数。
function SuperType(){
    this.colors = {"red","blue"};
}
function SubType(){
    SuperType.call(this);
}
var instance1 = new SubType();
instance1.colors.push("black");
alert(instance1.colors);//red,blue,black
var instance2= new SubType();
alert(instance2.colors);//red,blue结果就是SubType的每个实例都会具有自己的colors属性的副本了。
使用原型链实现对原型属性和方法的继承,借用构造函数实现对实例属性的继承。
function SuperType(name){
    this.name = name;
    this.colors = {"red","blue"};
}
SuperType.prototype.sayName = function(){
    alert(this.name);
};
function SubType(name,age){
    //继承属性
    SuperType.call(this,name);
    this.age = age;
}
//继承方法
SubType.prototype = new SuperType();这是js中最常见的继承方法。
Object.create():接收两个参数,一个是用作原型的对象,一个是为新对象定义个额外属性的对象(可选)
var person = {
            name: "Nicholas",
            friends: ["Shelby", "Court", "Van"]
        };

        var anotherPerson = Object.create(person);
        anotherPerson.name = "Greg";
        anotherPerson.friends.push("Rob");

        var yetAnotherPerson = Object.create(person);
        yetAnotherPerson.name = "Linda";
        yetAnotherPerson.friends.push("Barbie");

        alert(person.friends);   //

        var anotherPerson = Object.create(person, {
            name: {
                value: "Greg"
            }
        });

alert(anotherPerson.name); //"Greg"创建一个仅用于封装继承过程的函数,该函数在内部以某种方法来增强对象。
function createAnother(original){
    var clone = Object(original);
    clone.sayHi = function(){
        alert("hi");
    }
    return clone;
}
var person = {
            name: "Nicholas",
            friends: ["Shelby", "Court", "Van"]
        };
var anotherPerson = createAnother(person);组合继承的问题就是会调用两次超类型构造函数。一次是在创建子类型原型的时候,一次是在子类型构造函数内部。
寄生组合式继承:使用寄生式继承来继承超类型的原型。
function inheriPrototype(subType,superType){
    var prototype = object(superType.ptototype);
    prototype.constructor = subType;
    subType.prototype = prototype;
};
function SuperType(name){
    this.name = name;
    this.colors = {"red","blue"};
}
SuperType.prototype.sayName = function(){
    alert(this.name);
};
function SubType(name,age){
    //继承属性
    SuperType.call(this,name);
    this.age = age;
}
inheriPrototype(SubType,SuperType)js最理性的继承方式
方法 |
实现 |
原型链 |
利用原型让一个引用类型继承另一个引用类型的属性和方法。每个构造函数都有一个原型对象,原型对象都包含一个指向构造函数的指针,而实例都包含一个指向原型对象的内部指针。 |
原型链的两大问题,一是来自包含引用类型值的原型,另一个是在创建子类型的实例时,不能向超类型的构造函数中传递参数。 | |
借用构造函数 |
使用apply()和call( )方法在新创建的对象上执行构造函数。 |
优点:相对于原型链而言,可以在子类型构造函数中向超类型构造函数传递参数 | |
缺点:方法都在构造函数中定义,因此函数复用就无从谈起。 | |
组合集成 |
将原型链和借用构造函数的技术一起,取长处的方式。原理是使用原型链实现对原型属性和方法的集成,而通过借用构造函数来实现对实例属性的继承。 |
优点:避免了原型链和借用构造函数的缺陷,融合了它们的优点,成为JavaScript中最常用的继承模式。而且,instanceof和isPrototypeOf( )也能够用于识别基于组合继承创建的对象。 | |
缺点:无论什么情况下,都会调用两次超类型构造函数,一次是在创建子类型原型的时候,另一次是在子类型构造函数内部。 | |
原型式继承 |
此方法没有严格意义上的构造函数,借助原型可以基于已有的对象创建新对象,同时还不必因此创建自定义类型。 ECMAScript通过新增Object.create( )方法规范化了原型式继承。 |
缺点:包含引用类型值的属性始终都会共享相应的值,就像使用原型模式一样。 | |
寄生式继承 |
创建一个仅用于封装继承过程的函数,该函数在内部以某种方式来增强对象,最后再像真的处理之后一样返回对象。 |
缺点:使用寄生式集成来为对象添加函数,会由于不能做到函数复用而降低效率 | |
寄生组合式继承 |
Inherit properties by borrowing constructors, and inherit methods through the mixed form of the prototype chain. The basic idea is: instead of calling a super-violent constructor to specify a subtype's prototype, all we need is a copy of the supertype's prototype. That is, use parasitic inheritance to inherit the prototype of the supertype, and then assign the result to the prototype of the subtype. |
Advantages: High efficiency, the value calls the constructor of the supertype prototype once, the prototype chain can remain unchanged, and instanceof and isPrototypeOf() can be used normally. It is the most ideal inheritance paradigm. |
Reference document: https://blog.csdn.net/xiaoerjun/article/details/54524167
/chenxianru1/article/details/78527533
https://blog.csdn.net/lysunnyrain/article/details/50765659
The above is the detailed content of A super detailed introduction to prototypal inheritance in JavaScript. For more information, please follow other related articles on the PHP Chinese website!


