
This article shares with you the website architecture and evolution of Spring MVC code practice. The content is quite good. I hope it can help friends in need
Website Architecture and its evolution
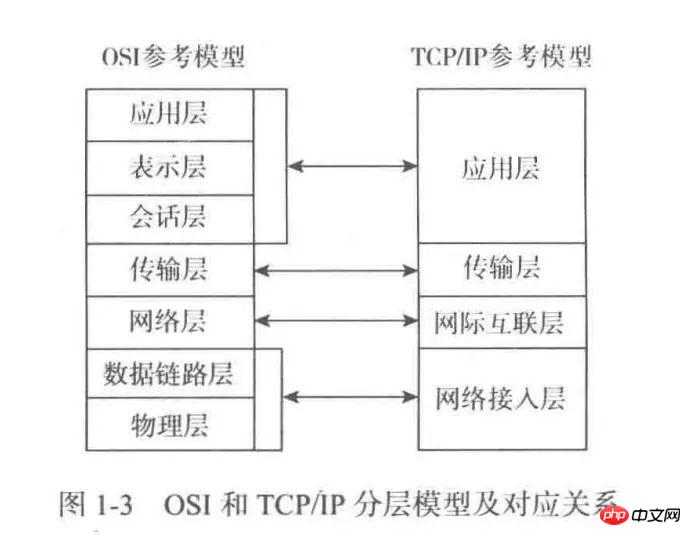
Network transmission decomposition method:
Standard OSI reference model
##TCP/IP Reference Model
##Caching and page staticization
Cache
Static page
Database optimization
##Table structure optimization
##SQL statement optimization
Partition
##Partition table
##Index optimization
Use stored procedures instead of direct manipulation procedures
##Separate active data
Batch read and delayed modification
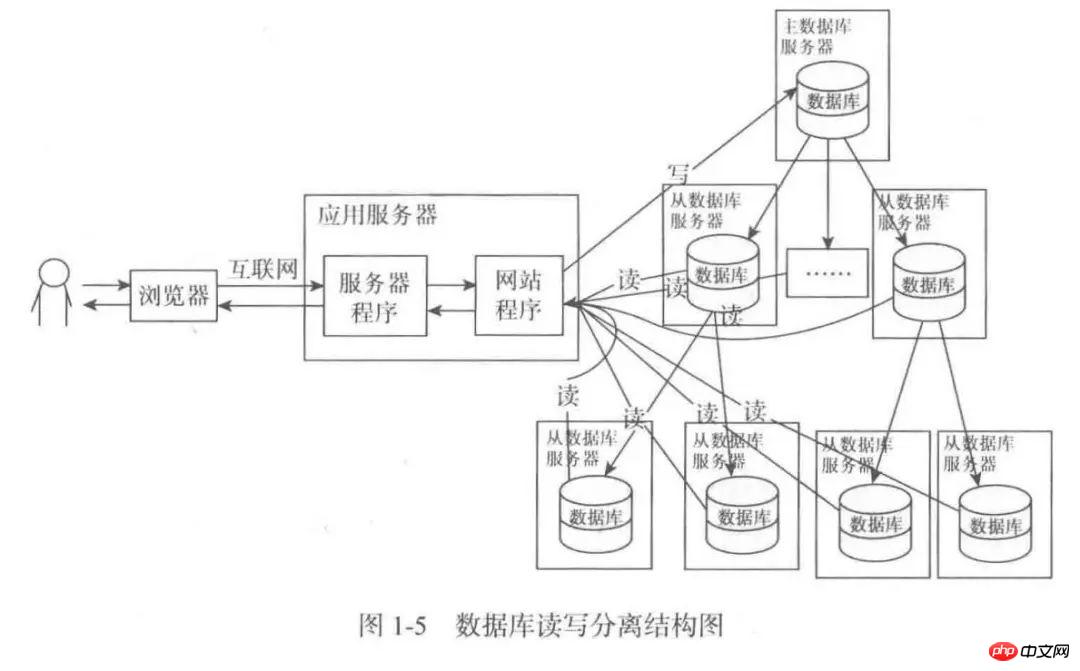
Read and write separation
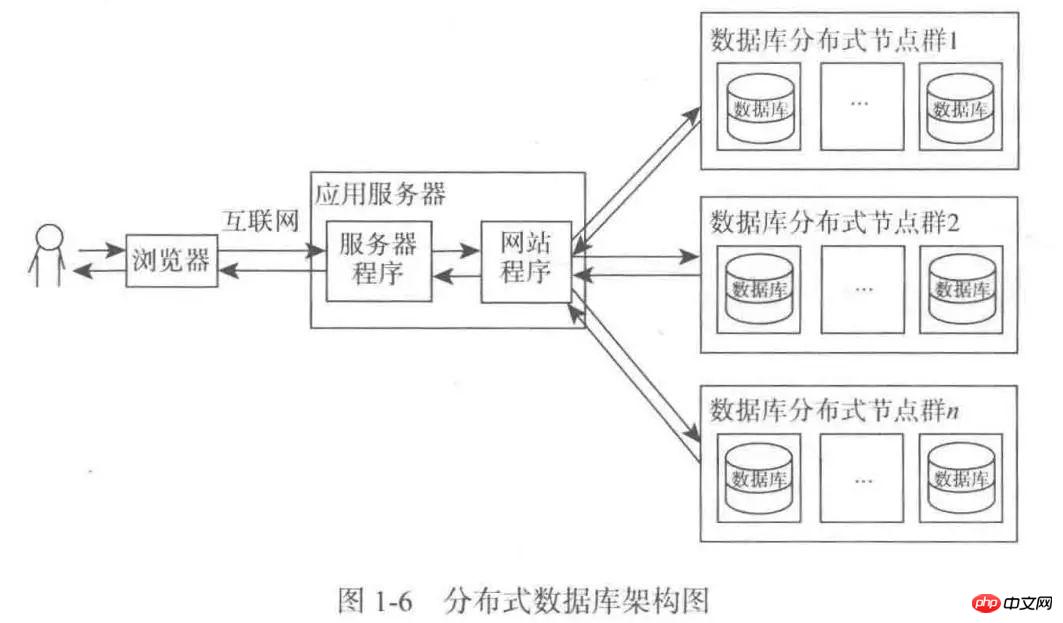
# #Distributed database
#NoSQL and Hadoop
##Common protocols and standards
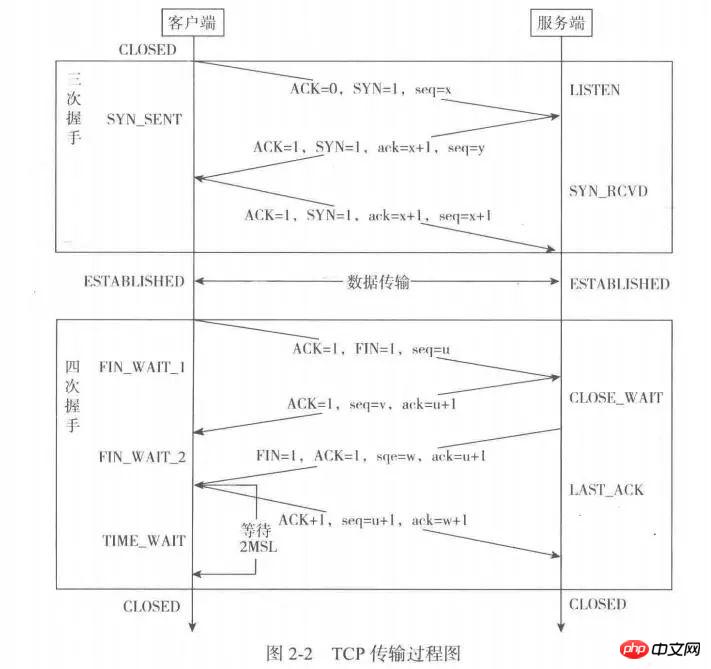
TCP/IP protocolTCP will communicate three times before transmission, which is called "three-way handshake". After transmitting the data, it will communicate four times when it is disconnected, which is called "four waves".
TCP two sequence numbers, three flag bits meaning:
seq: Indicates the sequence number of the transmitted data. Each byte during TCP transmission has a sequence number. When sending data, the first sequence number of the data will be sent to the other party. The receiver will check whether the reception is complete according to the sequence number. If the reception is not complete, it needs to be retransmitted. This way Data integrity can be guaranteed.
ack: Indicates the confirmation number. The receiving end uses it to feedback to the sending end the data information that has been successfully received. Its value is the starting sequence number of the next data packet it hopes to receive.
ACK: Acknowledgment bit, ack only works when ACK = 1. During normal communication, the ACK is 1. When the request is initiated for the first time, the ACK is 0 because there is no data that needs to be confirmed.
SYN: Synchronization bit, used to synchronize the sequence number when establishing a connection. When the connection is first established, there is no history of received data, so there is no way to set ack. This will not work according to the normal mechanism. The role of SYN is to solve this problem. When the receiving end receives the SYN = 1 report When writing, the ack will be directly set to the value of the received seq + 1. Note that the value here is not set after verification, but is set directly according to SYN, so that the normal mechanism can run, so SYN is called synchronization. Bit. SYN will be 1 in the first two handshakes, because the ack of both parties in the communication needs to set an initial value.
FIN: Termination bit, used to release the connection after the data transmission is completed.
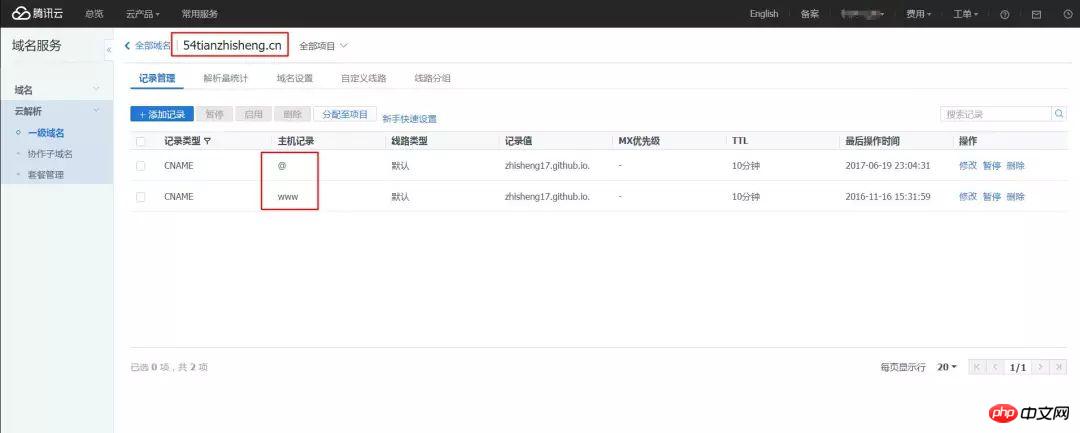
Record type:
A record: Point the domain name to an IPv4 address (for example: 8.8.8.8)
CNAME: Point the domain name to another domain name (for example: www.54tianzhisheng .cn)
MX: Point the domain name to the mail server address
TXT: Can be filled in arbitrarily, the length is limited to 255, usually SPF records ( Anti-spam)
NS: Domain name server record, specify the subdomain name to other DNS servers for resolution
AAAA: Point the domain name to an iPv6 address (For example: ff06:0:0:0:0:0:0:c3)
SRV: Record the server that provides a specific service (for example, xmpp-server.tcp)
Explicit URL: Redirect domain name 301 to another address
Implicit URL: Similar to explicit URL, but will hide the real target address
Host record:
To resolve www.54tianzhisheng.cn, please fill in www. The host record is the domain name prefix. Common usages are:
www: *The resolved domain name is www.54tianzhisheng.cn.
*@: Directly resolve the main domain name 54tianzhisheng.cn.
*: Pan-analytic, matching all other domain names *.54tianzhisheng.cn.
mail: Resolve the domain name to mail.54tianzhisheng.cn, which is usually used to resolve the mailbox server.
Second-level domain name: For example: abc.54tianzhisheng.cn, fill in abc.
Mobile website: For example: m.54tianzhisheng.cn, fill in m.
Socket is divided into two categories: ServerSocket and Socket.
ServerSocket is used on the server side. You can listen for requests through the accept method and return the Socket after listening to the request.
Socket users specifically complete data transmission, and the client directly uses Socket to send requests and transmit data.
I just wrote a demo for unilaterally sending messages:
Client:
<span style="color:rgb(199,146,234);line-height:20px;font-size:13px !important;white-space: !important;"> import</span><span style="color:rgb(238,255,255);line-height:20px;font-size:13px !important;white-space: !important;"> java</span><span style="color:rgb(204,204,204);line-height:20px;font-size:13px !important;white-space: !important;">.</span><span style="color:rgb(238,255,255);line-height:20px;font-size:13px !important;white-space: !important;">io</span><span style="color:rgb(204,204,204);line-height:20px;font-size:13px !important;white-space: !important;">.</span><span style="color:rgb(126,165,247);line-height:20px;font-size:13px !important;white-space: !important;">IOException</span><span style="color:rgb(204,204,204);line-height:20px;font-size:13px !important;white-space: !important;">;</span>
<span style="color:rgb(199,146,234);line-height:20px;font-size:13px !important;white-space: !important;">import</span><span style="color:rgb(238,255,255);line-height:20px;font-size:13px !important;white-space: !important;"> java</span><span style="color:rgb(204,204,204);line-height:20px;font-size:13px !important;white-space: !important;">.</span><span style="color:rgb(238,255,255);line-height:20px;font-size:13px !important;white-space: !important;">io</span><span style="color:rgb(204,204,204);line-height:20px;font-size:13px !important;white-space: !important;">. </span><span style="color:rgb(126,165,247);line-height:20px;font-size:13px !important;white-space: !important;">OutputStream</span><span style="color:rgb(204,204,204);line-height:20px;font-size:13px !important;white-space: !important;">;</span>
## import<span style="color:rgb(199,146,234);line-height:20px;font-size:13px !important;white-space: !important;"></span> java<span style="color:rgb(238,255,255);line-height:20px;font-size:13px !important;white-space: !important;"></span>.<span style="color:rgb(204,204,204);line-height:20px;font-size:13px !important;white-space: !important;"></span>net<span style="color:rgb(238,255,255);line-height:20px;font-size:13px !important;white-space: !important;"></span>.<span style="color:rgb(204,204,204);line-height:20px;font-size:13px !important;white-space: !important;"></span>Socket<span style="color:rgb(126,165,247);line-height:20px;font-size:13px !important;white-space: !important;"></span>;<span style="color:rgb(204,204,204);line-height:20px;font-size:13px !important;white-space: !important;"></span>
#/**<span style="color:rgb(79,103,117);line-height:20px;font-size:13px !important;white-space: !important;"></span>
## * Created by 10412 on 2017/5/2.<span style="color:rgb(79,103,117);line-height:20px;font-size:13px !important;white-space: !important;"></span>
## * TCP client: <span style="color:rgb(79,103,117);line-height:20px;font-size:13px !important;white-space: !important;"></span>
<span style="color:rgb(79,103,117);line-height:20px;font-size:13px !important;white-space: !important;"></span>
<span style="color:rgb(79,103,117);line-height:20px;font-size:13px !important;white-space: !important;"> ②: If the connection is successful, it means that the channel is established and the socket stream has been generated. Just get the read stream and write stream in the socket stream, and get the two stream objects through getInputStream and getOutputStream. </span>
## ③: Close the resource. <span style="color:rgb(79,103,117);line-height:20px;font-size:13px !important;white-space: !important;"></span>
*/
//单方面的输入!
public class TcpClient
{
    public static void main(String[] args) {
        try {
            Socket s = new Socket("127.0.0.1", 9999);
            OutputStream o = s.getOutputStream();
            o.write("tcp sssss".getBytes());
            s.close();
        } catch (IOException e) {
            e.printStackTrace();
        }
    }
}import<span style="color:rgb(199,146,234);line-height:20px;font-size:13px !important;white-space: !important;"> java</span><span style="color:rgb(238,255,255);line-height:20px;font-size:13px !important;white-space: !important;">.</span><span style="color:rgb(204,204,204);line-height:20px;font-size:13px !important;white-space: !important;">io</span><span style="color:rgb(238,255,255);line-height:20px;font-size:13px !important;white-space: !important;">.</span><span style="color:rgb(204,204,204);line-height:20px;font-size:13px !important;white-space: !important;">IOException</span><span style="color:rgb(126,165,247);line-height:20px;font-size:13px !important;white-space: !important;"> ;</span><span style="color:rgb(204,204,204);line-height:20px;font-size:13px !important;white-space: !important;"></span>
##import java<span style="color:rgb(199,146,234);line-height:20px;font-size:13px !important;white-space: !important;"></span>.<span style="color:rgb(238,255,255);line-height:20px;font-size:13px !important;white-space: !important;"></span>io<span style="color:rgb(204,204,204);line-height:20px;font-size:13px !important;white-space: !important;"></span>.<span style="color:rgb(238,255,255);line-height:20px;font-size:13px !important;white-space: !important;"></span>InputStream<span style="color:rgb(204,204,204);line-height:20px;font-size:13px !important;white-space: !important;"></span>;<span style="color:rgb(126,165,247);line-height:20px;font-size:13px !important;white-space: !important;"></span><span style="color:rgb(204,204,204);line-height:20px;font-size:13px !important;white-space: !important;"></span>
import java<span style="color:rgb(199,146,234);line-height:20px;font-size:13px !important;white-space: !important;"></span>.<span style="color:rgb(238,255,255);line-height:20px;font-size:13px !important;white-space: !important;"></span>net<span style="color:rgb(204,204,204);line-height:20px;font-size:13px !important;white-space: !important;"></span>.<span style="color:rgb(238,255,255);line-height:20px;font-size:13px !important;white-space: !important;"></span>ServerSocket<span style="color:rgb(204,204,204);line-height:20px;font-size:13px !important;white-space: !important;"></span>;<span style="color:rgb(126,165,247);line-height:20px;font-size:13px !important;white-space: !important;"></span><span style="color:rgb(204,204,204);line-height:20px;font-size:13px !important;white-space: !important;"></span>
<span style="color:rgb(199,146,234);line-height:20px;font-size:13px !important;white-space: !important;">import</span><span style="color:rgb(238,255,255);line-height:20px;font-size:13px !important;white-space: !important;"> java</span><span style="color:rgb(204,204,204);line-height:20px;font-size:13px !important;white-space: !important;">.</span><span style="color:rgb(238,255,255);line-height:20px;font-size:13px !important;white-space: !important;">net</span><span style="color:rgb(204,204,204);line-height:20px;font-size:13px !important;white-space: !important;">.</span><span style="color:rgb(126,165,247);line-height:20px;font-size:13px !important;white-space: !important;">Socket</span><span style="color:rgb(204,204,204);line-height:20px;font-size:13px !important;white-space: !important;">;</span>
/**
 * Created by 10412 on 2017/5/2.
 */
public class TcpServer
{
    public static void main(String[] args) {
        try {
            ServerSocket ss = new ServerSocket(9999);//建立服务端的socket服务
            Socket s = ss.accept();//获取客户端对象
            String ip = s.getInetAddress().getHostAddress();
            int port = s.getPort();
            System.out.println(ip + " : " + port + " connected");
            // 可以通过获取到的socket对象中的socket流和具体的客户端进行通讯。
            InputStream ins = s.getInputStream();//读取客户端的数据,使用客户端对象的socket读取流
            byte[] bytes = new byte[1024];
            int len = ins.read(bytes);
            String text = new String(bytes, 0, len);
            System.out.println(text);
            //关闭资源
            s.close();
            ss.close();
        } catch (IOException e) {
            e.printStackTrace();
        }
    }
}The above is the detailed content of Website architecture and evolution of Spring MVC code practice. For more information, please follow other related articles on the PHP Chinese website!


