


Preface: The blogger is currently a junior and a Web front-end enthusiast. The advantage of blogging is not writing for the sake of writing, but a process of recording thoughts. Don’t think about what it can bring you, but what you gain from it.
I happened to be free recently, so I set up a blog by referring to various tutorials on the Internet. Now record the complete process of building a blog with Hexo + GitHub Pages:
Personal blog address:
About process:
1. Build Node.js environment
2. Build a Git environment
3. GitHub registration and configuration
4. Install and configure Hexo
5. Associate Hexo with GitHub Pages
6. GitHub Pages address resolution to personal domain name
7 . Common operations of Hexo
8. Conclusion
Why should we build a Node.js environment? - Because the Hexo blog system is written based on Node.js
Node.js is a JavaScript running environment based on the Chrome V8 engine, which can interpret and run JS code in a non-browser environment.
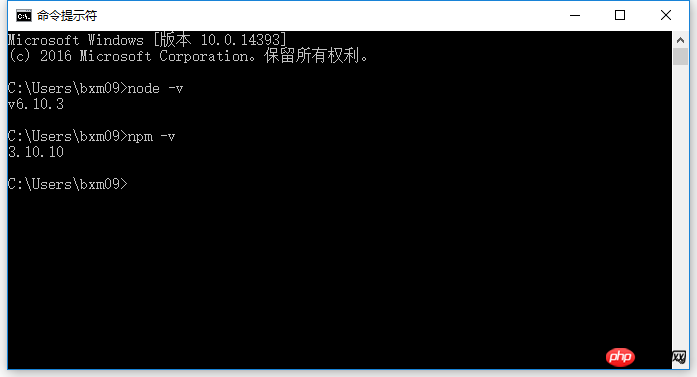
On the Node.js official website: Download the installation package v6.10.3 LTS
Just keep the default settings, click Next, and the installation will be over soon.
Then open the command prompt and enter node -v, npm -v. If the version number appears, it means the Node.js environment is configured successfully and the first step is completed! ! !
Why should we build a Git environment? - Because local web pages and articles need to be submitted to GitHub.
Git is a free, open source distributed version control system for agile and efficient handling of any project, small or large.
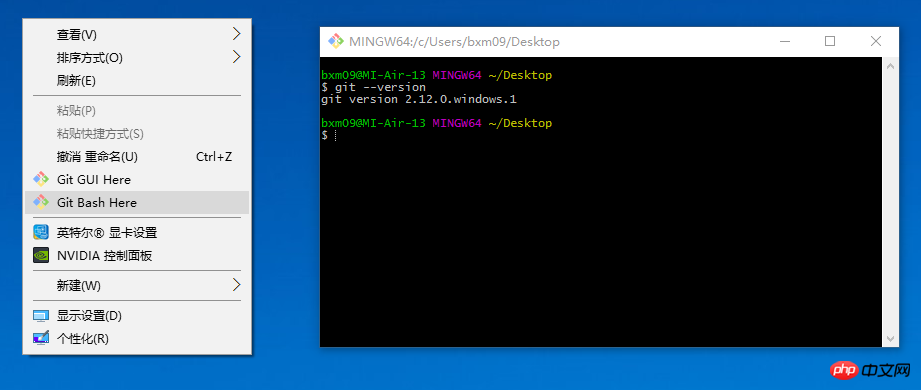
On Git official website: Download the installation packageGit-2.13.0-64-bit.exe

Right-click on the desktop and openGit Bush Here, enter git --version, if the version number appears, the Git environment configuration is successful, and the second step is completed! ! !
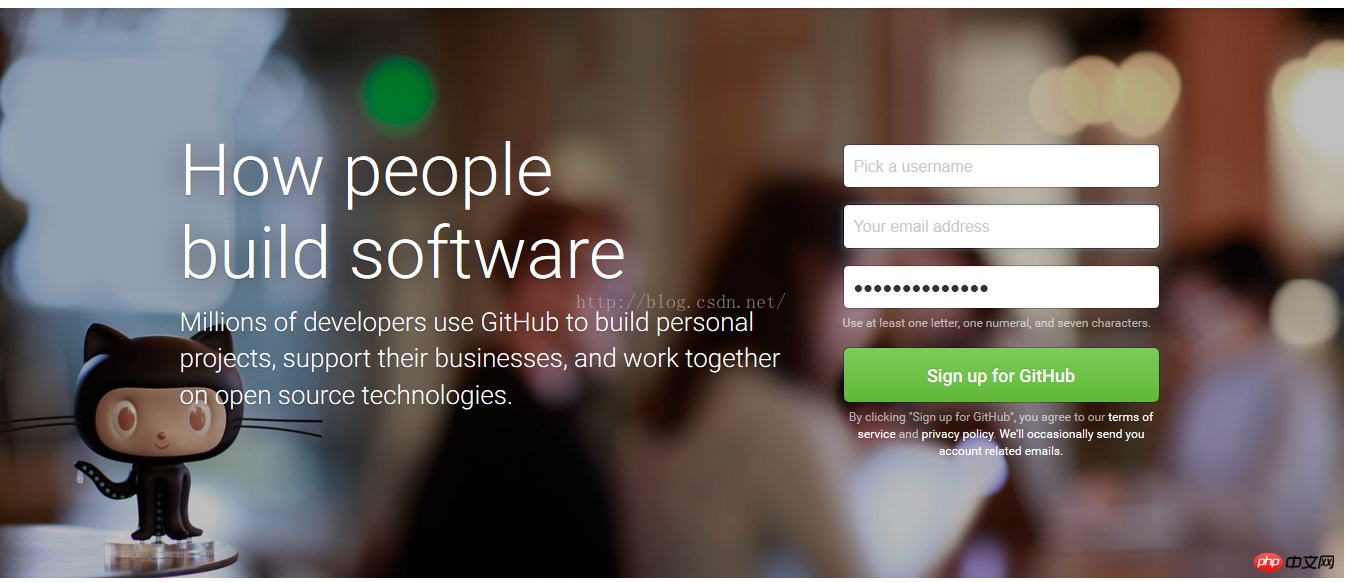
GitHub is a code hosting platform. Because it only supports Git as the only version library format for hosting, it is named GitHub.
Github registration:
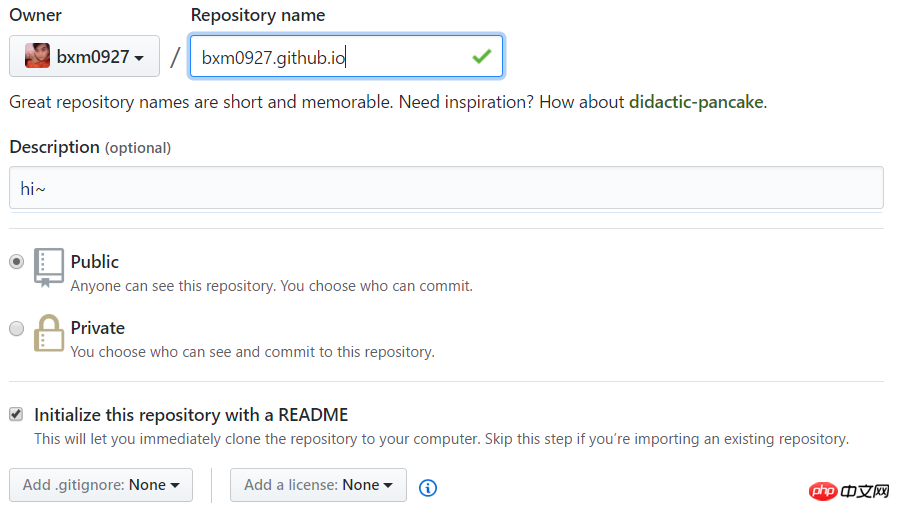
Note: yourname must be your username.
yourname/yourname.github.io
Use npm to install Hexo: Enter
npm install hexo-cli -g
WARN, but don’t worry, this is not Will affect your normal use.

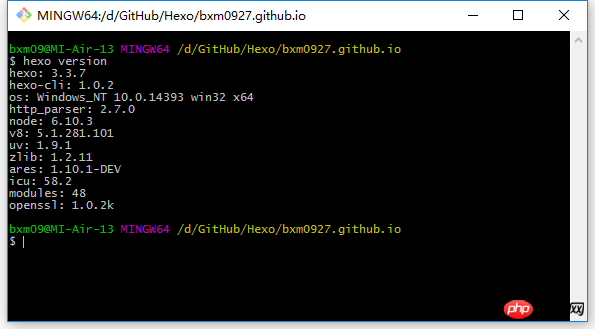
hexo version
hexo init bxm0927.github.io

cd bxm0927.github.io

npm install
.
├── .deploy         #需要部署的文件
├── node_modules    #Hexo插件
├── public          #生成的静态网页文件
├── scaffolds       #模板
├── source          #博客正文和其他源文件,404、favicon、CNAME 都应该放在这里
| ├── _drafts       #草稿
| └── _posts        #文章
├── themes          #主题
├── _config.yml     #全局配置文件
└── package.json    #npm 依赖等
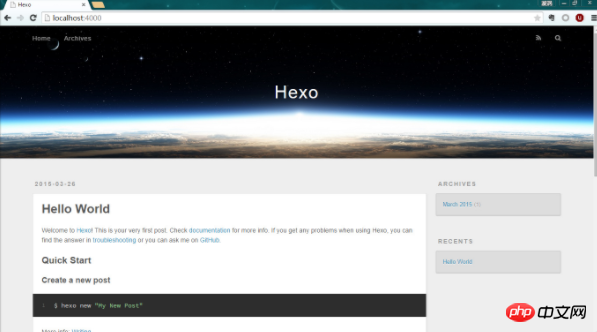
Run the local Hexo service
hexo server
或者
hexo s
Note 1: When executing hexo server, it prompts that the command cannot be found
Solution: The server is separated after Hexo 3.0 Now, you need to install the server. The installation command is as follows:sudo npm install hexo-server 或者 npm install hexo -server --save
Generate SSH keys
Enter your own email addressssh-keygen -t rsa -C "80583600@qq.com"
在回车中会提示你输入一个密码,这个密码会在你提交项目时使用,如果为空的话提交项目时则不用输入,我们按回车不设置密码。
添加 SSH Key 到 GitHub
打开 C:\Users\bxm09\.ssh\id_rsa.pub,此文件里面内容为刚才生成的密钥,准确的复制这个文件的内容,粘贴到 的 new SSH key 中
测试
可以输入下面的命令,看看设置是否成功,git@github.com的部分不要修改:
ssh -T git@github.com
如果是下面的反馈:
The authenticity of host ‘github.com (207.97.227.239)’ can’t be established.
RSA key fingerprint is 16:27:ac:a5:76:28:2d:36:63:1b:56:4d:eb:df:a6:48.
Are you sure you want to continue connecting (yes/no)?
不要紧张,输入yes就好,然后会看到:
Hi aierui! You've successfully authenticated, but GitHub does not provide shell access.
配置Git个人信息
现在你已经可以通过 SSH 链接到 GitHub 了,还有一些个人信息需要完善的。
Git 会根据用户的名字和邮箱来记录提交。GitHub 也是用这些信息来做权限的处理,输入下面的代码进行个人信息的设置,把名称和邮箱替换成你自己的。
git config --global user.name "bxm0927"
git config --global user.email "80583600@qq.com"
配置 Deployment
在_config.yml文件中,找到Deployment,然后按照如下修改,用户名改成你的:
需要注意的是:冒号后面记得空一格!
# Deployment
## Docs: https://hexo.io/docs/deployment.html
deploy:
  type: git
  repo: git@github.com:bxm0927/bxm0927.github.io.git
  branch: master
本地文件提交到 GitHub Pages
// 删除旧的 public 文件
hexo clean

// 生成新的 public 文件
hexo generate
或者
hexo g

// 开始部署
hexo deploye
或者
hexo d
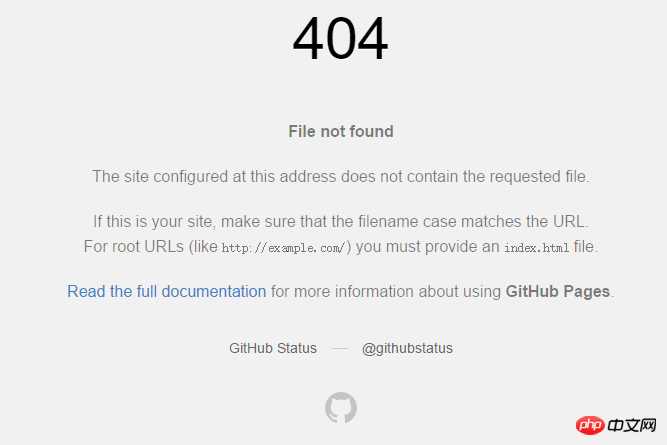
在浏览器中输入 https://bxm0927.github.io (用户名改成你的)看到了 Hexo 与 GitHub Pages 已经成功关联了,哇哇哇哇哇哇,开心死你了,不要忘了回来给我点赞哟 ~
注意1:若上面操作失败,则需要提前安装一个扩展:
npm install hexo-deployer-git --save
注意2:如果在执行 hexo d 后,出现 error deployer not found:github 的错误(如下),则是因为没有设置好 public key 所致,重新详细设置即可。
Permission denied (publickey).
fatal: Could not read from remote repository.
Please make sure you have the correct access rights
and the repository exists.
注意3:怎么避免 .md 文件被解析?
Hexo原理就是hexo在执行hexo generate时会在本地先把博客生成的一套静态站点放到public文件夹中,在执行hexo deploy时将其复制到.deploy文件夹中。Github的版本库通常建议同时附上README.md说明文件,但是hexo默认情况下会把所有md文件解析成html文件,所以即使你在线生成了 README. md,它也会在你下一次部署时被删去。怎么解决呢?
在执行hexo deploy前把在本地写好的README.md文件复制到.deploy文件夹中,再去执行hexo deploy。
Github Pages 是面向用户、组织和项目开放的公共静态页面搭建托管服 务,站点可以被免费托管在 Github 上,你可以选择使用 Github Pages 默 认提供的域名 github.io 或者自定义域名来发布站点。
看着博客的域名是二级域名,总有一种寄人篱下的感觉,为了让这个小窝看起来更加正式,我在阿里云上买了一个域名,打算将博客绑定自己的域名。
进行该绑定过程,其实就是一个重定向的过程。
在 GitHub 仓库的根目录下建立一个 CNAME 的文本文件(注意:没有扩展名),文件里面只能输入一个你的域名,不能加http://
www.lovebxm.com
注意:CNAME 一定是在你 Github 项目的 master 根目录下
进入阿里云域名解析地址,添加解析:
记录类型选择CNAME
主机记录填www
解析线路选择默认
记录值填yourname.github.io
TTL值为10分钟
再添加一个解析,记录类型A
主机记录填www
解析线路选择默认
记录值填你GitHub 的ip地址(在cmd中ping:)
ping bxm0927.github.com

点击保存,等 1 分钟,访问下你自己的域名,一切就ok了。
域名绑定成功,域名解析成功,因此你在浏览中输入 www.lovebxm.com,或 lovebxm.com 就可以访问到博客了,输入 bxm0927.github.io 会重定向到 www.lovebxm.com。过程:www 的方式,会先解析成 http://xxxx.github.io,然后根据 CNAME 再变成 www
注意:CNAME文件在下次 hexo deploy的时候就消失了,需要重新创建,这样就很繁琐
方法一:每次 hexo d 之后,就去 GitHub 仓库根目录新建 CNAME文件
方法二:在 hexo g 之后, hexo d 之前,把CNAME文件复制到 “\public" 目录下面,里面写入你要绑定的域名。
方法三(推荐):将需要上传至github的内容放在source文件夹,例如CNAME、favicon.ico、Super detailed tutorial on how to build a blog with Hexo + GitHub Pagess等,这样在 hexo d 之后就不会被删除了。
方法四:通过安装插件实现永久保留
$ npm install hexo-generator-cname --save
之后在_config.yml中添加一条
plugins:
- hexo-generator-cname
需要注意的是:如果是在github上建立的CNAME文件,需要先clone到本地,然后安装插件,在deploy上去即可。CNAME只允许一个域名地址。
注意1:每次生成的 CNAME 都是 yoursite.com 怎么解决?
修改 _config.yml
url:
root: /
permalink: :year/:month/:day/:title/
permalink_defaults:
hexo new "文章标题"

D:\GitHub\Hexo\test>hexo new "文章标题"
INFO  Created: D:\GitHub\Hexo\test\source\_posts\文章标题.md
在本地博客文件夹 source\_posts 文件夹下看到我们新建的 markdown 文件。
当然,我们也可以手动添加Markdown文件在source->_deploy文件夹下,其效果同样可以媲美hexo new
文章编辑好之后,运行生成、部署命令:
hexo clean

hexo g

hexo d
当然你也可以执行下面的命令,相当于上面两条命令的效果
hexo clean

hexo d -g
hexo new page folder
有两种多标签格式
tags: [a, b, c]
或
tags:
  - a
  - b
  - c
如果在博客文章列表中,不想全文显示,可以增加 <!-- more -->, 后面的内容就不会显示在列表。
<!--more-->
官方主题库:https://hexo.io/themes/
Hexo主题非常,推荐使用 Next 为主题,请阅读 Next 的官方文档( ),5 分钟快速安装。
再提示一点,大家可以hexo主题修改一步就hexo s看下变化,初次接触对参数不清楚。只有hexo s后在可以在本地浏览到效果,Ctrl+C 停止服务器。
添加 sitemap 和 feed 插件
切换到你本地的 hexo 目 CIA ,在命令行窗口,输入以下命令
npm install hexo-generator-feed -save
npm install hexo-generator-sitemap -save
修改 _config.yml,增加以下内容
# Extensions
Plugins:
- hexo-generator-feed
- hexo-generator-sitemap
#Feed Atom
feed:
  type: atom
  path: atom.xml
  limit: 20
#sitemap
sitemap:
  path: sitemap.xml
再执行以下命令,部署服务端
hexo d -g
配完之后,就可以访问 https://bxm0927.github.io/atom.xml 和 https://bxm0927.github.io/sitemap.xml ,发现这两个文件已经成功生成了。
GitHub Pages 自定义404页面非常容易,直接在根目录下创建自己的404.html就可以。但是自定义404页面仅对绑定顶级域名的项目才起作用,GitHub默认分配的二级域名是不起作用的,使用hexo server在本机调试也是不起作用的。
其实,404页面可以做更多有意义的事,来做个404公益项目吧。
推荐使用腾讯公益404 :
<script>
</script>
复制上面代码,贴粘到目录下新建的404.html即可!
很多人可能家里一台笔记本,公司一个台式机,想两个同时管理博客,同时达到备份的博客主题、文章、配置的目的。下面就介绍一下用github来备份博客并同步博客。
A电脑备份博客内容到github
配置.gitignore文件。进入博客目录文件夹下,找到此文件,用sublime text 打开,在最后增加两行内容/.deploy_git和/public
初始化仓库。
在博客根目录下,在git bash下依次执行git init和git remote add origin 为远程仓库地址。
同步到远程仓库。
gitbash下依次执行以下命令
git add . #添加目录下所有文件

git commit -m "更新说明" #提交并添加更新说明

git push -u origin master #推送更新到远程仓库
B电脑拉下远程仓库文件
在B电脑上同样先安装好node、git、ssh、hexo,然后建好hexo文件夹,安装好插件,(然后选做:将备份到远程仓库的文件及文件夹删除),然后执行以下命令:
git init

git remote add origin <server>

git fetch --all

git reset --hard origin/master</server>
发布博客后同步
在B电脑发布完博客之后,记得将博客备份同步到远程仓库
执行以下命令:
git add .

#可以用git master 查看更改内容

git commit -m "更新信息"

git push -u origin master  #以后每次提交可以直接git push
平时同步管理
每次想写博客时,先执行:git pull进行同步更新。发布完文章后同样按照上面的 发布博客后同步 同步到远程仓库。
在 md 文件中写中文内容,发布出来后为乱码,原因是 md 的编码不对,将 md 文件另存为UTF-8编码的文件即可解决问题。
There are many systems for building websites, such as:
- Hexo + GitHub Pages
- Jekyll + GitHub Pages
- WordPress + Server + Domain Name
- DeDeCMS + Server + Domain name
- …
Using Hexo + GitHub Pages to build a website has advantages and disadvantages:
- GitHub Pages does not support database management, so you can only create a blog with static pages, not like other blogs (Like WordPress) Manage your blog content through a database.
- However, GitHub Pages does not require the purchase of a server. It is free of server fees and can also perform load balancing. GitHub Pages has 300M free space.
- Is it really necessary to use a database for a personal blog? the answer is negative. The blog should be static, and comments can be recorded using the third-party NetEase Cloud post. Static blogs are more conducive to search engine spider crawling, and the lightweight feeling is really good.
- With Hexo you can easily write articles in Markdown, which is perfect for my taste. Markdown is really a language developed specifically for programmers. Now I feel like I don’t want to write anything without Markdown. What a rich text editor, what word, it’s too troublesome! And the styles are so ugly! The efficiency is too low!
Recommend several useful online Markdown editors:
- Job Tribe:
- Mark Flying Elephant: https://maxiang.io
Recommended picture bed:
- Minimalist picture bed + chrome plug-in + Qiniu Space, Qiniu Cloud Storage provides 10G of free space, and 10G of monthly traffic. It is the best way to store external link pictures on your personal blog. Qiniu Cloud Storage also has Various graphics processing functions, thumbnails, and video storage speeds are also impressive.
The above is the detailed content of Super detailed tutorial on how to build a blog with Hexo + GitHub Pages. For more information, please follow other related articles on the PHP Chinese website!


![[Web front-end] Node.js quick start](https://img.php.cn/upload/course/000/000/067/662b5d34ba7c0227.png)


