1. Basic syntax structure of html submit and bottom buttons
1. html submit button
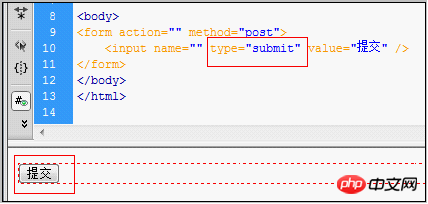
Set type="submit" in the input tag to set this form control to button.
submit button code:
The code is as follows:
<input name="" type="submit" value="提交" />
submit button effect screenshot

html submit button effect screenshot
2. HTML bottom button
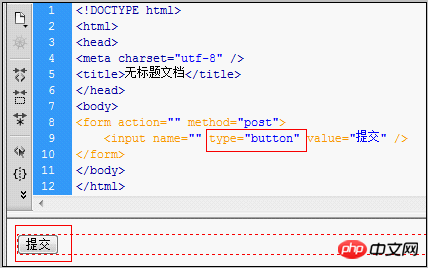
Set type="bottom" in the input tag to set this form control as a button.
bottom button code:
The code is as follows:
<input name="" type="button" value="提交" />
bottom button screenshot:

html botton button effect screenshot
2. The difference between html submit and bottom button
type=button is simply a button function
type=submit is to send the form
But those who are engaged in WEB UI should note that using submit to improve the usability of the page:
After using submit, the page supports keyboard enter key operation, and many WEB software designers, You may not have noticed that submit is unified.
After using the button, the page often does not support the enter key. Therefore, if you need to support the enter key, you must set up a submit. By default, the enter key operates on the first submit on the page.
The code is as follows:
<input type="submit" name="b1" value="提交" onClick="bt_submit_onclick()">
After executing onClick, go to action. Can be submitted automatically without onClick. So onclick is not required here.
The code is as follows:
<input type="button" name="b1" value="提交" onClick="bt_submit_onclick()">
After onClick is executed, the jump file is controlled in the js file. Submit requires onClick.
For example:
1, onclick="form1.action='a.jsp';form1.submit();" This realizes the submit function .
2, button code
The code is as follows:
<form name="form1" method="post" action="<a href="http://www.css.com">http://www.css.com</a>">
<input type="button" name="Button" value="按钮" onClick="submit()">
</form>

Button screenshot
3,Button HTML code
The code is as follows:
<input type="button" name="Button" value="Button"
onClick="javascript:windows.location.href="你的url"">
3. HTML submit and bottom button beautification css p layout
First we prepare the button image for button beautification, and modify the input submit or bottom button control Just add a class style, set the button background to beautify the picture, set the border to zero, width and height.
1. Beautify the html bottom button
1), picture material
You can save the picture as using

Beautify picture button material
2), corresponding complete HTML source code:
The code is as follows:
<!DOCTYPE html>
<html>
<head>
<title>button按钮美化在线演示-www.css.com</title>
<style>
html{width:100%;height:100%;}
body{background:#fff;font-size:18px;font-family:"Arial","Tahoma","微软雅黑","雅黑";
line-height:18px;padding:0px;margin:0px;text-align:center}
div{padding:18px}
img{border:0px;vertical-align:middle;padding:0;margin:0}
input,button{font-family:"Arial","Tahoma","微软雅黑","雅黑";border:0;
vertical-align:middle;margin:8px;line-height:18px;font-size:18px}
.btn{width:140px;height:36px;line-height:18px;font-size:18px;
background:url("bg26.jpg")no-repeatlefttop;color:#FFF;padding-bottom:4px}
</style>
</head>
<body>
<p>
<formid="form1"name="form1"method=""action="<a href="http://www.css.com/"target="_blank">http://www.css.com/"target="_blank</a>">
<div>
<inputtype="button"class="btn"value="按钮"onmouseover="this.style.backgroundPosition='left-36px'"
onmouseout="this.style.backgroundPosition='lefttop'"/>
</div>
</form>
</p>
</body>
</html>
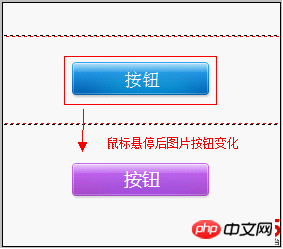
3), bottom effect screenshot

bottom beautification effect screenshot
2. Beautify the html submit button
1), picture material
can be used to Save as using

button image material right click and save as using
2), corresponding to the complete HTML source code:
The code is as follows:
<!DOCTYPE html>
<html>
<head>
<title>submit按钮美化 在线演示-www.css.com</title>
<!-- <a href="http://www.css.com">www.css.com</a> -->
<style>
html { width:100%; height:100%; }
body { background:#fff; font-size:18px; font-family:"Arial", "Tahoma", "微软雅黑", "雅黑";
line-height:18px; padding:0; margin:0; text-align:center; }
div { padding:18px }
img { border:0px; vertical-align:middle; padding:0px; margin:0px; }
input, button { font-family:"Arial", "Tahoma", "微软雅黑", "雅黑"; border:0;
vertical-align:middle; margin:8px; line-height:18px; font-size:18px }
.btns { width:143px; height:40px; background:url("bg11.jpg") no-repeat left top; color:#FFF; }
</style>
</head>
<body>
<p>
<form id="form1" name="form1" method="" action="<a href="http://www.css.com/">http://www.css.com/</a>" target="_blank">
<div>
<input type="submit" class="btns" onmouseover="this.style.backgroundPosition='left -40px'"
onmouseout="this.style.backgroundPosition='left top'" value="提交" />
</div>
</form>
</p>
</body>
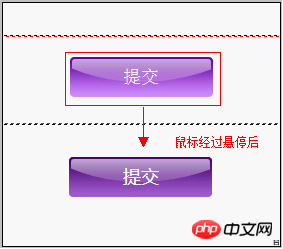
</html>3), screenshot of submit button effect

html screenshot of submit beautification effect
More uses css to beautify html form controls ( Form beautification) For detailed examples and related articles, please pay attention to the PHP Chinese website!
 OuYi exchange usdt price
 What is the difference between ibatis and mybatis
 How to convert excel to vcf
 How to solve the problem of no internet access when the computer is connected to wifi
 How to activate cloud storage service
 What are the network file server tools?
 linear-gradient property
 photoshare.db


