Waterfall flow is a website page layout that is visually represented by a jagged multi-column layout. As the page scroll bar scrolls down, this layout will continuously load data blocks and append them to the current tail. The first website to adopt this layout was Pinterest, which gradually became popular in the country. Most domestic fresh websites are basically of this style.

Waterfall Features:
1. Dazzling array: The whole page is mainly pictures, and pictures of different sizes are arranged according to certain rules.
2. Aesthetic: The style of pictures is mainly aesthetic pictures.
3. Simple operation: When browsing the website, you only need to gently slide the mouse wheel, and all the wonderful pictures will be presented in front of you.
How to implement waterfall flow layout:
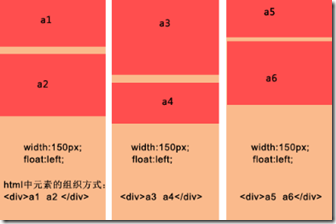
1. Traditional multi-column floating

Advantages:
The layout is simple, it should be said that there is no particular difficulty;
There is no need to explicitly know the height of the data block. When there is a picture in the data block, there is no need to specify the picture height.
Disadvantages:
The number of columns is fixed and it is not easy to expand. When the browser window size changes, only x columns can be fixed. If you want to add a column, it is difficult to adjust the arrangement of the data blocks;
When scrolling to load more data, it is still inconvenient to specify which column to insert into.
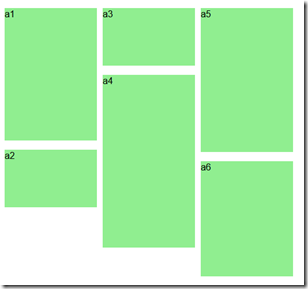
Example:
<!DOCTYPE html>
<html lang="en">
<head>
  <meta charset="UTF-8">
  <title>传统多列浮动</title>
  <style>
    div{
       float:left;
       margin: 5px 5px 5px 5px;
    }
    p{
      background: #90EE90;
      width:160px;
      text-align:center;
    }
  </style>
</head>
<body>
  <div>
    <p style="height:230px;">a1</p>
    <p style="height:100px;">a2</p>
  </div>

  <div>
    <p style="height:100px;">a3</p>
    <p style="height:300px;">a4</p>
  </div>

  <div>
    <p style="height:250px;">a5</p>
    <p style="height:200px;">a6</p>
  </div>
</body>
</html>
Effect:

2. CSS3 style definition

Advantages:
Direct CSS definition is the most convenient;
It is easy to expand, just add content directly to the container.
Disadvantages:
Only available in advanced browsers;
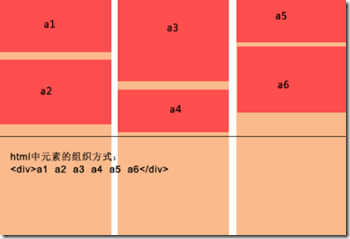
There is another shortcoming. His data blocks are arranged from top to bottom to a certain height, and then the remaining elements are added to the next column in turn. This is essentially different;
In view of these two main shortcomings, this method is destined to be limited to high-end browsers, and it is more suitable for text arrangement in multiple columns.
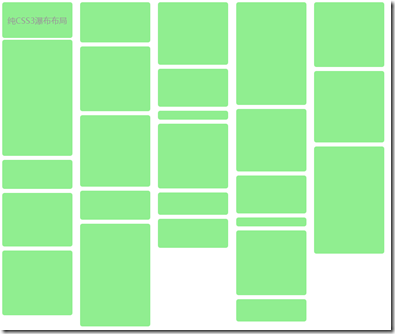
Example
<!DOCTYPE HTML>
<html>
<head>
<meta http-equiv="Content-Type" content="text/html; charset=utf-8">
<title>CSS3瀑布布局</title>
<style>
    .container{
        -webkit-column-width:160px;
        -moz-column-width:160px;
        -o-colum-width:160px;
        -webkit-column-gap:1px;
        -moz-column-gap:1px;
        -o-column-gap:1px;
    }
    div:not(.container){
        -webkit-border-radius:5px;
        -moz-border-radius:5px;
        border-radius:5px;
        background:#90EE90;
        border::#CCC 1px solid;
        display:inline-block;
        width:157px;
        position:relative;
        margin:2px;
    }
    .title{
         line-height:80px; font-size:18px; color:#999;
         text-align:center;
         font-family:"Microsoft YaHei";
    }
</style>
</head>

<body>
<section>
    <div class="container">
    <div style="height:80px" class="title">纯CSS3瀑布布局</div>
    <div style="height:260px"></div>
    <div style="height:65px"></div>
    <div style="height:120px"></div>
    <div style="height:145px"></div>
    <div style="height:90px"></div>
    <div style="height:145px"></div>
    <div style="height:160px"></div>
    <div style="height:65px"></div>
    <div style="height:230px"></div>
    <div style="height:140px"></div>
    <div style="height:85px"></div>
    <div style="height:20px"></div>
    <div style="height:145px"></div>
    <div style="height:50px"></div>
    <div style="height:65px"></div>
    <div style="height:230px"></div>
    <div style="height:140px"></div>
    <div style="height:85px"></div>
    <div style="height:20px"></div>
    <div style="height:145px"></div>
    <div style="height:50px"></div>
    <div style="height:145px"></div>
    <div style="height:160px"></div>
    <div style="height:240px"></div>
  </div>
</section>
</body>
</html>
効果:

3. 絶対位置決め
最良の解決策は、データコンテンツを追加するのに便利です。ウィンドウが変更され、列/データブロックの数が自動的に調整されます。
利点:
データコンテンツを追加するとウィンドウが変わり、列/データブロックの数が自動的に調整されるので便利です。
データ ブロックに画像が含まれている場合は、その高さを知る必要があります。
JS はデータ ブロックの位置を動的に計算します。ウィンドウが頻繁にズームされると、パフォーマンスが消費される可能性があります。
もの:
1) データ ブロックの配置 (コンテナー内の既存の要素を配置)、アルゴリズムの手順を以下に簡単に説明します。
設定(ブロック要素の幅を同じにする)
· 初期化中に、コンテナ内の既存のデータ ブロック要素に対して最初の計算が実行されます。これには、ユーザーが次の情報を提供する必要があります。 a、コンテナ要素 - ウィンドウの合計幅を取得します。 b、列幅 (ブロック要素の幅)。 c、列の最小数 ;
・表示列数の計算:ウィンドウの幅をブロックボックスの幅で割って切り捨て、ウォーターフォール表示の中心を設定します
・各列の高さを保存
· 列の数を取得した後、各データ ブロックを追加するときに開始高さがわかるように、各列の現在の高さを保存する必要があります。
· コンテナ内のすべてのデータ ブロックを順番に取得し、最初に現在の高さが最も小さい列を見つけます。次に、左は列のシリアル番号に基づいてデータ ブロックの左と上の値を決定します。列に列の幅を乗じた値、top は列の現在の値、最後に更新された列の高さにデータ ブロック要素の高さを加えたものです。この時点で要素の挿入は終了します。
・全ての要素を挿入したら、コンテナの高さを各列の最大高さ値に調整し、順次調整を終了します。
2) データの非同期ロード (2 つのステップを含む):
· ロードデータ、関数パラメータが渡され、より便利な制御のためにデータロード機能とロード停止(ロード時に停止)機能を提供できます。
以上がこの記事の全内容です。皆様の学習のお役に立てれば幸いです。


