


We have all used various rich text editors more or less. There is a very convenient function among them. Copy an image and paste it into the text box, and the image will be uploaded. So this is convenient How is the function implemented?
Principle Analysis
Extraction operation: copy=>paste=>upload
During this operation, all we need to do is: listen to the paste event => get the content in the clipboard => send a request to upload
In order to understand the following easily, you need to understand a few points first:
The test code and screenshots are as follows:
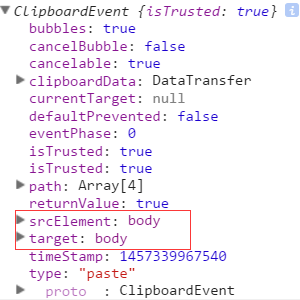
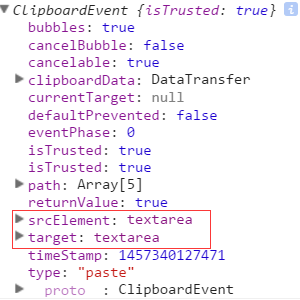
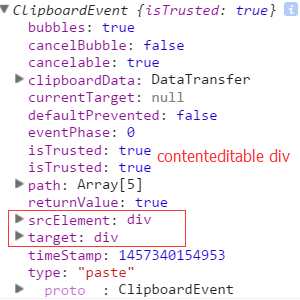
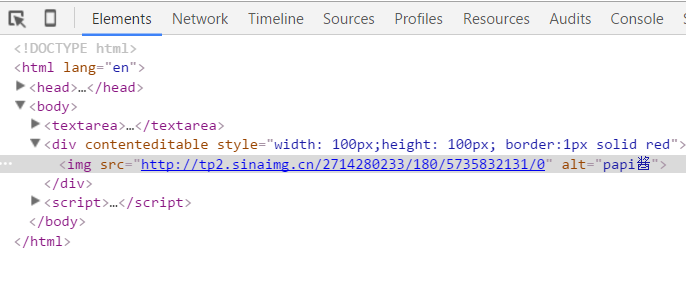
chrome:
<textarea ></textarea>
<div contenteditable style="width: 100px;height: 100px; border:1px solid">
</div>
<script>
document.addEventListener('paste', function (event) {
  console.log(event)
})
</script>
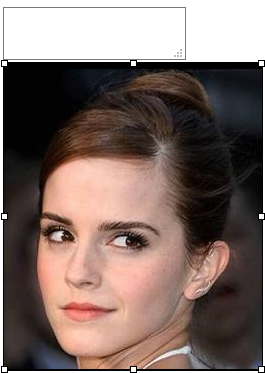
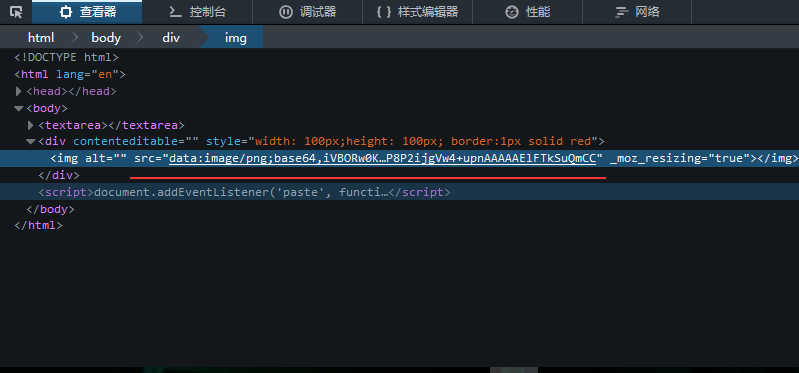
firefox:
ie11:(不截图了,可自行试验,其他浏览器同理<( ̄▽ ̄)/,因为懒...)
监听了paste事件,也知道了表现形式,接下来就是如何获取数据了:
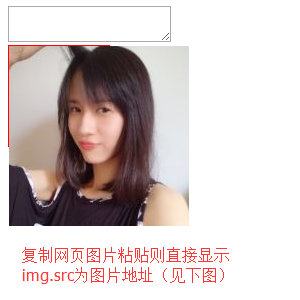
chrome有特定的方法,利用clipboardData.items、getAsFile()、new FileReader()等api可以在paste回调函数里获取到剪贴板里图片的base64编码字符串(无论是截图粘贴的还是网页图片复制粘贴的),ie11,firefox没有这样的api,不过依然有办法可以获取,因为数据已经表现在img的src里了,对于截图粘贴的,直接取img的src属性值(base64),对于网页粘贴的,则把地址传给后台,然后根据地址down下来,存在自己的服务器,最后把新地址返回来交给前端展示就ok了。为了保持一致性便于管理,统一将所有情况(截图、网页)中的img的src属性替换为自己存储的地址。因此可以得到以下核心代码(注释很全哦~~):
html展示:
<head>
<meta charset="UTF-8">
<title>Document</title>
<style>
body {
  display: -webkit-flex;
  display: flex;
  -webkit-justify-content: center;
  justify-content: center;
}
#tar_box {
  width: 500px;
  height: 500px;
  border: 1px solid red;
}
</style>
前端js处理逻辑:
document.addEventListener('paste', function (event) {
  console.log(event)
  var isChrome = false;
  if ( event.clipboardData || event.originalEvent ) {
    //not for ie11  某些chrome版本使用的是event.originalEvent
    var clipboardData = (event.clipboardData || event.originalEvent.clipboardData);
    if ( clipboardData.items ) {
      // for chrome
      var  items = clipboardData.items,
        len = items.length,
        blob = null;
      isChrome = true;
      //items.length比较有意思,初步判断是根据mime类型来的,即有几种mime类型,长度就是几(待验证)
      //如果粘贴纯文本,那么len=1,如果粘贴网页图片,len=2, items[0].type = 'text/plain', items[1].type = 'image/*'
      //如果使用截图工具粘贴图片,len=1, items[0].type = 'image/png'
      //如果粘贴纯文本+HTML,len=2, items[0].type = 'text/plain', items[1].type = 'text/html'
      // console.log('len:' + len);
      // console.log(items[0]);
      // console.log(items[1]);
      // console.log( 'items[0] kind:', items[0].kind );
      // console.log( 'items[0] MIME type:', items[0].type );
      // console.log( 'items[1] kind:', items[1].kind );
      // console.log( 'items[1] MIME type:', items[1].type );

      //阻止默认行为即不让剪贴板内容在div中显示出来
      event.preventDefault();

      //在items里找粘贴的image,据上面分析,需要循环
      for (var i = 0; i < len; i++) {
        if (items[i].type.indexOf("image") !== -1) {
          // console.log(items[i]);
          // console.log( typeof (items[i]));

          //getAsFile() 此方法只是living standard firefox ie11 并不支持
          blob = items[i].getAsFile();
        }
      }
      if ( blob !== null ) {
        var reader = new FileReader();
        reader.onload = function (event) {
          // event.target.result 即为图片的Base64编码字符串
          var base64_str = event.target.result
          //可以在这里写上传逻辑 直接将base64编码的字符串上传(可以尝试传入blob对象,看看后台程序能否解析)
          uploadImgFromPaste(base64_str, 'paste', isChrome);
        }
        reader.readAsDataURL(blob);
      }
    } else {
      //for firefox
      setTimeout(function () {
        //设置setTimeout的原因是为了保证图片先插入到div里,然后去获取值
        var imgList = document.querySelectorAll('#tar_box img'),
          len = imgList.length,
          src_str = '',
          i;
        for ( i = 0; i < len; i ++ ) {
          if ( imgList[i].className !== 'my_img' ) {
            //如果是截图那么src_str就是base64 如果是复制的其他网页图片那么src_str就是此图片在别人服务器的地址
            src_str = imgList[i].src;
          }
        }
        uploadImgFromPaste(src_str, 'paste', isChrome);
      }, 1);
    }
  } else {
    //for ie11
    setTimeout(function () {
      var imgList = document.querySelectorAll('#tar_box img'),
        len = imgList.length,
        src_str = '',
        i;
      for ( i = 0; i < len; i ++ ) {
        if ( imgList[i].className !== 'my_img' ) {
          src_str = imgList[i].src;
        }
      }
      uploadImgFromPaste(src_str, 'paste', isChrome);
    }, 1);
  }
})

function uploadImgFromPaste (file, type, isChrome) {
  var formData = new FormData();
  formData.append('image', file);
  formData.append('submission-type', type);

  var xhr = new XMLHttpRequest();
  xhr.open('POST', '/upload_image_by_paste');
  xhr.onload = function () {
    if ( xhr.readyState === 4 ) {
      if ( xhr.status === 200 ) {
        var data = JSON.parse( xhr.responseText ),
          tarBox = document.getElementById('tar_box');
        if ( isChrome ) {
          var img = document.createElement('img');
          img.className = 'my_img';
          img.src = data.store_path;
          tarBox.appendChild(img);
        } else {
          var imgList = document.querySelectorAll('#tar_box img'),
            len = imgList.length,
            i;
          for ( i = 0; i < len; i ++) {
            if ( imgList[i].className !== 'my_img' ) {
              imgList[i].className = 'my_img';
              imgList[i].src = data.store_path;
            }
          }
        }

      } else {
        console.log( xhr.statusText );
      }
    };
  };
  xhr.onerror = function (e) {
    console.log( xhr.statusText );
  }
  xhr.send(formData);
}
用express.js搭的简易后台的接收逻辑:
router.post('/', upload.array(), function (req, res, next) {
//1.获取客户端传来的src_str字符串=>判断是base64还是普通地址=>获取图片类型后缀(jpg/png etc)
//=>如果是base64替换掉"前缀"("data:image\/png;base64," etc)
//2.base64 转为 buffer对象 普通地址则先down下来
//3.写入硬盘(后续可以将地址存入数据库)
//4.返回picture地址
var src_str = req.body.image,
  timestamp = new Date().getTime();
if ( src_str.match(/^data:image\/png;base64,|^data:image\/jpg;base64,|^data:image\/jpg;base64,|^data:image\/bmp;base64,/) ) {
  //处理截图 src_str为base64字符串
  var pic_suffix = src_str.split(';',1)[0].split('/',2)[1],
    base64 = src_str.replace(/^data:image\/png;base64,|^data:image\/jpg;base64,|^data:image\/jpg;base64,|^data:image\/bmp;base64,/, ''),
    buf = new Buffer(base64, 'base64'),
    store_path = 'public/images/test_' + timestamp + '.' + pic_suffix;

  fs.writeFile(store_path, buf, function (err) {
    if (err) {
      throw err;
    } else {
      res.json({'store_path': store_path});
    }
  });
} else {// 处理非chrome的网页图片 src_str为图片地址
  var temp_array = src_str.split('.'),
    pic_suffix = temp_array[temp_array.length - 1],
    store_path = 'public/images/test_' + timestamp + '.' + pic_suffix,
    wstream = fs.createWriteStream(store_path);

  request(src_str).pipe(wstream);
  wstream.on('finish', function (err) {
    if( err ) {
      throw err;
    } else {
      res.json({"store_path": store_path});
    }
  });
}
});
需要node环境:安装node=>npm intall=>node app.js)
以上就是本文的全部内容,希望对大家的学习有所帮助。


![[Web front-end] Node.js quick start](https://img.php.cn/upload/course/000/000/067/662b5d34ba7c0227.png)


