Home > Web Front-end > JS Tutorial > body text

Create a dynamic gradient button with jQuery Detailed graphic tutorial_jquery

WBOY
Release: 2016-05-16 18:28:52
Original
1092 people have browsed it

本教程分为以下三步:

Step1 - Photoshop

Step2 - HTML/CSS

Step3 - JavaScript(jQuery)

Step4 - CSS修改


  最终结果如下:

Create a dynamic gradient button with jQuery Detailed graphic tutorial_jquery

Step1 - Photoshop

1. 新建文件

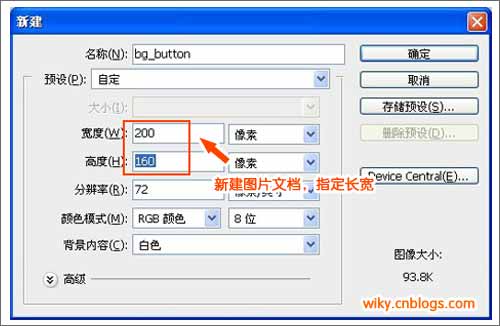
  按钮的尺寸是100px X 80px,但由于我们需要创建一个有两种状态的CSS sprite背景图,所以我们在Photoshop中创建(Ctrl+N)一个长宽为200px X 160px的图片文件,如下图:

Create a dynamic gradient button with jQuery Detailed graphic tutorial_jquery

2. 创建参考线

  为了使绘制按钮更容易,我们创建参考线,从标尺中拉出参考线,如果你找不到标尺,可以按Ctrl+R显示,如下图:

Create a dynamic gradient button with jQuery Detailed graphic tutorial_jquery

3. 绘制形状

  选择工具面板中的矩形工具,设置圆角半径为10px,在画布上绘制形状,如下图:

Create a dynamic gradient button with jQuery Detailed graphic tutorial_jquery

4. 设置形状样式

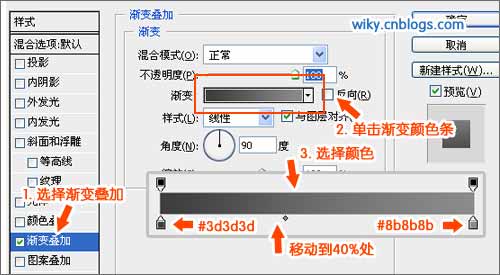
  接上图最后一步,双击层,打开图层样式窗口,设置形状的样式,首先选择渐变叠加,设置渐变颜色从#3d3d3d到#8b8b8b,如下图:

Create a dynamic gradient button with jQuery Detailed graphic tutorial_jquery

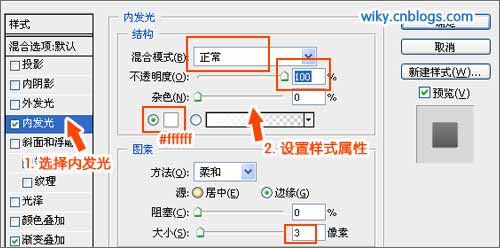
  然后,选择“内发光”,设置混合模式为“正常”,不透明度为100%,颜色设置为#ffffff,图素大小设置为3像素,如下图:

Create a dynamic gradient button with jQuery Detailed graphic tutorial_jquery

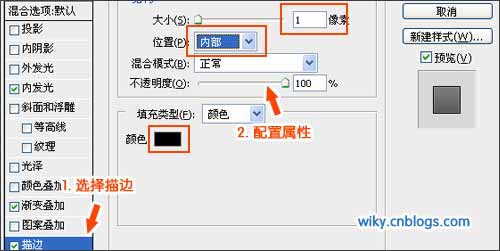
  之后,再选择“描边”,设置大小为1像素,位置为“内部”,颜色为黑色#000000,如下图:
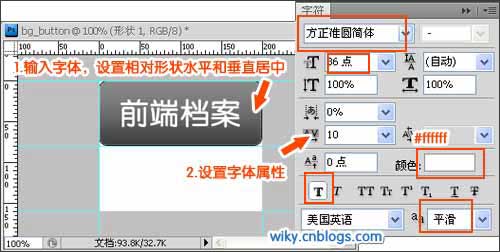
Create a dynamic gradient button with jQuery Detailed graphic tutorial_jquery

5. 添加字体

  输入文本,设置文字相对水平和垂直居中,字体为方正准圆简体,字号36点,加粗平滑,颜色为白色(#FFFFFF),如下图:

Create a dynamic gradient button with jQuery Detailed graphic tutorial_jquery

6. 设置字体样式

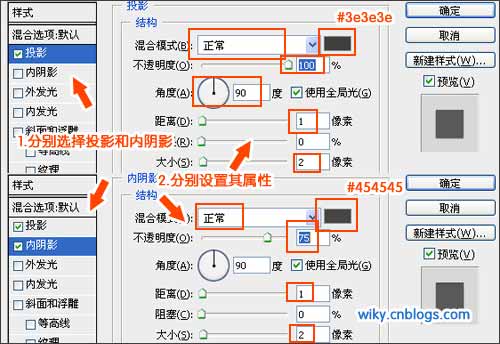
  同样的双击文字图层,打开文字图层样式,设置字体样式,点击“投影”,设置混合模式为“正常”,颜色为#3e3e3e,不透明度为100%,角度为90度,距离为1像素,大小为2像素;点击“内阴影”,设置混合模式为“正常”,颜色为#454545,不透明度为75%,角度为90度,距离为1像素,大小为2像素,如下图所示:

Create a dynamic gradient button with jQuery Detailed graphic tutorial_jquery

  至此,我们就完成链接状态下的按钮背景图,效果如下:
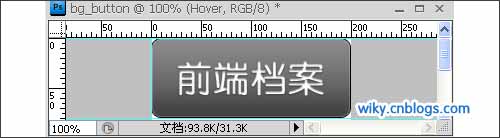
Create a dynamic gradient button with jQuery Detailed graphic tutorial_jquery

7. 悬停背景图

  制作鼠标悬停状态下的按钮背景图,把图层放入组内,复制组,移动,并重命名,如下图:

Create a dynamic gradient button with jQuery Detailed graphic tutorial_jquery

8.背景图属性

  修改hover背景图的样式属性,打开背景图的图层样式窗口,选择“描边”,修改边框颜色为#004d77;选择“渐变叠加”,修改渐变从#1671a3到#5baedc,如下图:
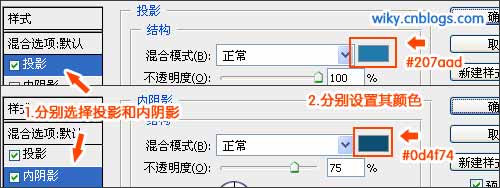
 

Create a dynamic gradient button with jQuery Detailed graphic tutorial_jquery

9. 设置字体样式

  打开字体图层样式,选择“投影”,修改投影颜色为#207aad;选择“内阴影”,修改字体颜色为#0d4f74,如下图:
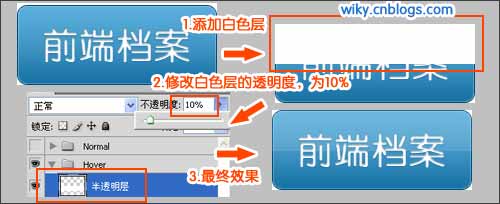
Create a dynamic gradient button with jQuery Detailed graphic tutorial_jquery

10. 图层半透明

  添加图层半透明效果,按以上步骤修改,鼠标悬停背景图如下,最后是再加上一层半透明层,先添加一个200px X 40px的白色层,置顶并设置白色层的透明度为10%,如下图:

Create a dynamic gradient button with jQuery Detailed graphic tutorial_jquery

  最后,我们完成的CSS sprite背景图如下,您也可以点击下载PSD文件。

Create a dynamic gradient button with jQuery Detailed graphic tutorial_jquery


Step2 - HTML/CSS
The HTML code of the button is very simple:
Front-end file
Then pass CSS Just set the background image. The CSS code is as follows:
Copy code The code is as follows:

/*Link button style*/
.button {
width:200px;
height:80px;
display:block;
background:url(bg_button.gif) top no-repeat;
text-indent:-9999px;
}
/*Button hover style*/
.button:hover{
background:url(bg_button.gif) bottom no-repeat;
}

According to the picture we designed earlier, the length and width of the button are 200px X 80px, and the background image is a black button. This piece of CSS can achieve the first effect in our example (Pure CSS effect).

Step3 - JavaScript/jQuery

Through JavaScript, we can make the button cooler. We need to add a element based on the previous one, as The background layer displayed when the mouse is hovering, then the HTML will be modified after the DOM is loaded:

view sourceprint?front end File

 The element is completely transparent before the mouse hovers over it. When the mouse passes over it, it gradually becomes opaque to achieve a gradient effect. The animation process is as follows:

Create a dynamic gradient button with jQuery Detailed graphic tutorial_jquery

Through the above analysis, we can write the jQuery code as follows. After the DOM is loaded, add a layer to the button link as the background image when the mouse passes over it, and add a mouse hover event to the element. , when the mouse passes over, it will gradually change to opaque, and when the mouse leaves, it will gradually change to fully transparent.

Copy code The code is as follows:

//Include the text into the element , and then appended to .button
$('.jsbutton,.viewbutton,.downloadbutton').wrapInner('').css('textIndent' ,'0').each(function () {
//First set the element to be fully transparent, then add the mouse hover event
$('span.hover').css('opacity ', 0).hover(function () {
$(this).stop().fadeTo(650, 1); //Fade to opaque
}, function () {
$(this ).stop().fadeTo(650, 0); //Fade to fully transparent
});
});

At this point, we have completed the JS code, and we still need Pay attention to one step, CSS modification, see Step 4.
Step4 - CSS modification
In the example of pure CSS effect, we use the :hover pseudo-class to switch the sprite image. When we use jQuery, we introduce a layer as the mouse passes over it. Background image, so the CSS needs to be modified as follows:
Copy code The code is as follows:

/* Previous button hover style*/
.button:hover{
background:url(bg_button.gif) bottom no-repeat;
}

modified to
Copy code The code is as follows:

/*There is no need to set the :hover style, but set span .hover style*/
.button span.hover {
/*Note to use absolute positioning*/
position: absolute;
display: block;
width:200px;
height:80px;
background:url(bg_button.gif) bottom no-repeat;
text-indent:-9999px;
}

Summary
Above us Implemented a dynamic gradient button in 4 steps. In the demonstration, I also provided an extended example. You can follow along to implement one yourself, or you can download the source code to modify and customize it. Of course, do you have any good suggestions or questions? , welcome to leave me a message.
Demo addresshttp://demo.jb51.net/js/gcb_download/gradual-change-button.html
Download addresshttp://demo.jb51.net/ js/gcb_download/gcb_download.rar
Related labels:
source:php.cn
Statement of this Website
The content of this article is voluntarily contributed by netizens, and the copyright belongs to the original author. This site does not assume corresponding legal responsibility. If you find any content suspected of plagiarism or infringement, please contact admin@php.cn
Popular Tutorials
More>
Latest Downloads
More>
Web Effects
Website Source Code
Website Materials
Front End Template
About us Disclaimer Sitemap
php.cn:Public welfare online PHP training,Help PHP learners grow quickly!