How to use the built-in virtual optical drive in Windows 10? Many users need to use a virtual optical drive in Windows 10 systems. Don't worry, it's very easy! In this article, PHP editor Yuzai will lead you step by step on how to find and use the built-in virtual optical drive in Windows 10. Read on to master the skills of using a virtual optical drive to make your file management easier and more efficient!
Where to find the virtual optical drive that comes with win10?
1. Open the directory where the image file is located through the resource manager that comes with Windows 10, and right-click the image file.

2. Select "Open with" and "Explorer" in the pop-up menu.

3. The resource manager will automatically load the image file to the virtual optical drive and open the virtual optical drive through the window.

At this time we can operate the files in the image through the window with the CD-ROM drive letter.
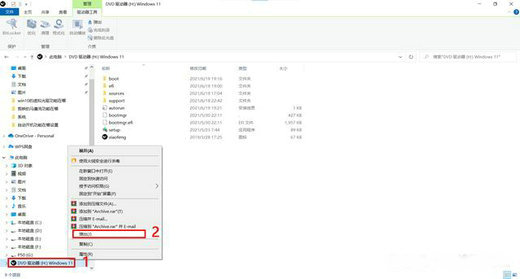
4. After the operation on the image file is completed, you need to "eject" the virtual optical drive. You can click the "Drive Tools" button in the toolbar at the top of the virtual optical drive window, and then select "Eject" to finish. Virtual optical drive.

You can also right-click the CD-ROM drive letter in the file tree on the left side of the window and select "Eject" in the pop-up menu.

The above is the detailed content of How to use the virtual optical drive that comes with win10 and where to analyze the virtual optical drive that comes with win10. For more information, please follow other related articles on the PHP Chinese website!


