Node.js http server
Node.js allows us to create servers and clients by using the low-level API of the HTTP module. When we first started learning node, we would all encounter the following code:
This code includes information about the http module, which means:
1. Request the HTTP module from the core of `Node.js` and assign it to a variable for use in future scripts.
The script then has access to methods for using `HTTP` through `Node.js`.
2. Use `createServer` to create a new web server object
3. The script passes an anonymous function to the server, telling the web server object what to happen whenever it receives a request
4. Line 4 of the script defines the port and host of the web server, which means you can use `http://127.0.0.1:3000`
to access the server
Http header
For every HTTP request and response, an HTTP header is sent. The HTTP header sends additional information, including the content type, the date the server sent the response, and the HTTP status code
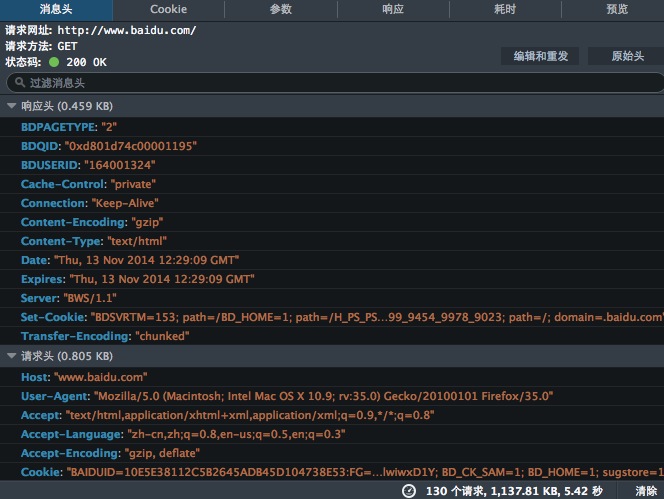
The http header contains a lot of information. The following is the http header information contained in my Baidu homepage:

Since I have added more websites to my Baidu homepage, the data here may be different from that of readers. From this we can see that Baidu’s web server is BWS/1.1
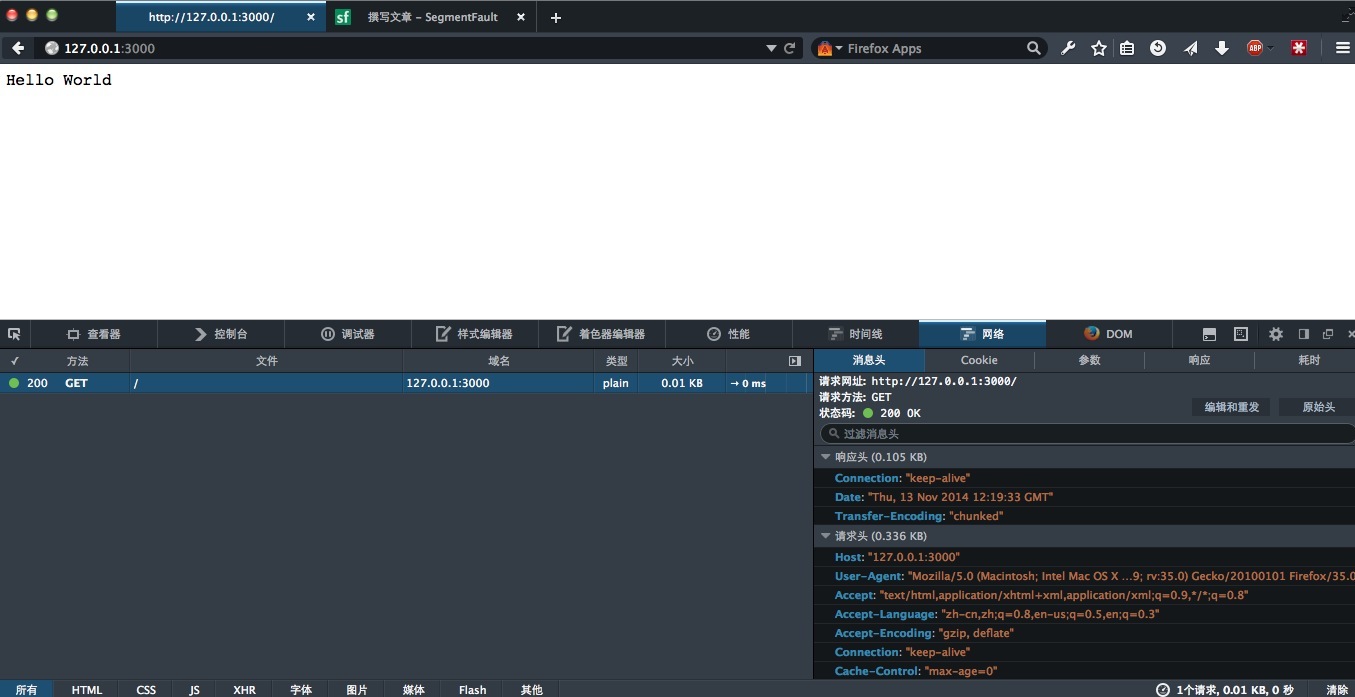
The following is the http header information of the above code:

Redirects in Node.js
In node, we can easily create a simple server to redirect visitors to another web page. The guidelines are as follows:
1. Send a 301 response code to the customer to tell the customer that the resource has been moved to another location;
2. Send a location header to tell the client where to redirect.
The relevant code is as follows:
Open the browser and visit http://127.0.0.1:3000The page will be redirected.
Respond to different requests
Node.js can not only create a single response, but for multiple types of requests, we need to add some routes to the application. Node makes this straightforward by using the URL module. The URL module allows us to read a URL, parse it and then do something with the output.
Now we can analyze the requested URL and extract content from it, for example, to get the hostname we can type:
At this time, he will return to "example.com"
To obtain the port number, you can enter:
Event Module
Node.js is considered the best way to achieve concurrency. The Events module is the core of Node.js and is used by many other modules to architect functionality around events. Since Node.js runs in a single thread, any synchronization code is blocking. Therefore, we need to consider some simple rules when writing Node.js code:
1. Don’t block - `Node.js` is single-threaded, if the code blocks everything else stops
2. Quick Return – Operations should return quickly. If it cannot return quickly, it should be moved to another process
The Events module allows developers to set up listeners and handlers for events. In client js, we can set a listener for the click event and then do something when the event occurs:
Of course, this is an example without considering IE compatibility. Node.js key events are more commonly network events, including:
1. Response from web server
2. Read data from file
3. Return data from the database
To use the Events module we first need to create a new EventEmitter instance:
Once you add the above content to the code, you can add events and listeners. We can send events as follows, such as:
The first parameter is a string describing the event so that it can be used for listener matching
In order to receive messages, you must add a listener, which handles the event when it is triggered, for example:
The Events module implements basic event listening mode methods such as addListener/on, once, removeListener, removeAllListeners, and emit. It is not the same as the events on the front-end DOM tree, because it does not have event behaviors belonging to the DOM such as bubbling and layer-by-layer capture, and there are no methods to handle event delivery such as preventDefault(), stopPropagation(), stopImmediatePropagation(), etc.
1. Class: events.EventEmitter: Obtain the EventEmitter class through require('events').EventEmitter.
2.emitter.on(event, listener): Add a listener to the end of the listener array for a specific event. Return emitter to facilitate chain calls, the same below.
3.emitter.removeListener(event, listener) removes a listener from the listener array of an event
4.emitter.listeners(event) returns the listener array of the specified event
For more details, see: Node.js API documentation
The following code shows a confidential message that can self-destruct in 5 seconds:
secretMessage.on('message', function (data) {
console.log(data);
});
secretMessage.on('self destruct', function () {
console.log('the msg is destroyed!');
});
secretMessage.emit('message','this is a secret message.It will self destruct in 5s');
setTimeout(function () {
secretMessage.emit('self destruct');
},5000);
In this script, two events are sent and there are two listeners. When the script is run, message events occur and are handled by the "message" handler
EventEmitter is used everywhere in Node.js, so it is important to master it. Node.js obtains data through I/O operations and extensively uses the Events module to support asynchronous programming
FAQ:
Q: Is there a limit to the maximum number of listeners for an event?
Answer: By default, if an event has 10 listeners operating on it, it will issue a warning. However, this number can be changed using emitter.setMaxListener(n)
Q: Is it possible to listen to all sent events?
Answer: No. We need to create listeners for each event we want to respond to


