


Regarding HTML editors, I have tried FCKeditor, the upgraded version of CKeditor, and TinyMCE. Recently, I am trying to use Baidu’s UEditor. In comparison, I still feel that the configuration of UEditor is relatively simple, it is quick to get started and the documentation and examples are complete. So here we take UEditor1.2.3.0PHP version UTF-8 version as an example to sort out the usage process of UEditor.
1. First is the document structure of UEditor
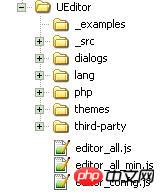
## _examples: Example pages of various versions of the editor
_src: JS file
##dialogs: Pop-up dialog box corresponding Resources and JS fileslang: Language pack file
PHP: File upload processing, remote image capture, online image management, screen Screenshot related files
themes: style images and style files
third-party: third-party plug-ins
editor_all.js: a packaged file of all files in the _src directory
editor_all_min.js: a compressed version of the editor_all.js file, which can be used only during formal deployment
editor_config.js: Editor configuration file
2. System configuration
UEditor's configuration can be divided into two types: system default configuration and user-defined configuration.The system default configuration is scattered in each corresponding core or plug-in file and is invisible to users. Works when user comments out custom configuration.User-defined configurations include two types, one is located in the editor_config.js file, with a higher priority than the system default configuration; the other is located in the parameters passed in when instantiating the editor, with a higher priority Highest.By default, UEditor comments out all configuration items that can be omitted in editor_congfig.js, and adopts the system default configuration. If the comment is uncommented, the configuration item shall prevail; uncommented configuration items require users to follow the actual project conditions. fill in.
The following is a simple configuration defined by myself:
4.创建编辑器实例及其DOM容器
5.设置选项并且渲染编辑器
如果需要有不同设置的ueditor,可以分别定义之后设置不同的自定义选项再渲染编辑器,
6.前后台数据交互
对于PHP可以直接用$_POST['ueditorName']获取编辑器的值,其中ueditorName的值为初始化编辑器时ueditor的name值。
以下为完整的渲染2个ueditor的代码
UEditor
【相关推荐】
2.html开发手册
The above is the detailed content of An easy-to-use HTML editor (UEditor) tutorial. For more information, please follow other related articles on the PHP Chinese website!


![[Web front-end] Node.js quick start](https://img.php.cn/upload/course/000/000/067/662b5d34ba7c0227.png)


