vue元件傳值的五種方法:1、父元件向子元件進行傳值;2、子元件傳送值給父元件;3、相鄰兄弟元件間進行傳參;4、遠兄弟組件間進行傳參;5、EventBus傳參。

本教學操作環境:windows7系統、vue2.9.6版,DELL G3電腦。
父元件傳送值給子元件:
子元件傳送值給父元件:
相鄰兄弟元件間進行傳參(親兄弟)
一、父子傳參
原理:父控制子,透過子元件的props屬性,拋出子元件自訂標籤屬性,來接收父元件的操作狀態
範例:父級裡的一個按鈕,控制子元件裡的一個p的顯示隱藏<!DOCTYPE html>
<html>
<head>
<meta charset="UTF-8">
<title>Document</title>
</head>
<style>
.div{
width:200px;
height:200px;
background:pink;
}
</style>
<body>
<!-- 这里的app范围就是 子组件son 的父级 -->
<div id="app">
<button @click='change'>父按钮</button>
<hr>
<!-- ********** 自定义标签属性test,接收父级的state ************-->
<son :test='state'></son>
</div>
<template id="tp1">
<div>
<!-- ************ 调用自定义属性test **************-->
<div v-show='test'>我是子组件的div</div>
</div>
</template>
<script src="../vue/vue.js"></script>
<script>
// 局部定义 子组件son
new Vue({
el:"#app",
data:{
state:true
},
methods:{
change(){
this.state = !this.state;
}
},
components:{
son:{
template:"#tp1",
//*********** 抛出自定义标签属性 ***************
props:['test']
}
}
})
</script>
</body>
</html>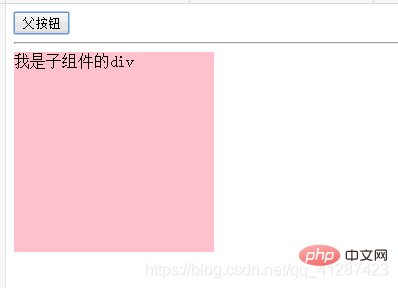 效果:
效果:
二、子父傳參
原則:子控制父,子元件綁定自訂事件,來處理父元件的方法函數,透過.$emit('自訂事件',[參數])來觸發屬於自己的自訂事件
範例:子元件裡一個按鈕,控制父元件裡的一個p的顯示隱藏<!DOCTYPE html>
<html>
<head>
<meta charset="UTF-8">
<title>Document</title>
</head>
<style>
.div{
width:200px;
height:200px;
background:pink;
}
</style>
<body>
<div id="app">
<c1></c1>
</div>
<!-- 父组件c1 子组件c2 子组件自定义事件test-->
<template id="c1">
<div>
<div v-show='state'>father显示/隐藏</div>
<hr>
<!--************ 子组件c2自定义事件,执行父组件c1的方法函数change_f ***************** -->
<c2 @test='change_f'></c2>
</div>
</template>
<template id="c2">
<div>
<button @click='change_son'>子按钮</button>
</div>
</template>
<!-- 引入Vue.js框架文档,可在官方文档下载-->
<script src='../vue/vue.js'></script>
<script>
//全局定义
// 实例化 父组件c1
Vue.component("c1",{
template:"#c1",
data(){
return {
state:true
}
},
methods:{
change_f(){
this.state = !this.state;
}
}
})
// 实例化 子组件c2
Vue.component("c2",{
template:"#c2",
methods:{
change_son(){
// ************ 在子组件方法里,触发子组件自定义事件 ******************
this.$emit("test")
}
}
})
//实例化一个Vue对象
new Vue({
el:"#app"
})
</script>
</body>
</html> 效果:三、相鄰兄弟傳參(親兄弟)原理:透過一個公有的父元素作為橋接(實例元件),結合父子props 傳參、子父自訂事件範例:c1、c2是兄弟關係c1可用控制c2裡元素的顯示隱藏
<!DOCTYPE html>
<html>
<head>
<meta charset="UTF-8">
<title>Document</title>
</head>
<style>
.div{
width:200px;
height:200px;
background:pink;
}
</style>
<body>
<div id="app">
父级状态
<p>{{state}}</p>
<hr>
<c1 @test_c1='change_f'></c1>
<hr>
<c2 :test_c2='state'></c2>
</div>
<template id="c1">
<div>这里是c1组件
<button @click='change_c1'>c1按钮</button>
</div>
</template>
<template id="c2">
<div>这里是c2组件,状态:{{test_c2}}
<div v-show='test_c2'>我是c2中的div</div>
</div>
</template>
<script src='../vue/vue.js'></script>
<script>
Vue.component("c2",{
template:"#c2",
props:['test_c2']
})
Vue.component("c1",{
template:"#c1",
methods:{
change_c1(){
this.$emit("test_c1")
}
}
})
new Vue({
el:"#app",
data:{
state:true
},
methods:{
change_f(){
this.state = !this.state;
}
}
})
</script>
</body>
</html>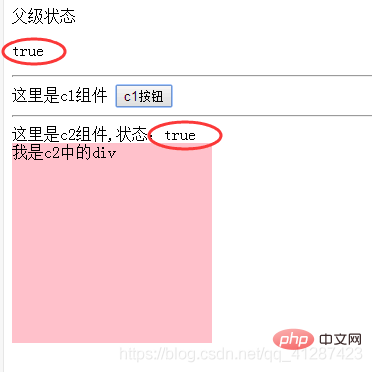 效果:
效果:
四、遠兄弟傳參(表兄弟)
原則:透過建立一個中間實例,註冊一個事件,在被控組件中,透過事件攜帶要執行的函數,在主控制元件中,透過事件,改變對應的動作
#
<!DOCTYPE html>
<html>
<head>
<meta charset="UTF-8">
<title>Document</title>
</head>
<body>
<div id="app">
<father></father>
</div>
<template id="father">
<div>
这是父组件
<hr>
<son1></son1>
<hr>
<son2></son2>
</div>
</template>
<template id="son1">
<div>
{{name}}
<button @click='click_son1'>触发angle中间事件</button>
</div>
</template>
<template id="son2">
<div>
{{name}}
</div>
</template>
<script src='../vue/vue.js'></script>
<script>
//********** 创建一个angle实例,作为中间变量(全局) **************
let angel = new Vue();
new Vue({
el:"#app",
components:{
father:{
template:"#father",
components:{
son1:{
template:"#son1",
data(){
return {
name:"我是son1"
}
},
methods:{
click_son1(){
// *************** 通过angel注册的test事件,修改son2中name的值 ************
angel.$emit('test','哈哈!修改成功!')
}
}
},
son2:{
template:"#son2",
data(){
return {
name:"我是son2"
}
},
methods:{
change(val){
this.name = val;
}
},
//生命周期,自动执行,组件准备ok就可用
mounted(){
// *************** 通过angel注册的test事件,将son1的修改方法传过去 ************
angel.$on('test',this.change)
}
}
}
}
}
})
</script>
</body>
</html>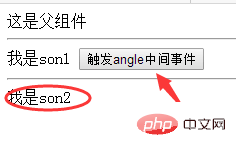 #點擊前:
#點擊前:
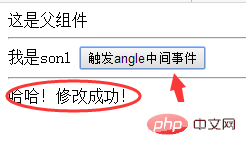 點選後:
點選後:
#五、EventBus傳參
1.在main.js種掛載全域EventBusVue.prototype.$EventBus = new Vue()
<template>
<div class="wrap">
<div>我是组件A</div>
<button @click="sendMsg">发送</button>
</div>
</template>
<script>
export default {
name: "A",
methods:{
sendMsg(){
this.$EventBus.$emit('sendMsg',"这是组件A发送的消息!")
}
}
}
</script><template>
<div>
<div>我是组件B</div>
</div>
</template>
<script>
export default {
name: "B",
mounted(){
this.$EventBus.$on('sendMsg',(msg)=>{
console.log(msg);//这是组件A发送的消息!
})
},
}
</script>以上是vue元件傳值有哪五種方法的詳細內容。更多資訊請關注PHP中文網其他相關文章!
