這篇文章帶給大家的內容是關於如何使用CSS和Vanilla.js實現一組tooltip提示框(附源碼),有一定的參考價值,有需要的朋友可以參考一下,希望對你有所幫助。
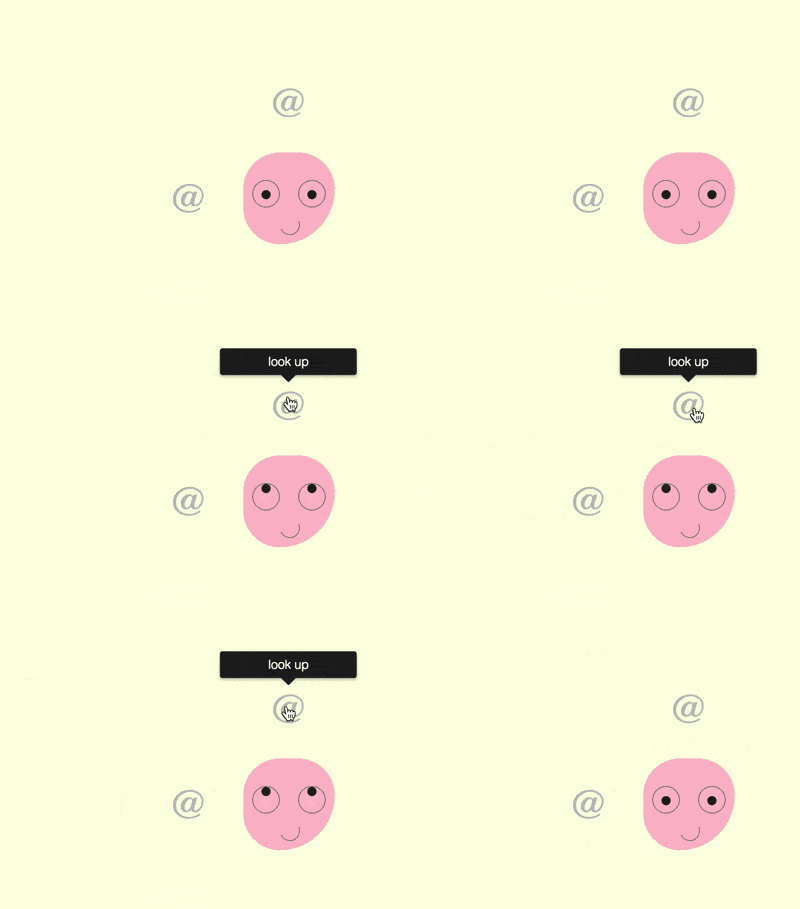
https://github.com/comehope/front- end-daily-challenges
定義dom,容器中包含一個名為.emoji 的子容器,代表一個頭像,它的子元素eye left、eye right、mouth 分別代表左眼、右眼和嘴巴:
<section>
    <div>
        <span></span>
        <span></span>
        <span></span>
    </div>
</section>
居中顯示:
body {
    margin: 0;
    height: 100vh;
    display: flex;
    align-items: center;
    justify-content: center;
    background-color: lightyellow;
}定義容器尺寸和子元素對齊方式:
.container {
    position: relative;
    width: 20em;
    height: 20em;
    font-size: 10px;
    display: flex;
    align-items: center;
    justify-content: center;
}定義頭像的輪廓:
.emoji {
    position: relative;
    box-sizing: border-box;
    width: 10em;
    height: 10em;
    background-color: pink;
    border-radius: 50% 50% 75% 50%;
}定義頭像眼睛的輪廓:
.emoji .eye {
    position: absolute;
    box-sizing: border-box;
    width: 3em;
    height: 3em;
    border: 0.1em solid gray;
    border-radius: 50%;
    top: 3em;
}

.emoji .eye.left {
    left: 1em;
}

.emoji .eye.right {
    right: 1em;
}畫出眼珠:
.emoji .eye.left::before,
.emoji .eye.right::before {
    content: '';
    position: absolute;
    width: 1em;
    height: 1em;
    background-color: #222;
    border-radius: 50%;
    top: 1em;
    left: calc((100% - 1em) / 2);
}畫出微笑的嘴:
.emoji .mouth {
    position: absolute;
    width: 2em;
    height: 2em;
    border: 0.1em solid;
    bottom: 1em;
    left: 40%;
    border-radius: 50%;
    border-color: transparent gray gray transparent;
    transform: rotate(20deg);
}接下來製作眼珠轉向4 個方向的效果。
以2 個變數分別表示眼珠的定位位置:
.emoji .eye {
    --top: 1em;
    --left: calc((100% - 1em) / 2);
}

.emoji .eye.left::before,
.emoji .eye.right::before {
    top: var(--top);
    left: var(--left);
}設定眼珠在4 個方向的定位位置:
.emoji.top .eye {
    --top: 0;
}

.emoji.bottom .eye {
    --top: 1.8em;
}

.emoji.left .eye {
    --left: 0;
}

.emoji.right .eye {
    --left: 1.8em;
}此時,若為dom 元素.emoji 增加top、bottom、left、right 4 個樣式中的任何一個樣式,眼珠就會轉向特定的方向。
在dom 中增加4 個元素,每個元素的內容是一個@ 字元:
<section>
    <div>
        <!-- 略 -->
    </div>

    <span>@</span>
    <span>@</span>
    <span>@</span>
    <span>@</span>
</section>
把4 個元素佈局在頭像周圍:
.tip {
    position: absolute;
    cursor: pointer;
    font-size: 4.5em;
    color: silver;
    font-family: sans-serif;
    font-weight: 100;
}

.tip.top {
    top: -15%;
}

.tip.bottom {
    bottom: -15%;
}

.tip.left {
    left: -15%;
}

.tip.right {
    right: -15%;
}寫一段腳本,增加一點互動效果。當滑鼠懸停在 4 個方向的 @ 上時,使眼珠朝相應的方向轉去。這裡的DIRECTION 常數儲存了4 個方向,EVENTS 常數儲存了2 個滑鼠事件,$ 常數包裝了根據類別名稱取得dom 元素的操作:
const DIRECTIONS = ['top', 'bottom', 'left', 'right']
const EVENTS = ['mouseover', 'mouseout']
const $ = (className) => document.getElementsByClassName(className)[0]

DIRECTIONS.forEach(direction =>
    EVENTS.forEach((e) =>
        $(`tip ${direction}`).addEventListener(e, () =>
            $('emoji').classList.toggle(direction)
        )
    )
)為眼珠設定緩動時間,使動畫平滑:
.emoji .eye.left::before,
.emoji .eye.right::before {
    transition: 0.3s;
}接下來製作tooltip 提示框。
為4 個@ 符號的dom 增加data-tip 屬性,其內容就是tooltip 訊息:
<section>
    <div>
        <!-- 略 -->
    </div>

    <span>@</span>
    <span>@</span>
    <span>@</span>
    <span>@</span>
</section>
用::before 偽元素展示提示訊息,樣式為黑底白字:
.tip::before {
    content: attr(data-tip);
    position: absolute;
    font-size: 0.3em;
    font-family: sans-serif;
    width: 10em;
    text-align: center;
    background-color: #222;
    color: white;
    padding: 0.5em;
    border-radius: 0.2em;
    box-shadow: 0 0.1em 0.3em rgba(0, 0, 0, 0.3);
}把頂部的提示框定位到頂部@ 符號的上方正中:
.tip.top::before {
    top: 0;
    left: 50%;
    transform: translate(-50%, calc(-100% - 0.6em));
}類似地,把其他3 個提示框也定位到@ 符號的旁邊:
.tip.bottom::before {
    bottom: 0;
    left: 50%;
    transform: translate(-50%, calc(100% + 0.6em));
}

.tip.left::before {
    left: 0;
    top: 50%;
    transform: translate(calc(-100% - 0.6em), -50%);
}

.tip.right::before {
    right: 0;
    top: 50%;
    transform: translate(calc(100% + 0.6em), -50%);
}用::after 偽元素在頂部提示框下面畫出一個倒三角形:
.tip::after {
    content: '';
    position: absolute;
    font-size: 0.3em;
    width: 0;
    height: 0;
    color: #222;
    border: 0.6em solid transparent;
}

.tip.top::after {
    border-bottom-width: 0;
    border-top-color: currentColor;
    top: -0.6em;
    left: 50%;
    transform: translate(-50%, 0);
}類似地,在其他3 個提示框旁邊畫出三角形:
.tip.bottom::after {
    border-top-width: 0;
    border-bottom-color: currentColor;
    bottom: -0.6em;
    left: 50%;
    transform: translate(-50%, 0);
}

.tip.left::after {
    border-right-width: 0;
    border-left-color: currentColor;
    left: -0.6em;
    top: 50%;
    transform: translate(0, -50%);
}

.tip.right::after {
    border-left-width: 0;
    border-right-color: currentColor;
    right: -0.6em;
    top: 50%;
    transform: translate(0, -50%);
}最後,隱藏提示框,使提示框只在滑鼠懸停時出現:
.tip::before,
.tip::after {
    visibility: hidden;
    filter: opacity(0);
    transition: 0.3s;
}

.tip:hover::before,
.tip:hover::after {
    visibility: visible;
    filter: opacity(1);
}以上是如何使用CSS和Vanilla.js實作一組tooltip提示框(附源碼)的詳細內容。更多資訊請關注PHP中文網其他相關文章!
