

本篇文章主要介紹了透過HttpClient 呼叫ASP.NET Web API範例,小編覺得挺不錯的,現在分享給大家,也給大家做個參考。一起跟著小編過來看看吧
在前面兩篇文章中我們介紹了ASP.NET Web API的基本知識和原理,並且透過簡單的實例了解了它的基本(CRUD)操作。我們是透過JQuery和Ajax對Web API進行資料操作。這篇我們來介紹一下使用HttpClient的方式來對Web API進行資料操作。
這裡我們還是繼續使用對Product的操作實例來示範它的基本應用。
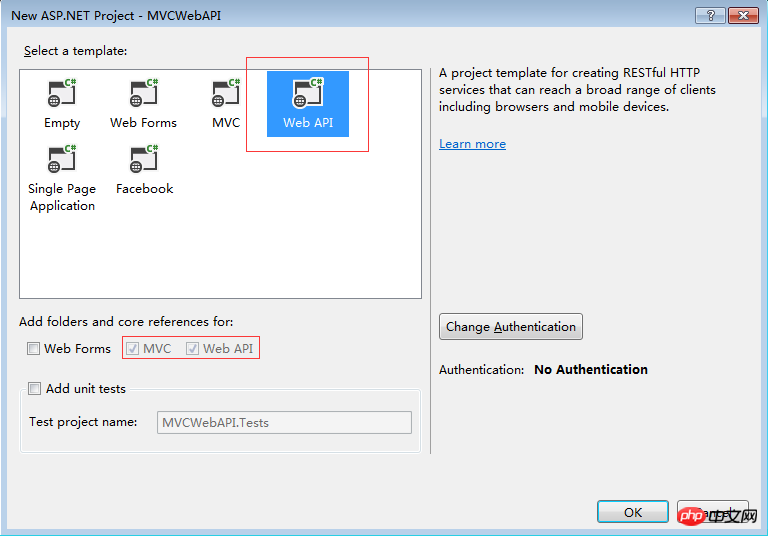
建立ASP.NET Web API應用程式
在VS中選擇建立一個ASP.NET Web Application應用程序,在精靈的下一個視窗中選擇Web API模板。
建立Model
#這裡我們在Models資料夾下建立一個簡單的Product model類,用來傳遞資料。
在Models資料夾上點選右鍵,選擇Add -> Class
public class Product { public int ProductID { get; set; } public string ProductName { get; set; } public decimal Price { get; set; } public int Count { get; set; } public string Description { get; set; } }
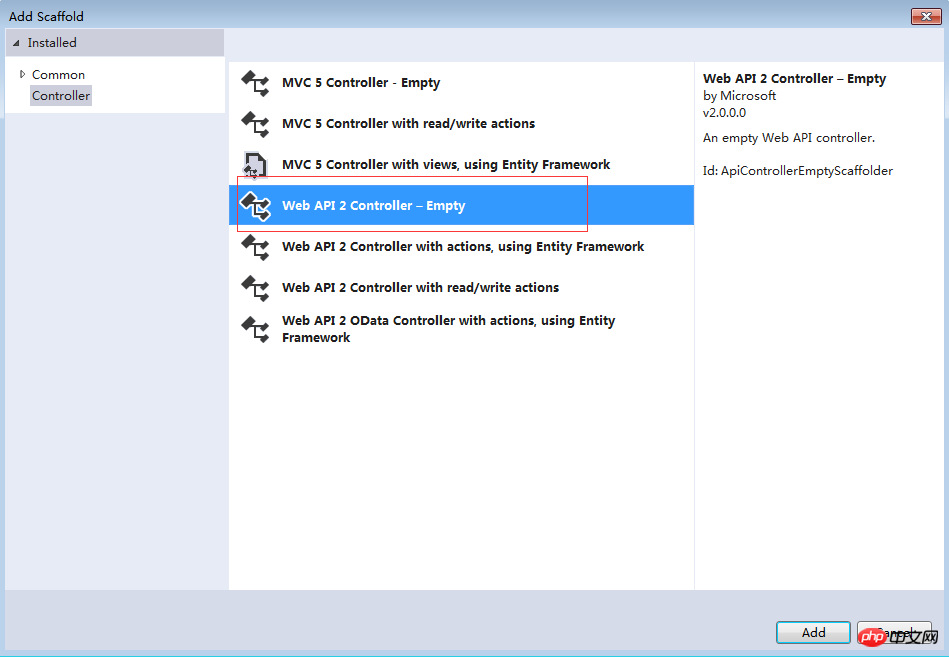
建立Cotroller
接著在Controllers資料夾下建立一個API Controller, 命名為"ProductsController"。
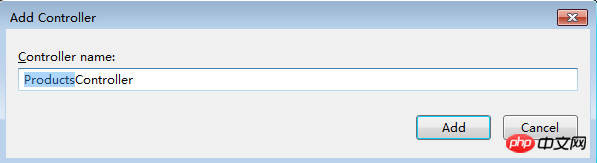
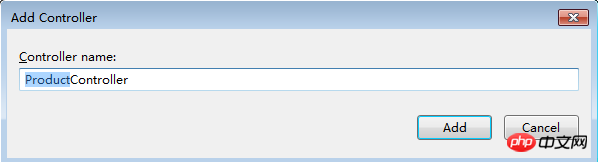
在Controllers資料夾上點選右鍵,選擇Add -> Controller ,在彈出精靈中選擇Web API 2 Controller - Empty
在精靈下一步輸入API Controller name為"ProductsController"。
因為我們需要透過HttpClient的方式來呼叫Web API,所以這裡我們還需要建立一個MVC Controller。
同樣在Controllers資料夾上點選右鍵,選擇Add -> Controller ,在彈出精靈中選擇MVC 5 Controller - Empty
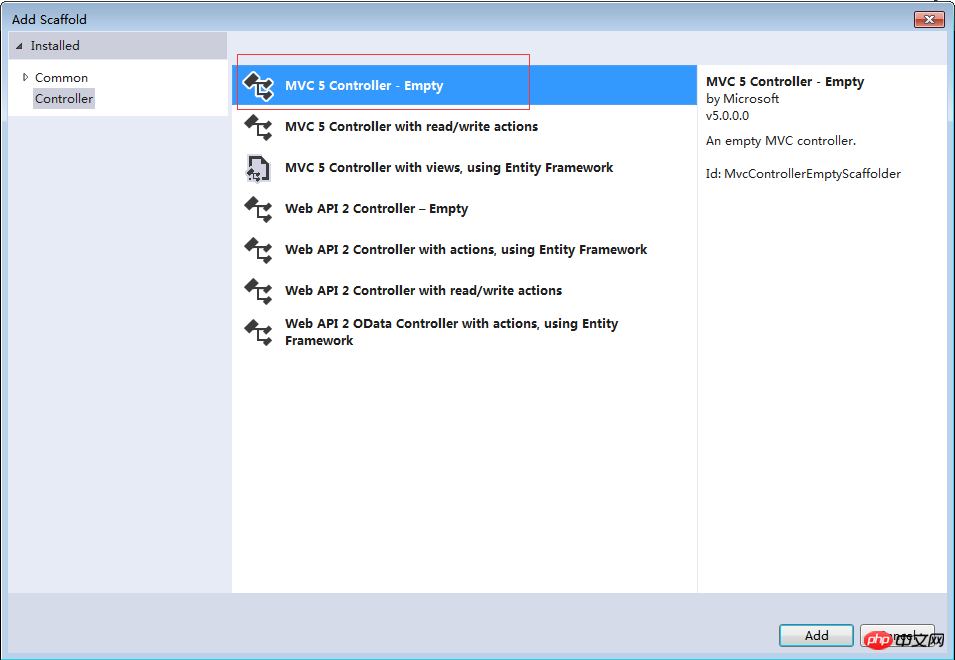
在精靈下一步輸入MVC 5 Controller name為"ProductController"。
建立Web API方法(CRUD)
#這裡我們依然使用模擬的資料建立簡單的CRUD Web API方法。前面的章節有詳細講到,這裡就不細說了。直接上代碼。
public class ProductsController : ApiController { // Mock product list public static List productList = initProductMockDataList(); private static List initProductMockDataList() { return new List() { new Product {ProductID=1,ProductName="Product A",Price=1000000,Count=5,Description="Description A"}, new Product {ProductID=2,ProductName="Product B",Price=200000,Count=2,Description="Description B"}, new Product {ProductID=3,ProductName="Product C",Price=500000,Count=8,Description="Description C"}, new Product {ProductID=4,ProductName="Product D",Price=80000,Count=10,Description="Description D"}, new Product {ProductID=5,ProductName="Product E",Price=300000,Count=3,Description="Description E"} }; } public IEnumerable Get() { return productList; } public Product Get(int id) { return productList.Where(p => p.ProductID == id).FirstOrDefault(); } public void Post([FromBody]Product product) { var lastProduct = productList.OrderByDescending(p => p.ProductID).FirstOrDefault(); int newProductID = lastProduct.ProductID + 1; product.ProductID = newProductID; productList.Add(product); } public void Put([FromBody]Product product) { var currentProduct = productList.Where(p => p.ProductID == product.ProductID).FirstOrDefault(); if (currentProduct != null) { foreach (var item in productList) { if (item.ProductID.Equals(currentProduct.ProductID)) { item.ProductName = product.ProductName; item.Price = product.Price; item.Count = product.Count; item.Description = product.Description; } } } } public void Delete(int id) { Product product = productList.Where(p => p.ProductID == id).FirstOrDefault(); productList.Remove(product); } }
透過JQuery和Ajax呼叫MVC Controller,在MVC Controller中透過HttpClient呼叫Web API
Web API中的(CRUD)方法建立完成,接下來我們就分別來看看各個方法的資料操作。
1.取得Product清單
打開我們建立好的MVC 5 Controller檔案ProductController。使用HttpClient的方式來呼叫我們Web API中的列表方法。
首先需要引入System.Net.Http
using System.Net.Http;
接下來為我們的Web API位址定義一個公共靜態變數。
public static readonly Uri _baseAddress = new Uri("http://localhost:21853/"); // // GET: /Product/ public ActionResult Index() { return View(); } public JsonResult GetProductList() { List productList = null; Uri address = new Uri(_baseAddress, "/api/products"); using (var httpClient = new HttpClient()) { var response = httpClient.GetAsync(address).Result; if (response.IsSuccessStatusCode) productList = response.Content.ReadAsAsync>().Result; } return Json(productList, JsonRequestBehavior.AllowGet); }
這裡我們需要透過點擊按鈕,透過Ajax呼叫來取得Product列表數據,所以這裡我們使用JsonResult回傳數據。
接下來,我們就來建立View。
資料夾Views->Product下建立一個View,名為"Index"。打開Index View,修改頁面程式碼如下:
@{ Layout = null; }     Index
   Get Product List
接著,我們要做的是,當點擊Get Product List按鈕是載入Product List,程式碼實作如下:
$('#btnGetProductList').click(function () { $.ajax({ url: '/Product/GetProductList', type: 'GET', dataType: 'json' }).success(function (result) { DisplayProductList(result); }).error(function (data) { alert(data); }); }); // Display product list function DisplayProductList(result) { var productTable = $("好了,運行代碼。
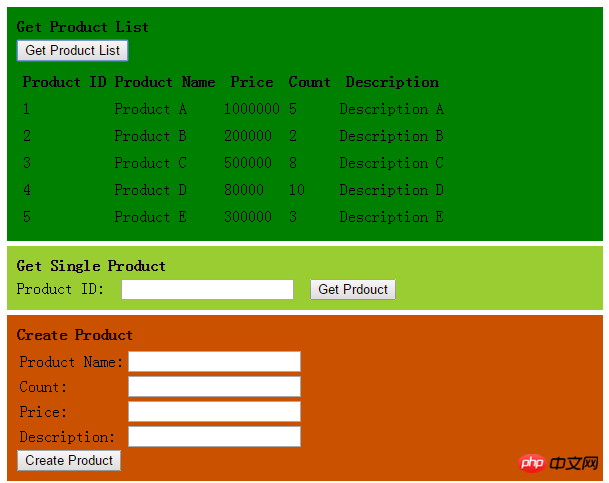
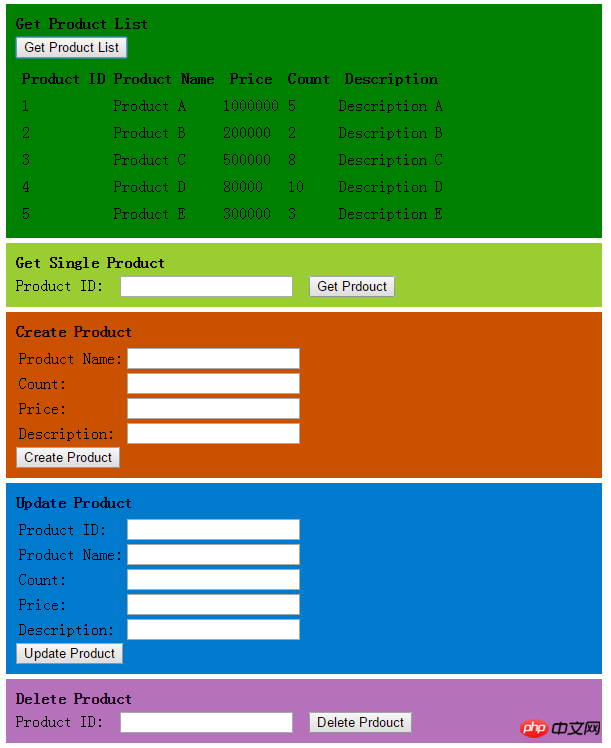
點擊Get Product List按鈕之前如下:

#點擊Get Product List按鈕之後如下:
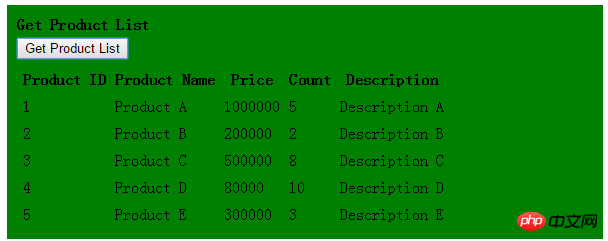
Product資料列表載入成功。
2.取得單一Product資料
這裡我們的做法是在搜尋框裡輸入Product ID,然後點選Get Product按鈕,找出這條Product資訊。
首先,我們先完成在ProductController中使用HttpClient呼叫Web API中取得單一Product資料的方法。
public JsonResult GetSingleProduct(int id) { Uri address = new Uri(_baseAddress, "/api/products/" + id); Product product = null; using (var httpClient = new HttpClient()) { var response = httpClient.GetAsync(address).Result; if (response.IsSuccessStatusCode) product = response.Content.ReadAsAsync().Result; } return Json(product, JsonRequestBehavior.AllowGet); }
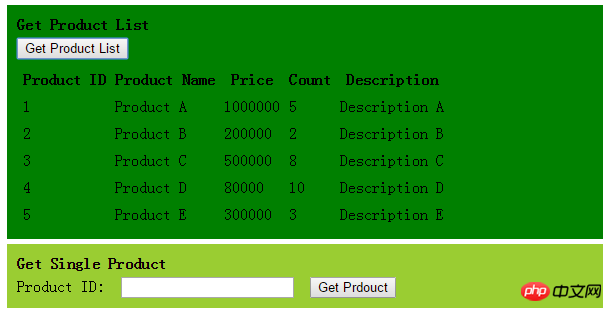
接著,來到Index View頁面中新增一個搜尋Product ID的textbox以及一個Get Product的按鈕。
Get Single Product
Product ID:
為按鈕Get Product按鈕新增Ajax方法
$('#btnGetProduct').click(function () { if ($('#txtSearchProductID').val().trim() != "") { $.ajax({ url: '/Product/GetSingleProduct?id=' + $('#txtSearchProductID').val(), type: 'GET', dataType: 'json' }).success(function (result) { if (result != null) { $('#product').html("Product ID: " + result.ProductID + "
" + "Product Name: " + result.ProductName + "
" + "Count: " + result.Count + "
" + "Price: " + result.Price + "
" + "Description: " + result.Description); } else { $('#product').html(''); } }).error(function (data) { alert(data); }); } });
執行程序,載入Product清單。
點擊Get Product按鈕前:
#這裡我們找Product ID為1的資料
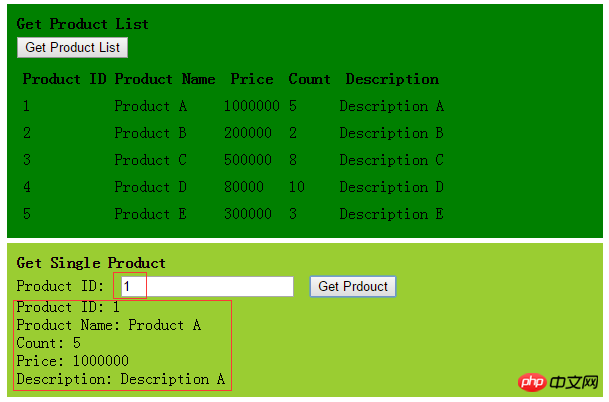
我們看到Product ID為1的資料成功取得。
3.新增一Product
這裡我們建立4個textbox,用來輸入Product Name,Count,Price,Description的資訊以及一個Create Product按鈕。
首先,我们先完成在ProductController中使用HttpClient调用Web API中新增一条Product数据的方法。
public JsonResult CreateProduct(Product product) { bool createSuccess = true; Uri address = new Uri(_baseAddress, "/api/products"); using(var httpClient=new HttpClient()) { var response = httpClient.PostAsJsonAsync(address, product).Result; if (!response.IsSuccessStatusCode) createSuccess = false; } return Json(createSuccess, JsonRequestBehavior.AllowGet); }
接着,来到Index View页面中添加4个textbox用来输入Product Name,Count,Price,Description的信息以及一个Create Product按钮。
Create Product
| Product Name: | |
| Count: | |
| Price: | |
| Description: |
为按钮Create Produc按钮t添加Ajax方法
$('#btnCreateProduct').click(function () { if ($('#txtCreateProductName').val().trim() != "" && $('#txtCreateCount').val().trim() != "" && $('#txtCreatePrice').val().trim() != "" && $('#txtCreateDescription').val().trim() != "") { var product = { ProductID: 0, ProductName: $('#txtCreateProductName').val(), Count: $('#txtCreateCount').val(), Price: $('#txtCreatePrice').val(), Description: $('#txtCreateDescription').val() }; $.ajax({ url: '/Product/CreateProduct', type: 'GET', data: product, dataType: 'json' }).success(function (result) { if (result != null && result) { $('#createMessage').html('Product create success.'); $("#btnGetProductList").trigger('click'); } }).error(function (data) { alert(data); }) } });
运行程序,加载Product列表。
点击Create Product按钮之前:
输入新增数据,点击Create Product按钮之后:
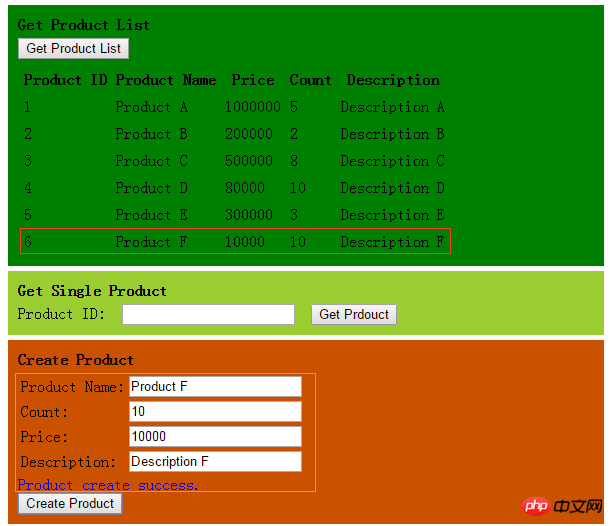
我们看到新增数据成功并显示到了Product列表中。
4.修改Product信息
这里我们创建5个textbox,用来输入Product ID,Product Name,Count,Price,Description的信息以及一个Update Product按钮。
首先,我们先完成在ProductController中使用HttpClient调用Web API中修改一条Product数据的方法。
public JsonResult UpdateProduct(Product product) { bool updateSuccess = true; Uri address = new Uri(_baseAddress, "/api/products"); using (var httpClient = new HttpClient()) { var response = httpClient.PutAsync(address, product, new JsonMediaTypeFormatter()).Result; if (!response.IsSuccessStatusCode) updateSuccess = false; } return Json(updateSuccess, JsonRequestBehavior.AllowGet); }
接着,来到Index View页面中添加5个textbox用来输入Product ID,Product Name,Count,Price,Description的信息以及一个Update Product按钮。
Update Product
| Product ID: | |
| Product Name: | |
| Count: | |
| Price: | |
| Description: |
为按钮Update Product按钮添加Ajax方法
$('#btnUpdateProduct').click(function () { if ($('#txtUpdateProductID').val().trim() != "" && $('#txtUpdateProductName').val().trim() != "" && $('#txtUpdateCount').val().trim() != "" && $('#txtUpdatePrice').val().trim() != null && $('#txtUpdateDescription').val().trim() != "") { var product = { ProductID: $('#txtUpdateProductID').val(), ProductName: $('#txtUpdateProductName').val(), Count: $('#txtUpdateCount').val(), Price: $('#txtUpdatePrice').val(), Description: $('#txtUpdateDescription').val() }; $.ajax({ url: '/Product/UpdateProduct', type: 'GET', data: product, dataType: 'json' }).success(function (result) { if (result != null && result) { $('#updateMessage').html('Product update success.'); $('#btnGetProductList').trigger('click'); } }).error(function (data) { alert(data); }) } });
运行代码,加载Product列表。
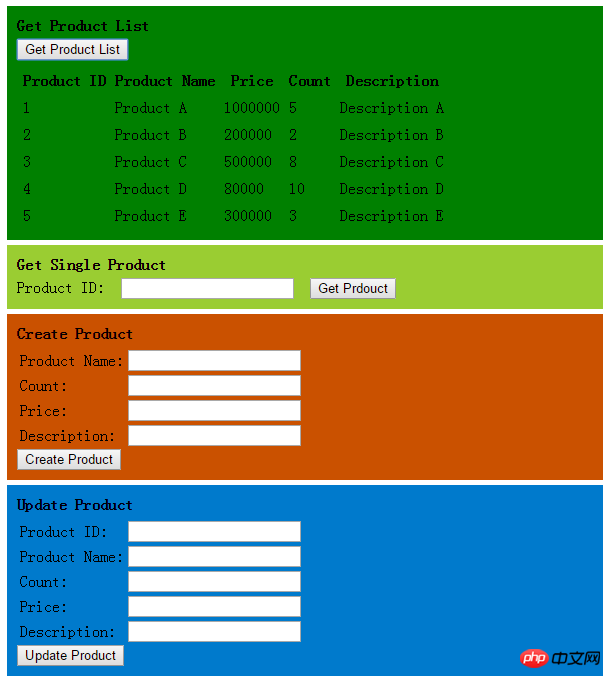
点击Update Create按钮之前:
这里我们修改第一条数据,输入修改信息,点击Update Product按钮之后:
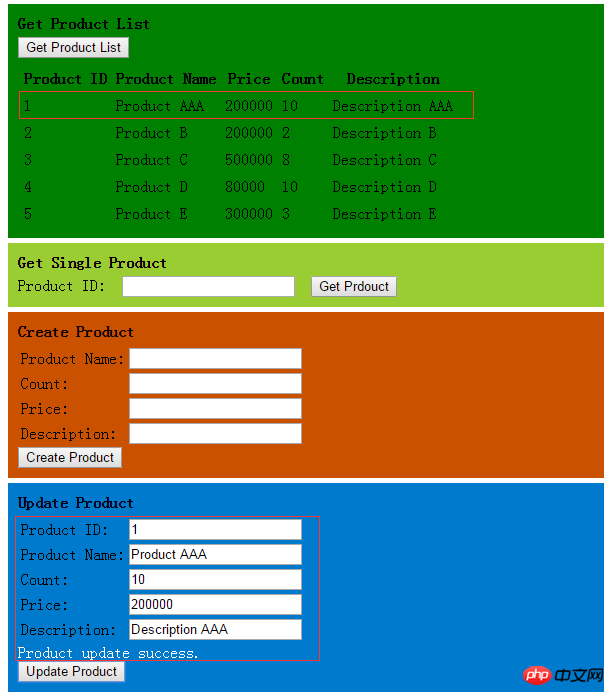
我们看到Product ID为1的信息成功修改并显示到了Product列表中。
5.删除Product
这里我们创建1个textbox,用来输入Product ID的信息以及一个Delete Product按钮。
首先,我们先完成在ProductController中使用HttpClient调用Web API中删除一条Product数据的方法。
public JsonResult DeleteProduct(int id) { bool deleteSuccess = true; Uri address = new Uri(_baseAddress, "/api/products/" + id); using (var httpClient = new HttpClient()) { var response = httpClient.DeleteAsync(address).Result; if (!response.IsSuccessStatusCode) deleteSuccess = false; } return Json(deleteSuccess, JsonRequestBehavior.AllowGet); }
接着,来到Index View页面中添加1个textbox用来输入Product ID的信息以及一个Delete Product按钮。
Delete Product
Product ID:
为按钮Delete Product按钮添加Ajax方法
$('#btnDeleteProduct').click(function () { if ($('#txtDeleteProductID').val().trim() != "") { $.ajax({ url: '/Product/DeleteProduct?id=' + $('#txtDeleteProductID').val(), type: 'GET', dataType: 'json' }).success(function (result) { if (result != null && result) { $('#deleteMessage').html('Product delete success.'); $('#btnGetProductList').trigger('click'); } }).error(function (data) { alert(data); }) } });
运行代码,加载Product列表。
点击Delete Product按钮之前。
这里我们输入Product ID为1的数据,点击Delete Product按钮之后:
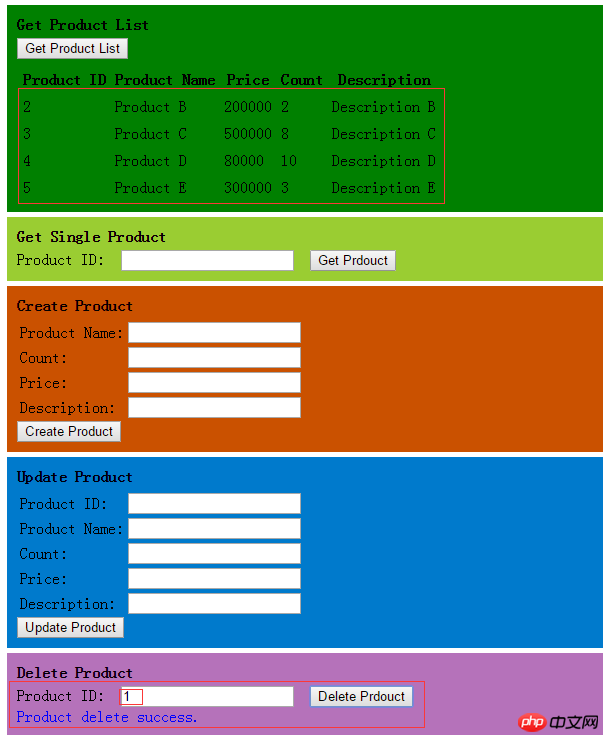
我们看到Product ID为1的数据成功删除,并且Product列表中也没有了这条数据。
以上是HttpClient呼叫ASP.NET Web API的圖文詳解的詳細內容。更多資訊請關注PHP中文網其他相關文章!


