


使用 GitHub Actions 自動化建置、測試和部署流程

該專案是一個快速範例項目,演示了應用程式在推送到主分支時自動建置、測試和部署到暫存環境的過程。
為了充分示範 CI/CD 管道,我們將使用最少的程式碼建立一個簡單的 Python 項目,然後將其整合到 GitHub Actions 中。
創建一個簡單的 Python 項目
就像我之前所說的,我們將創建一個將在管道中使用的簡單項目。我選擇在 python 中執行此操作沒有特殊原因,您可以使用您選擇的任何其他程式語言,這個專案的主要目的是演示管道。
建立專案資料夾
所以繼續建立專案資料夾並導航到該資料夾:
mkdir automated-testing
cd automated-testing
撰寫申請文件
現在我們將編寫簡單的Python應用程式。在專案資料夾中建立一個新檔案app.py。
touch app.py
將以下程式碼區塊加入檔案:
def hello():
  return "Hello, World!"

if __name__ == "__main__":
  print(hello())
這是一個非常簡單的 Python「Hello world」函數,作為可以在 CI 管道中測試的基本功能的範例。
def hello() 定義了一個名為 hello 的函數,它不帶任何參數。呼叫此函數時,它會傳回字串「Hello, World!」。
if __name__ == "__main__" 是一個標準的 Python 構造,用於確保某些程式碼僅在直接執行檔案時運行(而不是作為模組導入時)。它充當腳本的入口點。
直接執行 app.py 時(例如,透過執行 python app.py),腳本將呼叫 hello() 函數並列印結果,即「Hello, World!」。
建立需求文件。
典型的專案會有依賴項,在 python 專案中,它們通常在requirements.txt 檔案中定義。
建立新檔案requirements.txt
touch requirements.txt
將其新增至檔案:
pytest
建立單元測試
現在我們將新增一個基本測試檔test_app.py來測試app.py中的功能。將以下內容新增至文件:
from app import hello

def test_hello():
  assert hello() == "Hello, World!"
現在我們已準備好建立管道。
為 CI/CD 設定 GitHub 操作
要設定 GitHub 操作,我們需要在儲存庫中建立一個 .github/workflows 資料夾,這是我們向 GitHub 通知儲存庫中的 CI/CD 管道的方式。
建立一個新檔案:
mkdir -p .github/workflows
您可以在一個儲存庫中擁有多個管道,因此請在 .github/workflows 資料夾中建立一個檔案 proj.yml。我們將在這裡定義建置、測試和部署 Python 專案的步驟。
將以下程式碼加入您的檔案:
name: Build, Test and Deploy

# Trigger the workflow on pushes to the main branch
on:
  push:
    branches:
      - main

jobs:
  build-and-test:
    runs-on: ubuntu-latest

    steps:
    # Checkout the code from the repository
    - name: Checkout repo
      uses: actions/checkout@v4

    # Set up Python environment
    - name: Setup Python
      uses: actions/setup-python@v5
      with:
        python-version: '3.x'

    # Install dependencies
    - name: Install Dependecies
      run: |
        python -m pip install --upgrade pip
        pip install -r requirements.txt

    # Build (this project deosn't require a build but we will simulate a build by creating a file)
    - name: Build Project
      run: |
        mkdir -p build
        # Simulate build output by creating a file
        touch build/output_file.txt

    # Run tests using pytest
    - name: Run tests
      run:
        pytest

    # Upload the build output as an artifact (we created a file in the build step to simulate an artifact)
    - name: Upload build artifact
      uses: actions/upload-artifact@v4
      with:
        name: build-artifact
        path: build/

  deploy:
    runs-on: ubuntu-latest
    needs: build-and-test
    if: success()

    steps:
    # Download the artifact from the build stage
    - name: Download build artifact
      uses: actions/download-artifact@v4
      with:
        name: build-artifact
        path: build/

    - name: Simulate Deployment
      run: |
        echo "Deploying to staging..."
        ls build/
Breakdown of the CI/CD Pipeline Steps
- Trigger on Push to main: The pipeline is triggered whenever there is a push to the main branch.
- Checkout Code: This step uses GitHub’s checkout action to pull our code from the repository.
- Set Up Python: The pipeline sets up a Python environment on the CI runner (GitHub's virtual machine), ensuring that the correct Python version is used.
- Install Dependencies: It installs the required dependencies for our Python project (pytest in this case). This dependency was just added as an example of when a project has dependencies as this particular sample python application does not require any.
- Build: This stage was also just added for demonstration purposes, supposing this was a JavaScript/Node.js project this is where we would run the npm run build command and this will create an artifact we can upload and use in the deploy stage. Since this is a python project and it doesn't really require a build, we will create a file and folder in this stage. The file will serve as our artifact for the deploy stage.
- Run Tests: It runs the tests using pytest to validate the code.
- Upload Build Artifact: After running the tests, the build-and-test stage creates and saves a build artifact (in this case, a simulated output_file.txt in the build folder from the build step). The action upload-artifact is used to store this artifact. You can replace this with whatever actual build output your project creates.
- Deploy Stage: Our application will only be deployed if the test was successful which is why I have added the conditionals needs and if. Using “needs” we can require that the deploy job won’t even run unless the test job is successful. The download-artifact action retrieves the build artifact and the last step "Simulate Deployment" simulates deployment by printing a message and lists the artifact. If this was a live project we would have the actual deployment commands to deploy to a real staging environment here. You can replace the echo and ls commands with actual deployment commands (e.g., deploying to a cloud platform). This approach ensures that the output from the build-and-test stage is properly passed to the deploy stage, simulating how a real deployment would work with build artifacts.
Push to GitHub
If you haven't already, you need to initialize a git repository using the commands below:
git init
git add .
git commit -m "Create project as well as CI/CD pipeline"
Now we push to GitHub. Create a GitHub repository and push your code using the below commands:
git remote add origin <your-repo-url>
git push -u origin main
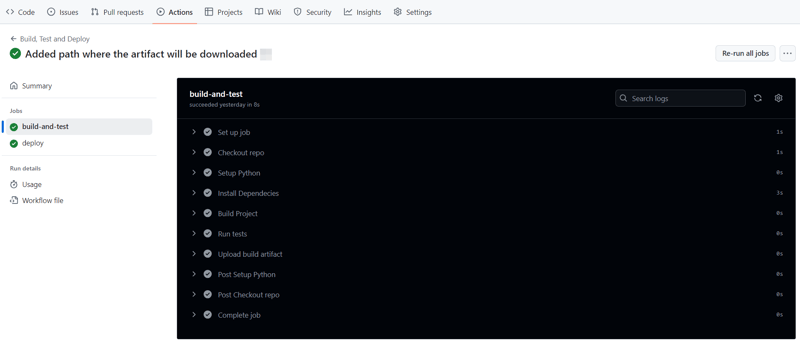
Verify the Pipeline
After pushing the code, you can visit the Actions tab in your GitHub repository. You should see the pipeline triggered, running the steps defined in your proj.yml file.
If everything is set up correctly, the pipeline will build, test, and simulate deployment. You can changes things around in your project and make new pushes to see the the pipeline works, create errors intentional so you can see how the pipeline works when the tests fail.
On a successful run this is how your Actions tab should look.
And that's it, this setup provides a working example of a CI/CD pipeline for a very basic Python project. If you found this helpful, please share with your connection and if you have any questions, do not hesitate to drop the question in the comments.
以上是使用 GitHub Actions 自動化建置、測試和部署流程的詳細內容。更多資訊請關注PHP中文網其他相關文章!

熱AI工具

Undress AI Tool
免費脫衣圖片

Undresser.AI Undress
人工智慧驅動的應用程序,用於創建逼真的裸體照片

AI Clothes Remover
用於從照片中去除衣服的線上人工智慧工具。

Clothoff.io
AI脫衣器

Video Face Swap
使用我們完全免費的人工智慧換臉工具,輕鬆在任何影片中換臉!

熱門文章
熱工具

記事本++7.3.1
好用且免費的程式碼編輯器

SublimeText3漢化版
中文版,非常好用

禪工作室 13.0.1
強大的PHP整合開發環境

Dreamweaver CS6
視覺化網頁開發工具

SublimeText3 Mac版
神級程式碼編輯軟體(SublimeText3)


 Python類可以有多個構造函數嗎?
Jul 15, 2025 am 02:54 AM
Python類可以有多個構造函數嗎?
Jul 15, 2025 am 02:54 AM
Yes,aPythonclasscanhavemultipleconstructorsthroughalternativetechniques.1.Usedefaultargumentsinthe__init__methodtoallowflexibleinitializationwithvaryingnumbersofparameters.2.Defineclassmethodsasalternativeconstructorsforclearerandscalableobjectcreati
 python for Loop範圍
Jul 14, 2025 am 02:47 AM
python for Loop範圍
Jul 14, 2025 am 02:47 AM
在Python中,使用for循環配合range()函數是控制循環次數的常見方式。 1.當明確知道循環次數或需按索引訪問元素時使用;2.range(stop)從0到stop-1,range(start,stop)從start到stop-1,range(start,stop,step)加入步長;3.注意range不包含結束值,且在Python3返回可迭代對象而非列表;4.可通過list(range())轉換為列表,倒序時用負步長。
 用於量子機學習的Python
Jul 21, 2025 am 02:48 AM
用於量子機學習的Python
Jul 21, 2025 am 02:48 AM
要入門量子機器學習(QML),首選工具是Python,需安裝PennyLane、Qiskit、TensorFlowQuantum或PyTorchQuantum等庫;接著通過運行示例熟悉流程,如使用PennyLane構建量子神經網絡;然後按照數據集準備、數據編碼、構建參數化量子線路、經典優化器訓練等步驟實現模型;實戰中應避免一開始就追求復雜模型,關注硬件限制,採用混合模型結構,並持續參考最新文獻和官方文檔以跟進發展。
 從Python中的Web API訪問數據
Jul 16, 2025 am 04:52 AM
從Python中的Web API訪問數據
Jul 16, 2025 am 04:52 AM
使用Python調用WebAPI獲取數據的關鍵在於掌握基本流程和常用工具。 1.使用requests發起HTTP請求是最直接的方式,通過get方法獲取響應並用json()解析數據;2.對於需要認證的API,可通過headers添加token或key;3.需檢查響應狀態碼,推薦使用response.raise_for_status()自動處理異常;4.面對分頁接口,可通過循環依次請求不同頁面並加入延時避免頻率限制;5.處理返回的JSON數據時需根據結構提取信息,複雜數據可用pandas轉換為Data
 python一行,如果還有
Jul 15, 2025 am 01:38 AM
python一行,如果還有
Jul 15, 2025 am 01:38 AM
Python的onelineifelse是三元操作符,寫法為xifconditionelsey,用於簡化簡單的條件判斷。它可用於變量賦值,如status="adult"ifage>=18else"minor";也可用於函數中直接返回結果,如defget_status(age):return"adult"ifage>=18else"minor";雖然支持嵌套使用,如result="A"i
 成品python大片在線觀看入口 python免費成品網站大全
Jul 23, 2025 pm 12:36 PM
成品python大片在線觀看入口 python免費成品網站大全
Jul 23, 2025 pm 12:36 PM
本文為您精選了多個頂級的Python“成品”項目網站與高水平“大片”級學習資源入口。無論您是想尋找開發靈感、觀摩學習大師級的源代碼,還是系統性地提昇實戰能力,這些平台都是不容錯過的寶庫,能幫助您快速成長為Python高手。
 python如果還有示例
Jul 15, 2025 am 02:55 AM
python如果還有示例
Jul 15, 2025 am 02:55 AM
寫Python的ifelse語句關鍵在於理解邏輯結構與細節。 1.基礎結構是if條件成立執行一段代碼,否則執行else部分,else可選;2.多條件判斷用elif實現,順序執行且一旦滿足即停止;3.嵌套if用於進一步細分判斷,建議不超過兩層;4.簡潔場景可用三元表達式替代簡單ifelse。注意縮進、條件順序及邏輯完整性,才能寫出清晰穩定的判斷代碼。
 python seaborn關節圖示例
Jul 26, 2025 am 08:11 AM
python seaborn關節圖示例
Jul 26, 2025 am 08:11 AM
使用Seaborn的jointplot可快速可視化兩個變量間的關係及各自分佈;2.基礎散點圖通過sns.jointplot(data=tips,x="total_bill",y="tip",kind="scatter")實現,中心為散點圖,上下和右側顯示直方圖;3.添加回歸線和密度信息可用kind="reg",並結合marginal_kws設置邊緣圖樣式;4.數據量大時推薦kind="hex",用
