


This article mainly introduces you to the relevant information about using WeChat applet to realize skin function, that is, to realize night mode. The article introduces it in detail through sample code, which has certain reference and learning value for everyone. Friends who need it Let’s take a look together below.
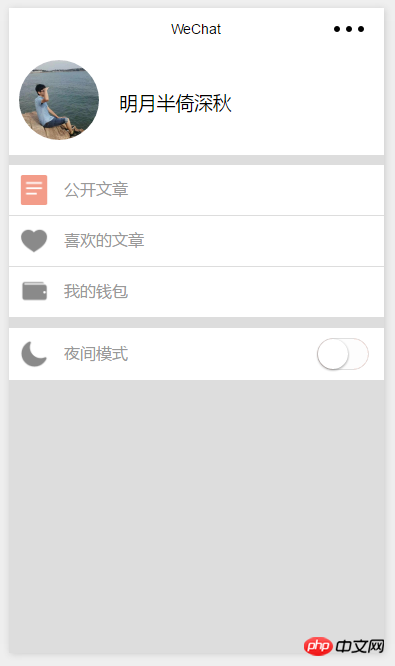
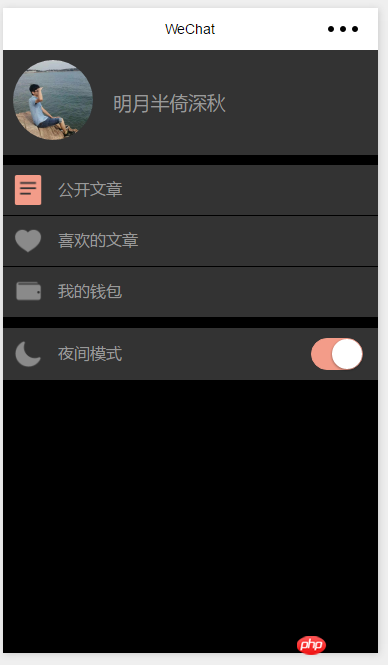
Old rule, show the renderings first
Page({
 data: {
 skinStyle: ""
 },
 onLoad: function (options) {
 },
 switchChange:function(e){
 var that =this
 var style
 //如果开启
 if(e.detail.value == true){
  style="dark"
 }else{
  //否则
  style.skin = ""
 }
 //保存信息
 that.setData({
  skinStyle: style
 })
 }
})/*夜间模式*/
/****个人信息页面****/
.dark-box{
background: #000 !important;
}
/*用户信息部分*/
.dark-box .user-box{
background: #333 !important;
color: #999;
}
/*列表部分*/
.dark-box .extra-box{
background: #333 !important;
}
.dark-box .extra-box .extra-item{
border-bottom: 1px solid #000 !important;
}
.dark-box .extra-box .item-head{
color: #999;
}
.dark-box .between-box{
background: #333 !important;
}
.dark-box .between-left{
background: #333 !important;
}
.dark-box .between-left .item-head{
color: #999;
}
/****个人信息页面结束****/This dark-box is the outermost and largest box (except the default page)
Now with this way of writing, we can change the skin style just by controlling the value of the variable skinStyle
We can also write a blue-box skin and then set the variable Just set skinStyle to blue
@import "../../skin/dark.wxss";
To set it to a global variable, just getApp() first and then pass it over
var app=getApp()
Page({
 data: {
 skinStyle: ""
 },
 onLoad: function (options) {
 },
 switchChange:function(e){
 var that =this
 //设置全局变量
 if(e.detail.value == true){
  app.globalData.skin="dark"
 }else{
  app.globalData.skin = ""
 }
 that.setData({
  skinStyle: app.globalData.skin
 })
 }
})I only wrote one page, so only this page will change
var app=getApp()
Page({
 data: {
 skinStyle: ""
 },
 onLoad: function (options) {

 },
 switchChange:function(e){
 var that =this

 //设置全局变量
 if(e.detail.value == true){
  app.globalData.skin="dark"
 }else{
  app.globalData.skin = ""
 }
 that.setData({
  skinStyle: app.globalData.skin
 })
 //保存到本地
 wx.setStorage({
  key: "skin",
  data: app.globalData.skin
 })
 }
})We need to get the skin settings when the program is opened
So we need to get the skin-related information in app.js
 getSkin:function(){
 var that =this
 wx.getStorage({
  key: 'skin',
  success: function (res) {
  that.globalData.skin=res.data
  }
 })
}Because we did not set it when the page was loaded
 onLoad: function (options) {
  var that =this
  that.setData({
  skinStyle: app.globalData.skin
  })
}Now let’s take a look
 The skin is OK
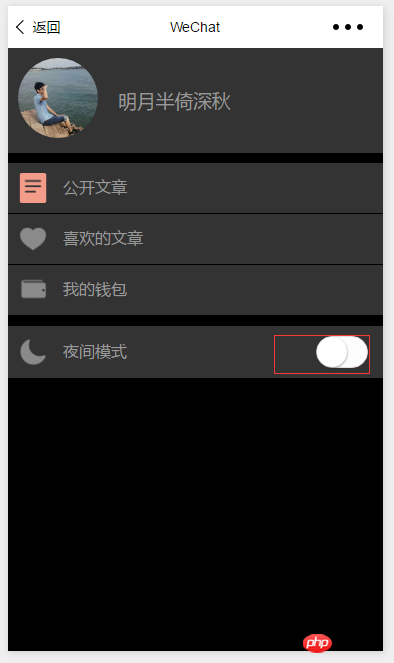
Because the switch has been reset
This is left to everyone to solve. Just make a judgment when starting up
Introduction to vidao’s video playback and barrage functions in WeChat Mini Program
WeChat Mini Program Develop a circular menu (imitation of the CCB circular menu)
The above is the detailed content of WeChat applet implements night mode for skin. For more information, please follow other related articles on the PHP Chinese website!


![[Web front-end] Node.js quick start](https://img.php.cn/upload/course/000/000/067/662b5d34ba7c0227.png)


