Course Intermediate 11331
Course Introduction:"Self-study IT Network Linux Load Balancing Video Tutorial" mainly implements Linux load balancing by performing script operations on web, lvs and Linux under nagin.

Course Advanced 17634
Course Introduction:"Shangxuetang MySQL Video Tutorial" introduces you to the process from installing to using the MySQL database, and introduces the specific operations of each link in detail.

Course Advanced 11348
Course Introduction:"Brothers Band Front-end Example Display Video Tutorial" introduces examples of HTML5 and CSS3 technologies to everyone, so that everyone can become more proficient in using HTML5 and CSS3.
Ways to fix issue 2003 (HY000): Unable to connect to MySQL server 'db_mysql:3306' (111)
2023-09-05 11:18:47 0 1 825
Experiment with sorting after query limit
2023-09-05 14:46:42 0 1 726
CSS Grid: Create new row when child content overflows column width
2023-09-05 15:18:28 0 1 615
PHP full text search functionality using AND, OR and NOT operators
2023-09-05 15:06:32 0 1 578
Shortest way to convert all PHP types to string
2023-09-05 15:34:44 0 1 1006

Course Introduction:1. The user double-clicks on the computer desktop to open the Firefox browser software, and enters the home page to click the three horizontal icons in the upper right corner. 2. In the drop-down tab that pops up, the user selects the setting option and enters the setting window. 3. In the settings window that opens, the user needs to switch the tab on the left to the Privacy and Security tab. 4. Then the relevant function options will be displayed on the right side of the page. The user can directly enter the permissions section. Click the exception button of the block pop-up window option 5. In the pop-up website window with page special permissions, the user enters the URL in the website address box and presses the Allow and Save Changes buttons in sequence to set up website trust.
2024-03-27 comment 0 1130

Course Introduction:1. How to connect to the Internet through the computer login interface? To connect to the network on the computer login interface, first ensure that the network connection is open and available. Then find the network connection icon in the lower left or right corner of the login interface and click to open the network connection menu. Select an available wireless network or wired network in the menu, and enter the network password or other login information in the pop-up dialog box. Click the Connect button and wait for the computer to automatically connect to the selected network. If the network requires additional authentication or setup, you may need to enter a username and password or other authentication information. After the connection is successful, make sure that the network status shows Connected, then you can log in smoothly on the login interface and access the Internet. 2. How to select an account on the HP computer login interface? Method: Open, click ----, enter
2024-08-23 comment 0 1033

Course Introduction:WinXP networking method: First step, open "Network Neighborhood", second step, click on the "View Network Connection" function on the left, third step, after entering, double-click to open "Local Area Connection", fourth step, click "Properties" button, in the fifth step, find "Internet Protocol (TCP/IP)", in the sixth step, select "Obtain an IP address automatically", and finally confirm. Detailed instructions for winxp networking steps: Recommended: Where to view winxp configuration 1. Find "Network Neighborhood" on the computer desktop and click on it. 2. In the "Network Neighborhood" dialog box that opens, select "View Network Connections" on the left and click. 3. In the pop-up window, the existing network situation appears. The wired network is currently used. Double-click "Local Area Connection". 4. In the pop-up “Local Connection
2024-02-15 comment 0 1950

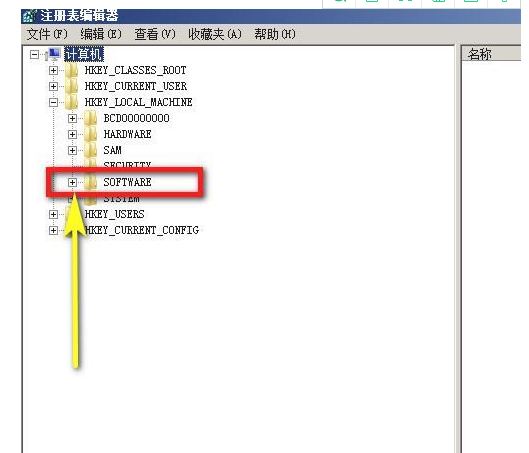
Course Introduction:As we all know, when our software is automatically installed, it is installed to the C drive by default, which takes up a lot of system disk space and causes the computer to run slower. Many users using the win11 system want to know how to set up automatic software installation. to the D drive, then this issue of the win11 tutorial will share specific solutions with the majority of users. Users in need are welcome to come to this site to view the complete steps. How to set up win11 software to automatically install to the D drive: 1. Click [Start] in the lower left corner of the computer; enter [regedit] in the pop-up edit box; the regedit program will pop up above; then click this program. 2. Open the registry editor interface. Find SOFTWARE here; click the + sign on the left side of it to hide
2024-02-10 comment 0 1394

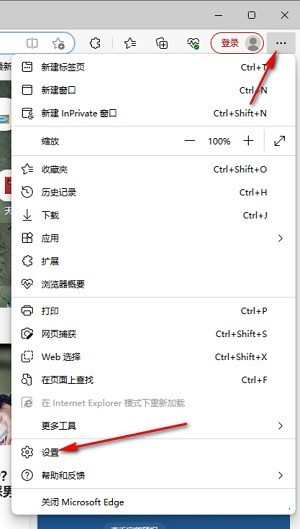
Course Introduction:1. Click to open the edge browser, left-click the three-dot icon in the upper right corner, and then select the [Settings] option to enter, as shown in the figure below. 2. After entering the page, click [Cookies and Website Permissions] in the left navigation bar to open it, as shown in the figure below. 3. Then, we slide the mouse wheel to the page on the right, find the [Pop-up windows and redirection] option and click to enter, as shown in the figure below. 4. After entering, we click the [Switch] button behind the [Block] function to turn it on, as shown in the figure below. 5. In addition, we can also click the [Add] button after [Block], and then add the URLs that do not allow pop-up windows to the box, then the URL-related information we add will not
2024-05-09 comment 0 607