Course Intermediate 11273
Course Introduction:"Self-study IT Network Linux Load Balancing Video Tutorial" mainly implements Linux load balancing by performing script operations on web, lvs and Linux under nagin.

Course Advanced 17598
Course Introduction:"Shangxuetang MySQL Video Tutorial" introduces you to the process from installing to using the MySQL database, and introduces the specific operations of each link in detail.

Course Advanced 11309
Course Introduction:"Brothers Band Front-end Example Display Video Tutorial" introduces examples of HTML5 and CSS3 technologies to everyone, so that everyone can become more proficient in using HTML5 and CSS3.
Ways to fix issue 2003 (HY000): Unable to connect to MySQL server 'db_mysql:3306' (111)
2023-09-05 11:18:47 0 1 773
Experiment with sorting after query limit
2023-09-05 14:46:42 0 1 703
CSS Grid: Create new row when child content overflows column width
2023-09-05 15:18:28 0 1 594
PHP full text search functionality using AND, OR and NOT operators
2023-09-05 15:06:32 0 1 552
Shortest way to convert all PHP types to string
2023-09-05 15:34:44 0 1 981

Course Introduction:HTML, CSS and jQuery: Tips for implementing image cropping effects Introduction: In modern web design, implementing image-related special effects is a very common requirement. Among them, the picture cropping effect is a very attractive effect that can add some dynamics and visual effects to the web page. This article will introduce the techniques of using HTML, CSS and jQuery to achieve image cropping effects, and provide specific code examples. 1. Understand the Canvas tag of HTML5: Before implementing image cropping effects, we first need
2023-10-27 comment 0 990
Course Introduction:这是一款基于HTML5 SVG制作的路径过渡动画幻灯片特效。该幻灯片特效使用SVG路径来剪裁幻灯片中的图片,制作出幻灯片切换时不规则的图形变换效果。,。
2016-05-17 comment 0 1534

Course Introduction:Today, the editor explained the relevant tutorials on how to use the PS perspective cropping tool. The following are the detailed steps on how to use the PS perspective cropping tool. Let’s learn together. I hope it can help everyone. How to use perspective cropping tool in ps? The first step of the tutorial on using the PS perspective cropping tool: Start the PS software and open the picture (as shown in the picture). Step 2: Click the Cropping tool on the toolbar and select Perspective Cropping (as shown in the picture). Step 3: Click on four points of a book to see the perspective grid effect (as shown in the picture). Step 4: Click Enter or the check mark in the property bar to apply the cropping effect (as shown in the picture). Step 5: After clicking, you can see that the book changes to a square shape on the front (as shown in the picture). Step 6: This is about using
2024-08-16 comment 0 832

Course Introduction:How to use PS to make two-inch photos 1. Two-inch photo size: width 3.5 cm, height 5.3 cm. 2. Opening in photoshop requires a portrait. Because the size does not meet the regulations, use the cropping tool to crop it. Find the crop tool in the toolbox, or press the C key, and then fine-tune the settings in the property bar: According to the size of the two-inch photo, we set the width to 3.5 cm, the height to 5.3 cm, and the print resolution to 300 to obtain general printing results. 3. Then use the crop tool to drag the composition in the image to retain the part that needs to be displayed. In order to confirm whether the cropped image size is the size of a two-inch photo, we can click the "Image Size" command in the image menu. In "Document size" we
2024-01-17 comment 0 8311

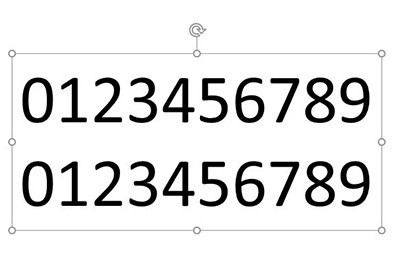
Course Introduction:First, drag out the text box in the PPT and enter two lines of numbers from 0 to 9. Be careful not to press Enter when wrapping the text. Use the size of the text box itself to automatically wrap the text. Then adjust the text direction to [Stacked], and stretch the text box up and down so that one number is in one line. Then we select the text box, copy it, save it as an image, and reinsert the image. Crop the image so that only 0 is displayed. Finally, duplicate the slide and crop the image again, this time to show the final number. Click the switch effect above and add the [Smooth] or [Promote] switching effect.
2024-04-24 comment 0 739