

Course Intermediate 10914
Course Introduction:"Self-study IT Network Linux Load Balancing Video Tutorial" mainly implements Linux load balancing by performing script operations on web, lvs and Linux under nagin.

Course Advanced 16847
Course Introduction:"Shangxuetang MySQL Video Tutorial" introduces you to the process from installing to using the MySQL database, and introduces the specific operations of each link in detail.

Course Advanced 10562
Course Introduction:"Brothers Band Front-end Example Display Video Tutorial" introduces examples of HTML5 and CSS3 technologies to everyone, so that everyone can become more proficient in using HTML5 and CSS3.
node.js - windows cannot start mongodb service?
2017-06-24 09:43:05 0 1 1109
Create a CSS-based typing animation for each line in a sequence
2024-03-31 17:50:29 0 1 385
2017-05-16 16:42:11 0 2 1071
Android monitors headphone plugging and unplugging without opening the APP
2017-06-24 09:42:57 0 2 1032
2017-06-12 09:28:16 0 4 895

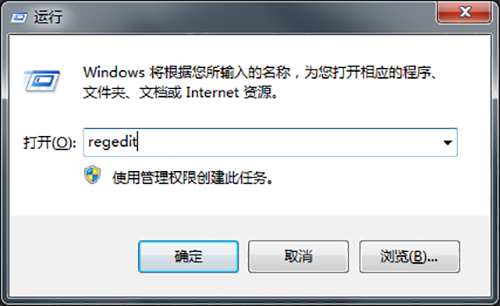
Course Introduction:Recently, some users using the win7 system have found that their computers will automatically check every time they are turned on, and they need to wait more time before they can successfully enter the system. Many friends want to turn off the system power-on self-check, but If you don’t know how to set it up, today’s win7 tutorial will explain the specific steps to you. Friends in need are welcome to come to this site to view the detailed methods. Introduction to how to turn off the power-on self-test in win7 system 1. Press win+R to open the run window, type regedit, and press Enter to open the registry editor on your computer. 2. Then in the opened registry editor window, expand HKEY_LOCAL_MACHINE\System in the left menu bar.
2024-02-11 comment 0 1358

Course Introduction:Some users using Win11 system will encounter the self-test process every time they turn on the computer and need to wait for a long time before entering the system. Many users want to turn off the power-on self-test function, but don't know how to do it. In fact, it can be easily turned off through the registry. Below are detailed steps. How to turn off the power-on self-test function in win11 1. First, we right-click the start menu below, and then click run, or press win+r on the keyboard to open it. 3. Then locate the following location in the registry: computer HKEY_LOCAL_MACHINESYSTEMCurrentControlSetControlSessionManager. 5. Then delete the numerical data in it
2024-02-01 comment 0 1280
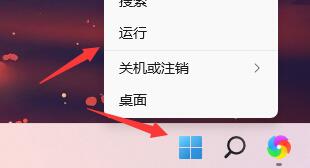
Course Introduction:For some friends who use the win11 system, the computer will perform a self-check every time it is turned on. It will check the computer motherboard, hard disk, CPU and other hardware, so it will take a long time to enter the system. Many users want to Turn off the power-on self-test function, but you don’t know how to operate it. You only need to turn it off through the registry. Then this win11 tutorial will bring you detailed operation methods. Let’s take a look at the specific steps. How to turn off the power-on self-test function in win11 1. First, we right-click the start menu below, and then click "Run", or press win+r on the keyboard to open it. 2. Then enter “regedit” and press Enter
2024-02-05 comment 0 1376

Course Introduction:Some users want to perform disk detection on the computer every time Win10 is turned on. So how to turn off boot disk detection in Win10? Here the editor will give you a detailed introduction to the tutorial of turning off the boot disk detection in Win10. If you are interested, please come and take a look with the editor. Tutorial on turning off startup disk detection in Win10 Method 1: Command modification method 1. Click the search icon in the taskbar, enter "cmd", select "Command Prompt", and click "Run as administrator". 2. If we want to turn off the disk detection of the C drive, first check the disk to see if it is faulty. In the command prompt window, enter "chkdskc: /f
2024-02-29 comment 0 1168
Course Introduction:Although there are higher-end Windows systems now, some users still prefer to use the win7 system. Recently, many users have encountered the problem of automatically detecting the hard disk at startup, and it takes a long time to enter the system. Many people want to use the hard disk The self-test is turned off, but I don’t know how to operate it. It doesn’t matter. Today, the editor of this website will share with you the specific operation steps. I hope that the content of this win7 tutorial can help everyone solve the problem. How to turn off the hard disk self-test at startup in win7 1. Press and hold the [windows+R] key, enter [regedit] in [Run] and press Enter 2. Then enter the opened registry editor interface and press the path below to open [HKEY_LOCAL_MACHINE\ SY
2024-02-11 comment 0 851