Found a total of 105 related content

How to remove folder permissions in Win10 How to remove folder permissions in Win10
Article Introduction:Hello everyone! Today we are going to teach you how to remove folder permissions in Win10. Sometimes we will encounter folder permission problems, which will subject our files to some restrictions. So how to remove folder permissions? It's actually very simple. You just need to click on the properties of the folder you want to remove permissions to set it. Next, let’s learn more about how to remove folder permissions in Win10! Method to remove folder permissions in Win10 1. First, select and right-click the file that needs to be removed, and in the menu item that opens, select [Properties]. 2. In the file properties window, switch to the [Security] tab, and then click [Edit]. 3. Set the permissions for each [group or user name] and check all the boxes in the [Deny] column.
2024-09-10
comment 0
225
How to change the background of Win10 folder to black? How to change the background of Win10 folder from black to white?
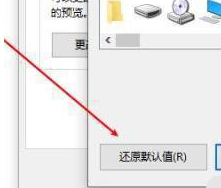
Article Introduction:When you are using win10, you may find that the background of your folders has turned black, which makes you uncomfortable to use. So how do I change it back to white? It's actually very simple, just right-click on the folder, select "Properties", and then click "Change Icon". Next, I will give you a detailed introduction on how to change the background of the win10 folder from black to white. How to change the folder background black to white in win10? Method 1: First, right-click the folder and select Properties. 2. Next, click the Customize tab and click the Change Icon button below. 3. After that, the change icon interface appears, click to restore the default value. 4. Return to the folder properties interface, click Apply or OK~ Then you will see that the folder background color is restored to normal.
2024-09-10
comment 0
799
Where is the Win10 startup folder? Win10 startup folder path location
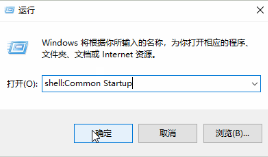
Article Introduction:During the process of Win10, I want to make some applications start automatically when booting. I need to place them in the startup folder, but I don’t know where the Win10 startup folder is. Now I will give you a detailed introduction to Win10 startup. Start the folder path location. Friends in need can take a look! 1. Use the "win R" shortcut key to start running, enter "shell:CommonStartup", and press Enter to open. 2. The opened folder window interface is the location of the startup file. You can directly drag and drop the program you want to start at startup.
2024-09-19
comment 0
881

How to set folder permissions in win10 How to set folder permissions in win10 system
Article Introduction:Hello everyone! In the win10 system, we can adjust the permissions of the folder according to our own needs! However, some friends may encounter the problem of not knowing how to modify folder permissions. Don’t worry, today’s win10 tutorial will explain how to operate it in detail! If you are interested, remember to visit our PHP Chinese website! How to set folder permissions in win10 system 1. Right-click the folder and click Properties in the menu to open it. 2. In the folder properties interface, click [Security] in the window here, and then click the advanced options below. 3. In the owner section, you can see that the owner is not the account we log in to, click Change. 4. Next click the Advanced button. 5. Then in the new window that pops up
2024-09-12
comment 0
627

What to do if win10 cannot delete folders? Win10 cannot delete folders?
Article Introduction:When we use computers, we leave behind many useless folders, which take up a lot of space. Some people using Win10 system find that they cannot delete folders, and even forced deletion is useless. So what to do? Today I will teach you two methods, come and learn with me! Solution to the problem of not deleting folders in Windows 10 Method 1: Close the program 1. In the Windows system, press the Ctrl shift Esc key combination to directly open the Task Manager. 2. Then we find the program we want to close, right-click and select End Task. Method 2: Check properties 1. First, we directly right-click the stand-alone folder or file, and then select Properties. 2. Then we directly uncheck the read-only attribute in the tab
2024-09-12
comment 0
795

What to do if Win10 cannot delete the Start menu folder
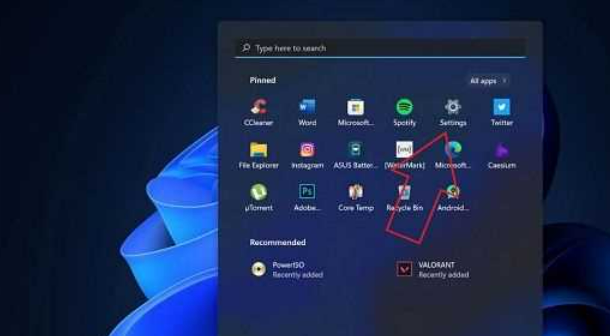
Article Introduction:Recently, some friends reported that when using Win10, they wanted to delete the folder in the start menu but found that the deletion could not be successful. What happened? How to solve this situation? The editor will give you the details below. Let me introduce the solution to the problem that Win10 cannot delete the Start Menu folder. If you are interested, you can take a look. Win10 cannot delete the Start menu folder: 1. Click Start in the taskbar, open the Start menu, and find the folder that needs to be deleted. 2. Right-click and select "Open file location" in "More". 3. In the opened folder window, click the arrow icon in the picture below. 4. Then find the folder you want to delete, right-click and select &q
2024-09-14
comment 0
892

What to do if win10 folder cannot be deactivated as read-only
Article Introduction:Hello everyone, let me teach you how to cancel the read-only status of a win10 folder. Sometimes we encounter a folder that is set to read-only status. What should we do at this time? Don't worry, just open the folder's properties, find the security option, and then cancel the read-only status! Let me explain the specific steps in detail below. I hope everyone can easily solve this problem. Solution to the problem that win10 folder cannot be canceled as read-only 1. Right-click on the folder and select "Properties". 2. Switch to [Security]-[Edit] and click [Add]. 3. Click [Advanced]-[Find Now] in the lower left corner. 4. Select the currently logged-in user name below (if you don’t know which one it is, we can identify it by the avatar. If there is only one person in the avatar,
2024-09-10
comment 0
445

What should I do if I can't remove the read-only attribute of the font folder in Windows 10?
Article Introduction:Many users have set the read-only attribute of their folders and now want to cancel it but don't know how. How to remove the read-only attribute of win10 font folder? It's actually very simple. Just click on Properties, find the Security tab, and follow the prompts. Next, this site will teach you in detail how to cancel the read-only attribute of the win10 font folder, so you don’t have to worry about not understanding English authorization. The read-only attribute of win10 font folder cannot be removed without auth. Detailed explanation 1. Find the file that is set to read-only mode, right-click the file and select the [Properties] option to enter. 2. Click the [Security] tab at the top of the page and click the [Advanced] button to enter the advanced settings window. 3. Go to the advanced settings window
2024-09-13
comment 0
1038
Can win10 packages be deleted? How to delete win10 packages folder
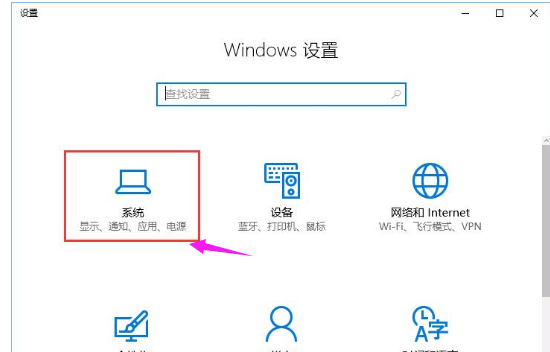
Article Introduction:Hello everyone, what I want to share with you today is about whether the packages folder in win10 can be deleted. In fact, many friends are asking this question, let me answer it for you! First, we can find the system in Windows settings, and then find the temporary file under the current system drive letter, and then we can operate. If you also want to know how to delete the packages folder of win10, then follow me and take a look! How to delete win10packages folder 1. Press [Win i] to open windows settings and click [System]. 2. Click [Save] on the left. 3. Click the current system drive letter on the right. 4. Wait for the system to automatically scan junk files
2024-09-13
comment 0
294

What to do if win10 cannot access shared folders
Article Introduction:Some friends set up a shared folder on their computer in order to make it easier to read files while working. However, some people using Win10 saw this folder through the LAN, but did not have permission to enter. So what should we do to add permissions? Today I will teach you how to do it, come and take a look! Win10 shared folder does not have permission to access solution 1. First, press the "Win+R" keys to open the run window. 2. Enter "gpedit.msc" in the run window, and then press the Enter key to start the Local Group Policy Editor. 3. In the editor, navigate to "Computer Configuration". 4. Under this configuration, find and click the "Manage Templates" option. 5. Find "Network" in "Administrative Templates", and then find "Network" again under "Network"
2024-09-09
comment 0
862

What to do if win10 cannot access the font folder? win10 font folder access denied solution
Article Introduction:Hello everyone, do you know? When our computer wants to display a new font, we must put the file into the font folder. But some friends who use Windows 10 find that they cannot enter the font folder and don’t know what to do. Don't worry, I'll teach you how to solve this problem, making sure it's easy to understand. Let’s take a look at the specific steps next! Win10 font folder access denied solution 1. Right-click this computer and click the "Manage" option. 2. Select "System Tools>Local Users and Groups>Users". 3. Right-click the first "Adaministrat" option on the right taskbar and select "Properties" from the options given. 4. Cancel "Account is disabled" on the "General" page
2024-09-10
comment 0
905

What to do if Win10 folder opens with search results? Win10 folder opens with search results in detail
Article Introduction:Oops, as soon as the Win10 folder is opened, it becomes a search function. How can this be done? In fact, it is very simple. Just enter "Registry" directly on the computer, and then click on the "Registry Editor" that automatically appears on the system. Then find the "shell" thing and set it up. Let me tell you how to do it in detail below! Detailed explanation of search when opening a Win10 folder 1. Press the Win+S key combination to open the search. In the search box, enter the registry, then click and open the best matching registry editor application given by the system. 2. In the Registry Editor window, expand to the following path: Computer\HKEY_CLASSES_ROOT\Directory\shell. 3. Click shell on the left
2024-09-09
comment 0
424

Where are the Win10 system files? Where are the Win10 system files?
Article Introduction:Some friends are worried that the system files have been cleared by mistake when cleaning files. They want to check the Win10 system files, but don’t know where the Win10 system files are. Now I will introduce to you the location of the Win10 system files. If you need Friends can come and take a look. 1. Double-click "This PC" on the desktop. 2. After entering the new interface, double-click to open the system disk. Generally speaking, the system disk is the C drive. 3. Then click on the "Windows" folder to enter. 4. After entering, all the files inside are system files. Be careful not to clean them when cleaning.
2024-09-19
comment 0
950

How to close shared folders in Win11 Introduction to methods to close shared folders in Win11
Article Introduction:Hi guys! Shared folders are a good helper for us to quickly transfer files on our computers, but some friends ask how to turn off shared folders in Win11? It's actually very simple. Just click on the Sharing tab in Properties and select Advanced Sharing Settings. Next, let’s take a look at the specific steps to close shared folders in Win11! Introduction to how to close shared folders in Win11 1. Find the folder you don’t want to share, right-click and open "Properties". 2. Then enter the "Share" tab above. 3. Click on the "Advanced Sharing" settings. 4. After opening it, cancel "Share this folder". 5. Click "OK" below to save and cancel sharing.
2024-09-12
comment 0
926

What to do if the Win10 folder search box cannot be entered
Article Introduction:When we use the Windows 10 system, it comes with a function that can search for files, which can help us find the files we want quickly. However, some friends may not know how to use this file search function, or they may not be able to type when searching for files. It doesn't matter, I'm going to teach you how to use the file search function in Win10, and how to solve the problem of being unable to type when searching for files. Detailed explanation of why Win10 folder search box cannot type words 1. First, right-click the "This PC" icon on the desktop and select to open the "Management" interface. 2. Then, in the opened interface, expand "Services and Applications" and click to enter "Services". 3. Then, find and double-click to open the "Windowssearch" service. 4. Follow
2024-09-09
comment 0
292

How to set shared folder read-only permissions in win10 and cannot modify permissions
Article Introduction:Hi guys! Do you know? Sharing files is really super convenient! Not only can we quickly transfer data, but it also allows us to share our results with others! However, some Win10 users may encounter some problems, such as not knowing how to set the read-only permissions of shared folders to prevent others from changing them. It's okay, don't worry! I will give you a detailed introduction on how to operate it! First, you need to right-click the folder you want to share, then click Sharing under Properties, then select Advanced Sharing to set read-only permissions! Isn't it very simple? Hurry up and give it a try! How to set shared files in win10 to be read-only and cannot be modified. Method 1. First, share the folder according to the normal process. On the host side, right-click the folder that needs to be shared, and then click
2024-09-09
comment 0
1069

How to close shared folders in win11 tutorial on closing shared folders in win11
Article Introduction:For the convenience of work, some people using Win11 have set up shared folders that can be accessed through the LAN. But now I want to turn it off, but I forgot where to do it. Today I will teach you how to turn off shared folders. Let’s take a look at today’s Win11 tutorial! Tutorial on closing shared folders in win11 1. First find the folder you want to close sharing, right-click and select "Properties" in the option list. In the window that opens, click the "Sharing" tab in the upper part. 2. Then click on the "Advanced Sharing" option. 3. Then find the "Share this folder", uncheck the small box, and click OK to save.
2024-09-09
comment 0
1055

How to create a shared folder in win11 How to create a shared folder in win11
Article Introduction:How to create a shared folder in win11? The method is very simple, just click on the start menu, find the run window, and then enter the "shrpubw" command, and then you can create a shared folder! Below, this site will tell you in detail how to create a shared folder in win11! How to create a shared folder in win11 1. First, press the [Win+X] key combination on the keyboard, or right-click the [Windows Start Logo] on the taskbar, and select [Run] in the right-click menu item that opens. 2. Open Run, then enter the [shrpubw] command and press [OK or Enter]. 3. In the Create Shared Folder Wizard window, click [Next Page]. 4. Click to browse
2024-09-09
comment 0
930
What to do if Win11 drags a folder and it freezes? Win11 dragging a folder freezes. Detailed explanation
Article Introduction:When we use win11 system, sometimes we need to move folders, but some users ask what to do if win11 gets stuck when moving folders? It may be because of the translucenttb plug-in. If not, just click on the color setting in the personalization settings! Now let me tell you in detail about the problem of stuck moving folders in Win11. Detailed explanation of the lag in dragging folders in Win11 1. The lag in dragging windows in Win11 is mainly due to the incompatibility between the resource manager and the transparency effect. 2. If we use the translucenttb plug-in, we can try to turn it off. 3. If we do not use the translucenttb plug-in, then click on the start menu and select "Settings". 4.
2024-09-09
comment 0
927
What to do if win11 is stuck when right-clicking on a folder
Article Introduction:Many friends will find that when they use the win11 system, they will get stuck when they right-click to open a folder, and they don't know what to do. Don’t worry, we can solve this problem by opening the process under Task Manager. Next, I will give you a detailed explanation of the specific solution to the issue where right-clicking on a folder is stuck in Win11. Detailed explanation of how to right-click a folder stuck in Windows 11. 1. First, we press the "ctrl alt delete key" at the same time to open the task manager. 2. After entering the page, we click "Processes", find the background of "File Explorer" and close it. 3. Finally, we click Restart to restart the computer. 4. After returning to the page, enter the folder options and click "..." at the top on the right to find the option. 5. When we open
2024-09-12
comment 0
957
