Found a total of 10000 related content

How to use Vue to achieve a picture magnifying glass effect
Article Introduction:How to use Vue to achieve the picture magnifying glass effect Introduction: The picture magnifying glass effect is a common web page interactive effect. When the mouse is hovered over the picture, the picture can be enlarged and the details of the enlarged part can be displayed. This article will introduce how to use the Vue framework to achieve the picture magnifying glass effect, and provide specific code examples for reference. 1. Requirements analysis: We need to implement a picture magnifying glass effect in the Vue project. When the user hovers the mouse over the picture, the picture can be enlarged and the details of the enlarged part can be displayed. Specifically, we need to achieve the following functions
2023-11-07
comment 0
1433

Tips and methods for using CSS to achieve special effects for image display
Article Introduction:Tips and methods for using CSS to achieve special effects for image display. Whether it is web design or application development, image display is a very common requirement. In order to improve the user experience, we can use CSS to achieve some cool image display effects. This article will introduce several commonly used techniques and methods, and provide corresponding code examples to help readers get started quickly. 1. Picture zoom special effects Zoom mouse hover effect When the mouse is hovering over the picture, the interactivity can be increased through the zoom effect. The code example is as follows: .image-zoom{
2023-10-24
comment 0
2268
How to create a long picture sliding effect in Premiere
Article Introduction:1. Double-click Premiere and double-click the PR material library. 2. Select your long picture to open, and drag the picture into the timeline. 3. Click on the picture and double-click to preview the picture so that the picture has white dots. Pull the image up so that it's just a little bit at the top of the screen. 4. Turn on Effect → fx motion and click the stopwatch at the location. 5. Move the blue line to the tail, double-click the image to make it have white spots, and pull down the image in the preview window. 6. Let the picture show a little bit in the lower part of the window, and create a long picture sliding effect here, as shown in the picture.
2024-06-05
comment 0
769
jQuery plug-in MixItUp implements animation filtering and sorting_jquery
Article Introduction:The MixItUp filtering and sorting jQuery plug-in is a jQuery filtering and sorting plug-in that displays descriptions when the mouse rolls over the image. It is a lightweight but powerful jQuery plug-in that provides beautiful animated filtering and sorting functions for categorized and ordered content. Perfect for portfolio sites, galleries, photo blogs, and any categorized or organized content.
2016-05-16
comment 0
2282

How to turn off incognito mode in Quark Quark turns off incognito browsing tutorial sharing
Article Introduction:Quark's incognito mode is mainly to protect users' privacy and avoid leaving traces when users browse the web. This mode can indeed protect privacy in some cases, but it will also clear the user's browsing history and cache, making it difficult for you to find web pages you have browsed before. If you want to close it, you can follow this tutorial. Quark turns off incognito browsing tutorial sharing 1. Open the Quark APP and click on the three horizontal lines icon in the lower right corner. 2. Click Incognito. 3. Just show that incognito browsing is turned off.
2024-07-12
comment 0
721

How to send QQ flash photos
Article Introduction:In the QQ chat application, flash photos, as a unique picture form, provide strong support for user privacy protection. After sending a flash photo, the recipient has only one chance to view it. Once it expires, the image will be automatically destroyed without leaving any trace. This design not only effectively avoids the risk of pictures being abused or maliciously spread, but how to use the flash function in QQ? Below, the editor of this site will bring you a detailed introduction to the steps and functions. I hope you can Help everyone. How to send flash photos in QQ If you want to send flash photos to QQ friends, you must first open QQ APP, find the target friend in the message list and click to enter the chat interface with the friend. 2. Then we click the album icon at the bottom of the chat interface, and then select the photo you want to send. 3. Wait until
2024-04-02
comment 0
984

jQuery plug-in multiScroll realizes full-screen mouse scrolling switching page special effects_jquery
Article Introduction:What this article shares with you is a jQuery full-screen (full-screen) scrolling plug-in web page special effect. Roll the mouse wheel to switch the entire screen to one screen. You can set the text/picture to display the JS code absolutely up, down, left, right, and center. The most popular jQuery full-screen scrolling nowadays. Plug-in! (Compatibility test: IE6 and above, Firefox, Chrome, Opera, Safari, 360 and other mainstream browsers)
2016-05-16
comment 0
1108

Teach you how to view computer usage records in Windows 10
Article Introduction:When we use Windows 10, we will leave traces on the computer. At this time, we can also check whether our computer has been used by others. Recently, some friends want to know how to check computer usage records in Windows 10. So today I will teach you how to check computer usage records in Windows 10. How to view computer usage records in Windows 10: 1. Click the task icon in the lower left corner. 2. After clicking it, we can see the program that the computer is running, and scroll down to record the previous computer operations. 3. Click to display within 30 days, and scroll down to see earlier computer operation records. 4. Click here for more, you can see more operation records of the day. The above is about wind
2023-07-20
comment 0
4386

How to preload pictures along the way in Amap
Article Introduction:Amap is a navigation software that everyone often uses when traveling. It has a function of preloading pictures along the way. Some friends are not very familiar with this. Here is how to enable this function. After opening the Amap app on your phone, go to the "My" option in the lower right corner and tap the "Hexagon" settings icon in the upper right corner to open the settings page. 2. After coming to the settings page, there is a "Footprint Settings", click on it to enter. 3. Next, find "Preload photos along the way" in the footprint settings page. There is a switch button displayed behind it. Click the slider on it to set it to blue to turn on the function. The process of using Amap You can add photos along the way with one click.
2024-03-01
comment 0
606

How to create plant text effects in CorelDRAW Production method tutorial
Article Introduction:CorelDRAW is a very easy-to-use picture design software. The software has powerful functions and can create a variety of special effects. Today I will tell you how to create plant text effects. This special effect is like text and plants merging into one, with plants forming the text, which is very suitable for posters with plants and flowers as the theme. The specific operations are as follows: 1. Open the CorelDRAW software, import the plant material and copy it. 2. Click [Text Tool] to enter text on the material, change the fill color of the text, and change the outline color to white. 3. Select the picture, right-click [Inside Powerclip] ], click the text after the mouse turns into an arrow, so that the picture will be displayed in the text. 4. Click [Bezier Tool] to draw pictures connected to the text.
2024-02-15
comment 0
641

Method to transfer point coordinate data in CAD to Excel table
Article Introduction:How to convert CAD midpoint coordinate data into an Excel table. This is a method for your reference: On a topographic map, the elevation of each point is generally marked. This method has no effect if no elevation is indicated. First, open the original dwg file, the layer where the observation points and elevation labels are located, and turn off all other layers so that only the point and elevation label information is displayed. Next, use the mouse frame selection method to select all points and elevation label information. Be careful not to use Ctrl+A to select all. Then, create a new dwg file, right-click on the window, select "Paste to original coordinates" from the pop-up options, and paste the previously selected point and elevation label information into the new file. Finally, save the new file to preserve the copied point and elevation labels
2024-01-16
comment 0
2229

Where should the desktop wallpaper pictures be placed on the computer?
Article Introduction:1. Where should the desktop wallpaper pictures be placed on the computer? Desktop wallpaper should be placed on the desktop of the computer. Desktop wallpaper is a background picture on the computer monitor. It is usually placed on the computer desktop. There is a special "Desktop" folder in the computer operating system for storing desktop pictures. Users can choose according to their own preferences. Select the picture you want as the desktop wallpaper. The picture can also be placed in other folders, and then change the desktop wallpaper through settings. However, it is generally recommended to place it in the desktop folder for ease of use. 2. How to set the picture as the computer desktop wallpaper? 1. First find the picture you want to set as the computer desktop background, right-click the stand-alone picture thumbnail, and click "Set as desktop background" in the pop-up options. 2. If you are not satisfied with the setting effect, you can use PS or the like.
2024-08-15
comment 0
520
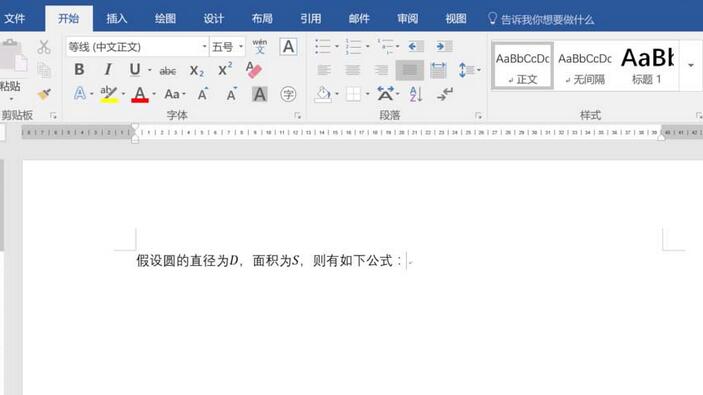
How to convert ink to mathematical formulas in word2016
Article Introduction:When editing a document, it is very troublesome to enter formulas. By inserting input, you often need to find letter symbols one by one, which is quite troublesome. This experience introduces how to quickly enter documents. You need to have a Word version of 2016. Position the mouse where you want to insert the formula and click on the drawing in the red box. In the drawing ribbon, find the item in the red box [Convert ink to mathematical formulas]. After clicking, a window will pop up, as shown in the red box below. At this time, you can use the mouse to write formulas in the yellow area. This is actually quite troublesome, but if the computer supports touch screen and can use handwriting or pen strokes, the efficiency will be different. Then he spoke. After the formula is written, the system automatically recognizes it and displays it in the line above. Check whether
2024-04-26
comment 0
1044

How to take videos and photos on Douyin? How to delete photos and videos taken?
Article Introduction:As a popular short video application, Douyin not only supports shooting short videos, but also adds photos to videos to make the content richer and more diverse. So, how to shoot videos and add photos in TikTok? 1. How to shoot videos and photos on Douyin? 1. Open the Douyin app and click the "+" button to start recording videos. 2. During the recording process, you can switch between different filters and special effects by sliding the screen up and down to add interest to the video. 3. After recording the video, click the "Next" button to enter the video editing page. 4. On the video editing page, click the "Picture" button in the middle of the bottom of the screen. 5. Select the photos you need to add and click the "Confirm" button. 6. The photos will be displayed as thumbnails on the video editing page. you can
2024-06-02
comment 0
1126
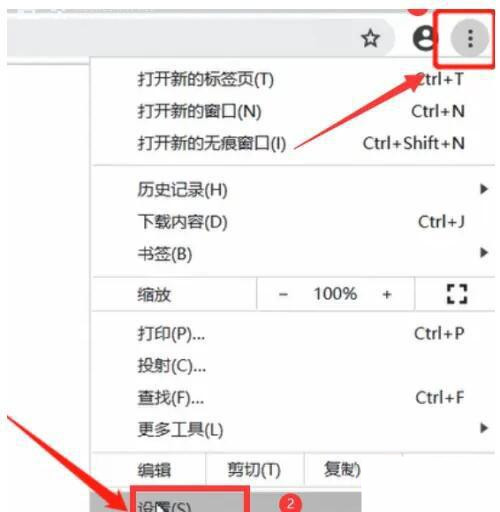
What should I do if the image in Google Chrome cannot be loaded? What should I do if the image in Chrome cannot be displayed?
Article Introduction:Google Chrome is undoubtedly the most popular browser software, but when we use Google Chrome, we may encounter images that cannot be loaded. We have checked that the network is normal, so where is the problem? This tutorial will bring you how to solve the problem that Google Chrome images cannot be loaded. I hope it can help you. Solution: 1. Double-click to open Google Chrome on your computer. 2. Click the three dots icon in the upper right corner and click Settings in the sub-option. 3. Click Privacy Settings and Security on the left side of the interface, and then click Website Settings. 4. Swipe down to find and click on the picture. 5. Just select the website to see the displayed pictures, or you can set the settings for the specified website in the customization section below. If the above methods still don't work, you can try the following steps:
2024-08-26
comment 0
410

How to stop scrolling subtitles in Edius
Article Introduction:Click the Create Subtitles button on the Timeline panel, enter text on the subtitle track T track, keep the subtitle type still, and click Save. In the special effects panel, click the small plus sign in front of [Subtitle Mixing] to display all subtitle special effects. 3. Select and drag the special effect [Flying into A] or [Flying into B] to the subtitles according to your needs; [Flying into A] means that the subtitles start from the bottom of the screen and scroll upwards, and [Flying into B] starts from the video material. Scroll up below. On the gray bar below the subtitle bar, you can see that it is clearly divided into three parts. The ones on both sides represent the subtitle rolling time period, and the middle one is the duration of the EDIUS rolling subtitles stay. You can move the cursor to the segments on both sides like the picture above, and left and right arrow symbols will appear. You can change the scrolling and stopping of EDius subtitles at will.
2024-04-17
comment 0
579
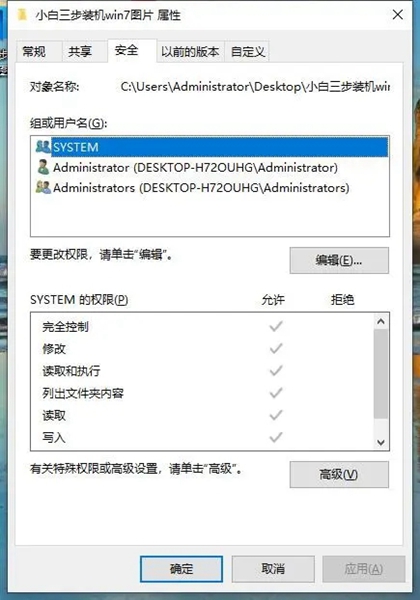
How to get administrator rights to delete files in win10 home edition
Article Introduction:Dear, when you try to copy or delete a specific file while running Windows 10 system, you may encounter an annoying warning prompt that you need administrator rights to delete this folder. To this end, this guide will wholeheartedly show you how to obtain Windows 10 administrator rights through detailed pictures and text tutorials! What to do if you need administrator rights to delete files in win10 Home Edition 1. First, right-click the target file or folder , move to the "Security" tab, and click the "Advanced" button below. 2. If you find that the "Add" option is grayed out, you need to change the owner first and click the "Change" option. 3. Select the "Advanced" option, click the "Find Now" button, and select "Local Accounts and
2024-01-16
comment 0
911

How to turn off automatic rotation in vivoxfold3?
Article Introduction:Auto-rotate is a common feature that automatically adjusts the screen's orientation based on the device's orientation. However, sometimes we may want to fix the orientation of the screen, especially when using vivoxfold3. If you're looking for ways to turn off auto-rotate, you've come to the right place! In this article, we will show you how to turn off auto-rotation on vivoxfold3 so that you can have better control over the screen's orientation. How to turn off auto-rotation in vivoxfold3? You can open the shortcut bar by pulling down the top of the screen or sliding up the bottom of the screen. Find the vertical screen lock icon and click the switch. When the icon dims, you can unlock the vertical screen lock. Method 2: Go to Settings--Display and Brightness-Vertical Screen Lock and turn off the switch. If you turn off automatic photo rotation
2024-03-18
comment 0
970
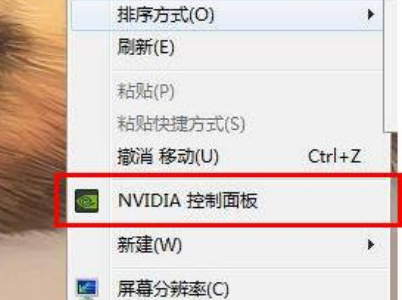
What is the appropriate setting for N card image sharpening? Share the best setting method!
Article Introduction:Many friends use N cards. The game can be optimized through the program settings that come with the N card. So what is the appropriate amount of image sharpening for the N card? The editor below will bring you detailed solutions. Interested users can come and take a look. How to set up n card sharpening to make it clear? 1. First, right-click the desktop to open the NVIDIA Control Panel. 2. After entering the nvidia control panel, click Manage 3D Settings on the left. 3. Click Image Sharpening in the function on the right. 4. After customizing adjustments, click OK. 5. It is recommended here that you do not need to maximize the effect. My personal suggestion is to adjust the sharpening to 0.6 and ignore the film grain and choose 0.05. Those who need it can try it. There is no frame drop and the image quality is also very good.
2024-08-28
comment 0
653


