Found a total of 13 related content
How to set up color management in Win11
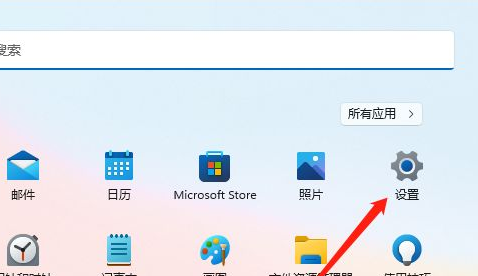
Article Introduction:When using the win11 system, I feel that the colors displayed on the computer are not good-looking, so how do I set up and manage them? For this reason, the editor provides you with a simple tutorial on how to set up Win11 color management. Here, you can easily solve the problem according to the tutorial, which is good for you. experience. Win11 color management setting method tutorial 1. Click the Start menu in the taskbar, and then open the settings function. 2. In the settings window that opens, click Display Function on the right side. 3. Then click Advanced Display in the relevant settings on the page that opens. 4. Then click the display adapter properties of the monitor in the display information. 5. Click Color Management in the opened settings to make adjustments.
2024-09-14
comment 0
224
Where is win11 color management? Tips for opening and setting color management in win11
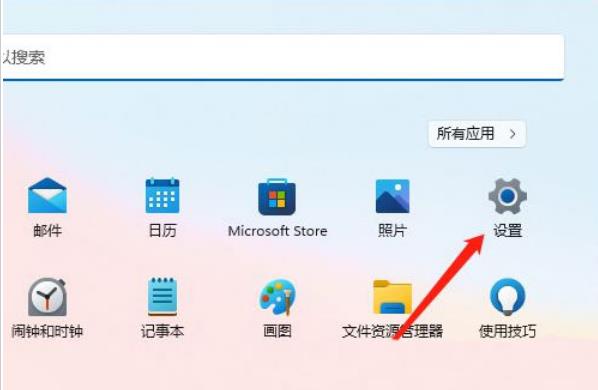
Article Introduction:After upgrading their computers, many Win11 users find that the colors on their computers are not very nice and want to adjust them themselves. So, where is win11 color management? Users can directly click the Windows logo at the bottom of the taskbar, and then select Display under Settings to operate. Next, we will introduce in detail how to open and set up the color management of win11. Where is the color management in win11? 1. First, press the Win key, or click the Windows logo at the bottom of the taskbar. In the menu that opens, click Settings under All Apps. 2. In the system settings window, click Display (Monitor, Brightness, Night Mode, Display Profile) on the right side. 3. Under related settings, click Advanced Display (Display Information, Refresh Rate).
2024-09-13
comment 0
482

Realtek High Definition Audio Manager How to set up headphones for listening realtek High Definition Audio Manager settings for headphones sound tutorial
Article Introduction:The realtek high-definition audio manager can help us make some sound settings, but many users are asking the realtek high-definition audio manager how to set the headphones properly? Users can directly open the hardware and sound under the control panel, and then select the Realtek High Definition Audio Manager interface to make settings. Let this site carefully introduce the specific operation methods for users. How to set the headphones properly in realtek high-definition audio manager? 1. Find the Control Panel option in the Start menu in the lower left corner of the computer. 2. In the pop-up dialog box, click Hardware and Sound Options to enter the lower-level page. 3. The page pops up as shown in the figure, and then select Realtek High Definition Audio Manager
2024-09-09
comment 0
465
How to set up to close the desktop window manager in win10
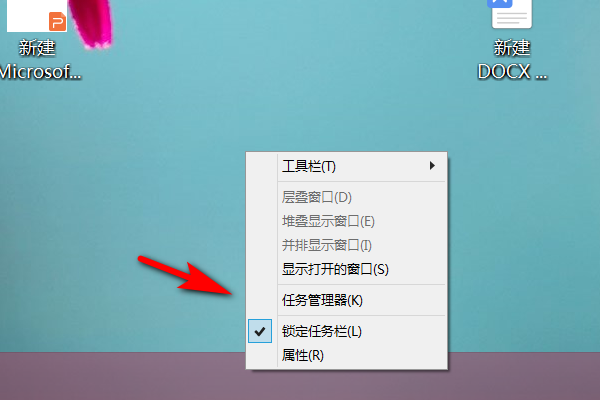
Article Introduction:There is a new thing in the win10 system called the desktop window manager. Generally, it is not used, but it is always open and takes up a lot of CPU, so many people want to turn it off. So how to do it? Today I will share with you how to set up win10, let’s take a look! How to close the desktop window manager in win10: 1. Right-click the taskbar at the bottom of the desktop, and then select "Task Manager" in the option list. 2. After entering the new interface, click "Details" below. 3. In the window that opens, find the desktop window manager and right-click to select "End Task". In the pop-up window, check the small box of "Discard unsaved data and close".
2024-09-13
comment 0
558
Where to set virtual memory on win10 computer win10 system virtual memory setting tutorial
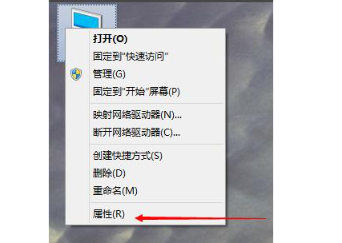
Article Introduction:Hello everyone! Today I want to share with you a super practical tip, that is, how to set up virtual memory on Win10! If you don’t know how to set it up, or where to set it up, come and take a look! I guarantee you'll love this tutorial! Win10 system virtual memory setting tutorial 1. Right-click the "This PC" icon and select "Properties". 2. Click the "Open advanced system settings" option. 3. Click the "Advanced" tab in the pop-up panel, and then select "Performance Settings" in the lower right corner to open it. 4. A "Performance Options" window pops up, select "Advanced" at the top, and then select the "Change" option to open the virtual memory settings. 5. Select "Do not use automatic management of paging file size for all drives" and
2024-09-09
comment 0
1041
How to set the workgroup name in win10 Introduction to the method of setting the workgroup name in win10 system
Article Introduction:In the win10 system, the name of the workgroup is WORKGROUP by default. Sometimes it is easy to get confused when there are too many groups. Some friends want to know how to set the name of the workgroup. Today we will teach you how to do it. Friends in need can come to the PHP Chinese website at any time to see the detailed steps! Introduction to how to set the workgroup name in win10 system 1. First find My Computer, then right-click and select Properties to open. 2. Then on the left side of the opened window, find Advanced System Settings and click Open. 3. Select the computer in the system properties, and then select the [Change] option. Here you can see a brief introduction to this function. 4. In settings such as changing the computer name, you can easily change the name of the workgroup.
2024-09-10
comment 0
990
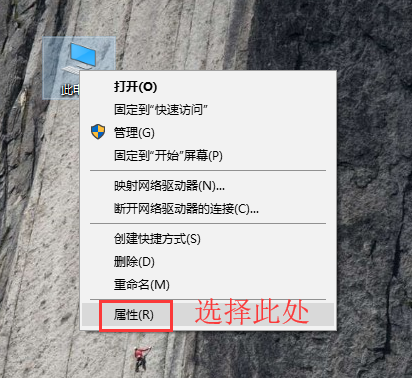
How to set up clear document open history when exiting in win10 system
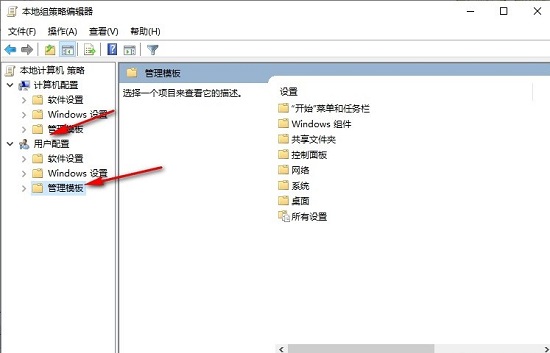
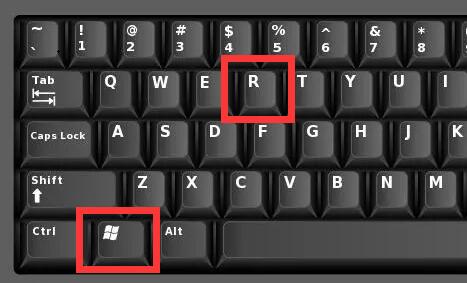
Article Introduction:Hello everyone! Today I will teach you how to clear document opening history when exiting in win10 system. When we use computers, we leave a lot of document operation records. Some friends want to protect their privacy and have to manually delete the records every time. However, we can let it be automatically deleted when the computer is shut down! Let’s take a look at the detailed operation method now! The setting method is as follows: 1. "win+R" shortcut key to start running, enter "gpedit.msc", and press Enter to open. 2. After entering the Group Policy Editor interface, click "Administrative Templates" in "User Configuration" in the left column. 3. Then click on the "Start Menu and Taskbar" option. 4. Then find “Clear history of recently opened documents when exiting the system” on the right
2024-09-09
comment 0
409
How to manage the functions in the right-click menu in win10 How to set the function menu of the right mouse button in win10
Article Introduction:How to manage the functions in the right-click menu in win10? When we use win10 system, we will add some programs to the right click, so that we can open them quickly. However, some users may want to delete some menus that are not commonly used, so how to manage them? Users can directly go to the shell folder under HKEY_CLASSES_ROOT to set it up. Below, this site will give you a detailed introduction on how to set the function menu of the right mouse button in win10! How to set the function menu of the right mouse button in win10 1. First press "Win+R" on the keyboard to open Run. 2. Then enter "regedit" and click "OK" to open the registry. 3. Then enter the registry "HKEY_CLASSES_
2024-09-10
comment 0
899
How to set the start menu not to display commonly used applications in win10 system
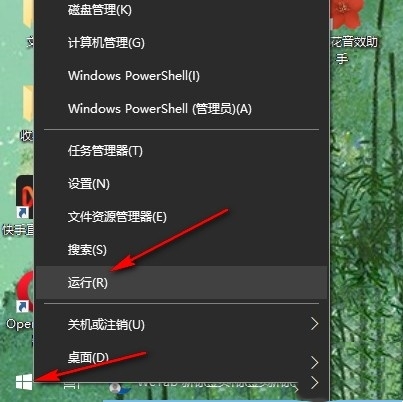
Article Introduction:Hello everyone, today I will teach you how to set the start menu in win10 system not to display commonly used applications! Some friends may find this feature a bit annoying and want to turn it off. Don’t worry, I will introduce you to the specific setting method right now! If you also want to try it, come and take a look! The setting method is as follows: 1. Right-click "Start" in the taskbar in the lower left corner and select "Run" in the option list. 2. In the run window, enter "gpedit.msc" and click OK to open. 3. After entering the Group Policy Editor interface, click the "Computer Configuration - Administrative Templates - Start Menu and Taskbar" option in the left column. 4. Then select "Show or hide the most used list from the Start menu" on the right.
2024-09-09
comment 0
530

How to solve the problem that administrator rights are required when deleting a folder in Windows 10 system
Article Introduction:Hello everyone! Have you ever encountered this situation? Just when I was deleting some useless folders, a prompt popped up saying that I needed to provide administrator rights to delete this folder. This is usually because the system permission is not fully enabled in the security properties of the folder. But don’t worry, we can fix this by resetting it. Today I will teach you how to operate it, let’s take a look! The solution is as follows 1. Right-click the file or folder you want to operate next, click the Security tab, and click the Advanced button below. 2. Next go to the following interface. If the add below is gray, you need to change the owner first. 3. After clicking Change, the following interface appears. For Win10 system, we click Advanced. 4.
2024-09-09
comment 0
208
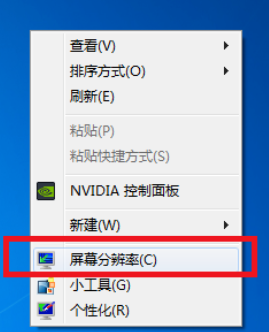
How to set up dual screen display in win7 system win7 dual screen display setting tutorial
Article Introduction:Nowadays, many people have higher and higher demands for using computers. Some users using win7 system need to use two screens at the same time to do different things. They connected the monitors but didn't know how to set them up so that both screens would show. Today we will teach you two solutions. We hope that these contents can help more people solve the problem. Win7 dual-screen display setting tutorial method one 1. Right-click the mouse on a blank space on the desktop to select the screen resolution and click to proceed to the next step. 2. After entering the display adjustment interface, find the multi-display option, and select to expand these displays in the selection and confirm. 3. After completing the above operations, we have completed the dual-screen display settings. The specific main screen and secondary screen can be operated according to the user's actual situation. Method 2 1, the same
2024-09-13
comment 0
529

How to set folder permissions in win10 How to set folder permissions in win10 system
Article Introduction:Hello everyone! In the win10 system, we can adjust the permissions of the folder according to our own needs! However, some friends may encounter the problem of not knowing how to modify folder permissions. Don’t worry, today’s win10 tutorial will explain how to operate it in detail! If you are interested, remember to visit our PHP Chinese website! How to set folder permissions in win10 system 1. Right-click the folder and click Properties in the menu to open it. 2. In the folder properties interface, click [Security] in the window here, and then click the advanced options below. 3. In the owner section, you can see that the owner is not the account we log in to, click Change. 4. Next click the Advanced button. 5. Then in the new window that pops up
2024-09-12
comment 0
627

How to set the voice recognition function to automatically turn on when the system starts in Windows 10
Article Introduction:Hello everyone, today we are going to teach you how to set up the voice recognition function to automatically turn on when the system starts on win10! Some friends may find it troublesome to turn it on manually every time, so they would like to know how to set up automatic startup. Don’t worry, we will explain it in detail in today’s win10 tutorial. Interested friends can come to the PHP Chinese website to see the specific steps! The setting method is as follows 1. "Win+R" shortcut key to start running, enter "control" and press Enter to open. 2. After entering the new interface, switch the "View Mode" in the upper right corner to "Large Icons", and then click "Speech Recognition" there. 3. Then click "Advanced Voice Options" in the upper left corner. 4. Then in the window that opens, find "Enable voice activation"
2024-09-13
comment 0
677
