Found a total of 20 related content
What should I do if the win10 screensaver does not work after setting it? Analysis of the problem that the win10 screensaver does not work after setting it
Article Introduction:As we all know, we all set screensavers when using computers, but some friends find that the screen saver settings in win10 do not work. What should they do? It's actually very simple, just open the lock screen option under the personalization page. Below, this site will give you a detailed introduction to the solution to the problem that the win10 screensaver does not work after setting it. Analysis of the problem that the win10 screensaver does not work after setting it up 1. Open the personalization page on the computer and open the personalization settings option. 2. Open the lock screen option. In the personalization page, open the lock screen option. 3. Turn on the screen saver. In the lock screen interface, open the screen saver settings option. 4. To turn on the screen saver function, we need to select the screen saver and the waiting time, click the OK button
2024-09-12
comment 0
887

How to disable the use of the camera on the lock screen in win10 How to turn off the camera on the lock screen in win10
Article Introduction:Many people have discovered that the camera can still be used when the screen is locked on a Win10 computer! So some people will directly use the camera to enter the system. Many friends want to know how to disable the use of the camera on the lock screen interface. Today I will tell you how to set up win10 to disable the use of the camera on the lock screen interface! How to turn off the lock screen camera in win10 1. First open the "Start" button in the lower left corner of the computer desktop, and then open the "Settings" option in the menu list. 2. After entering the settings page, we find the "Privacy" setting on the page and click to open the setting. 3. After entering the privacy settings page, we swipe down from the list on the left to find the "Camera" option, and click to open this option. 4. In the camera page, we find "Allow apps to access your
2024-09-09
comment 0
654

How to turn off the personalized lock screen interface in win11 How to turn off the personalized lock screen interface in win11
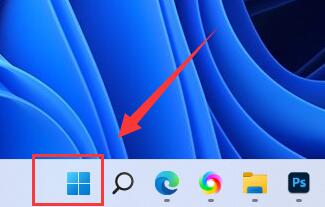
Article Introduction:Oops, many people are asking how to turn off the personalized lock screen interface in Win11. It's actually very simple. Just click the settings button under the start menu, and then select the power option on the right to operate. Next, let me teach you how to do it! The first step to turn off the win11 personalized lock screen interface is to click the "Windows icon" at the bottom to open the start menu. In the second step, click the "Settings" button in the start menu. The third step is to open the "Power" option on the right. Step 4: Click "Screen and Sleep" on the right and click the following two options. Step 5: Select "Never" in the drop-down menu and change both options to "Never" to turn off automatic screen lock.
2024-09-10
comment 0
1053

How to change the save location of screen recording in Win10 How to change the save location of screen recording in Win10
Article Introduction:Win10 computers have a built-in screen recording function. The system will automatically save the video to the computer. Some friends want to change the screen recording save location. So how to change the screen recording save location in Win10? Today I will give you the details. Let’s introduce how to change the screen recording save location in Win10. Let’s take a look! 1. Double-click to enter "This PC", right-click the "Videos" folder, and select "Properties" in the option list to open it. 2. In the window that opens, click the "Location" tab at the top. 3. Then click the "Remove" button below. 4. Then select a suitable screen recording to save
2024-09-14
comment 0
1066
How to set up and turn off the personalized lock screen interface in win11
Article Introduction:Some Win11 users accidentally set a personalized lock screen interface on their computers. It looks cool, but in fact it sometimes affects usage. So many people want to turn it off, but don't know how. Today, the editor of PHP Chinese website will teach you how to do it. I hope this Win11 tutorial can help more people. Let’s take a look at the specific steps next! Tutorial on turning off the win11 personalized lock screen interface 1. Click the Windows icon at the bottom to open the start menu. 2. Click the Settings button in the start menu. 3. Open the power option on the right. 4. Click Screen and Sleep on the right, and click the following two options. 5. Select Never in the drop-down menu and change both options to Never to turn off automatic screen lock.
2024-09-10
comment 0
639

How to record desktop screen in Win11
Article Introduction:When using a computer, you sometimes need to record the screen. Do you know how to record the desktop screen in Win11? For this reason, the editor provides you with a simple tutorial on how to record the desktop screen in Win11. Here you can easily record the screen through the method. Use it to record the screen content you want. Win11 desktop screen recording method tutorial 1. First, through the start menu in the taskbar, find the settings function and click to enter, then find [Game] in the left sidebar and click to enter. 2. Then in the column on the right you can see a [Screenshot] function, click to enter. 3. After entering, you can see a game recording process, open it, and then you can use the [win+Alt+G] shortcut keys to perform screen recording operations. If you need to record sound,
2024-09-14
comment 0
440

How to set up Sogou Browser to enable automatic saving of screenshots
Article Introduction:When we use Sogou Browser, when we see some content, we will want to take a screenshot and save it. However, each screenshot needs to be saved manually. There is a function in the application that can enable automatic saving of screenshots. So we What should be done to enable this function? This software tutorial will share the operation method with the majority of users, hoping to help more people solve the problem. How to enable automatic saving of screenshots: 1. Double-click to open the software, click on the three horizontal lines icon in the upper right corner, and then click on the option in the list below. 2. After entering the new interface, click the General Settings option in the left column. 3. Then find the Enable automatic image saving on the right, and finally check the small box.
2024-09-14
comment 0
397

What should I do if the ev screen recording video picture is not clear? What should I do if the ev screen recording video picture is not clear?
Article Introduction:ev screen recording can help users record the wonderful moments of the computer or for recording some teachings. Recently, many friends have found that when they use ev screen recording to record the screen, they find that the video is blurry and unclear, so ev What should I do if the screen recording video is not clear? Now let this site introduce to users in detail how to solve the problem of unclear ev screen recording video. How to solve the problem of unclear video recording in EV screen recording: 1. We need to find the installed EV screen recording on the computer desktop and click it with the left mouse button to open it. 2. At this time, you can enter the EV screen recording. A settings icon will appear in the upper right corner of the page. Click the icon. 3. Then a settings window will open on the page, where
2024-09-09
comment 0
272
How to enter the complex disease interface in Win10 How to enter the complex disease interface in Win10
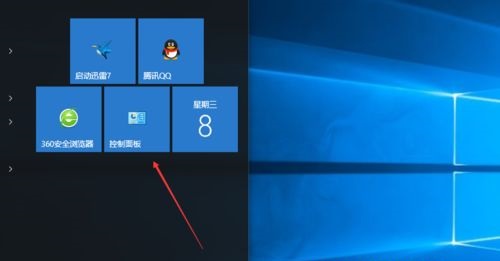
Article Introduction:Hello everyone, today I will teach you how to find the troubleshooting interface in Win10 system. When you use computers, you sometimes encounter various problems, right? At this time, we can use the computer's built-in troubleshooting function to find out where the problem lies, and then try to let the computer solve it by itself. However, some friends may not know how to enter the difficult and complicated disease interface, so I will share it with you today! How to enter the Troubleshooting Interface in Win10 1. Click the "Control Panel" on your computer to enter, or enter "Control Panel" in the search box in the lower left corner and open it; 2. Click "View By" in the upper right corner and select "Large Icons" or " Small icon"; 3. Find "Security and Maintenance" below and click to enter; 4. Finally
2024-09-12
comment 0
644

How to solve the problem of circles on the win11 login interface? How to solve the problem of circles on the win11 login interface?
Article Introduction:How to solve the problem that Windows 11 Microsoft account keeps spinning when logging in? Recently, many friends have reported to the editor that their Microsoft accounts keep spinning around when logging in but cannot log in. They don’t know what is going on and are stuck on the login interface. What should I do if the win11 login interface spins in circles? Friends who are still unclear, don’t worry, follow the editor to see how to solve the problem of circles on the win11 login interface. Method 1: Check the network 1. First, we open the browser and see if we can access the Internet normally. 2. If you cannot access the Internet, you can confirm your network connection. 3. Go to "Settings" - "Troubleshooting" - "Other Troubleshooting" and check the Internet connection. Method 2: Modify DNS server 1. If you can connect to the Internet but still log in
2024-09-18
comment 0
663

What should I do if the Windows 10 Microsoft Store login interface keeps spinning in circles?
Article Introduction:Hello everyone, sometimes when we use Win10 system, we will download applications directly from the Microsoft Store. But recently, many users have asked me what to do if they keep spinning in circles on the Microsoft Store login interface. There may be a problem with their network, or it may be a problem logging in with a local account. So, let’s give you a detailed introduction to the solution to the problem that the Windows 10 Microsoft Store login interface keeps spinning! Analysis of the problem that the Win10 Microsoft Store login interface keeps spinning in circles 1. Network connection problem Make sure the computer is connected to a reliable Internet. Logging in to a Microsoft account requires a stable network connection. If your network is unstable or disconnected, it may cause problems during the login process. 1. Make sure the computer is connected to an available W
2024-09-14
comment 0
693
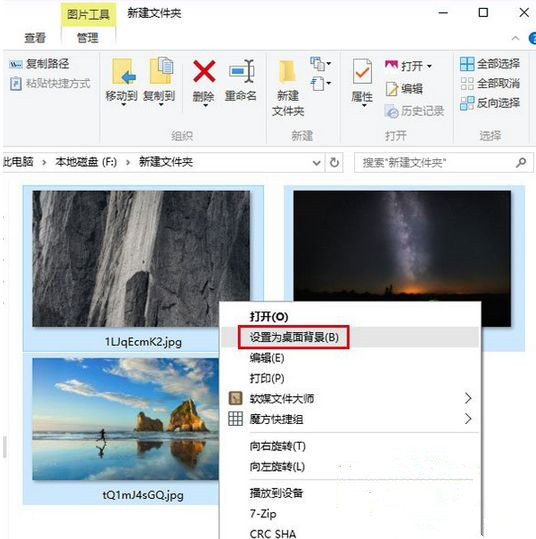
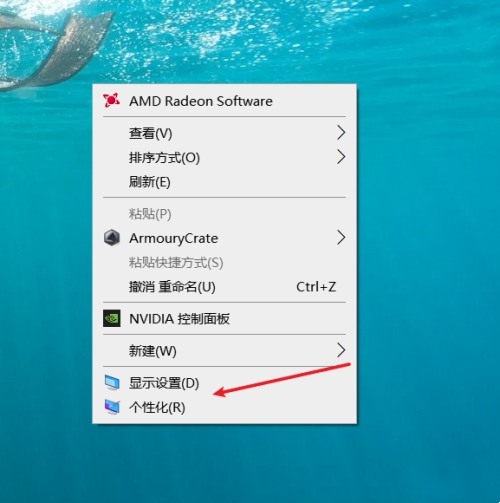
How to set different wallpapers on dual screens in Win10 How to set different desktops on dual screens in Win10
Article Introduction:When we use win10 computers, we sometimes need to use an external monitor, but we don’t know how to set different wallpapers. It's actually very simple, just right-click on any wallpaper and select "Set as desktop background". Next, I will teach you how to set different desktop backgrounds on win10 dual screens. How to set up different desktops in Win10 dual screen Method 1: 1. Put the wallpaper pictures into a folder with any path. 2. Select all wallpapers (Ctrl+A). 3. Right-click on any wallpaper and select "Set as desktop background". Method 2: How to set up different desktops for dual screens in Win10 system, and so on for multiple screens. 1. Right-click on the desktop and open Personalization. 2. Right-click on the desktop image you want to set and select it.
2024-09-13
comment 0
437

How to permanently close the user login interface in win10 How to permanently close the login interface in win10
Article Introduction:Hello everyone, today I will teach you how to permanently close the user login interface in win10 system. It's actually very simple. You just need to right-click the start menu in the lower left corner and select "Run" to set it up. Next, I will introduce the steps of this method in detail, I hope everyone can learn it! Method to permanently close the login interface in win10 1. First of all, if we want to close the login account, we must enter the account first and cannot close it on the login interface. 2. Then right-click the start menu in the lower left corner to open Run. 3. Enter "controluserpasswords2" in the run box. 4. After confirmation, enter the user account and uncheck the option "Users must enter a username and password if using this computer". 5. Finally click the following “O
2024-09-09
comment 0
886
How to solve the problem that the system installed from USB disk cannot enter the boot interface. How to enter the boot interface after installing the system from USB disk
Article Introduction:Nowadays, many users use USB flash drives to install the system. We need to enter the boot interface to install normally, but many people cannot enter or do not know how to enter. In response to this situation, many users do not know how to operate. , this software tutorial will share the specific operation steps with the majority of users. Users in need can come to the PHP Chinese website to get the complete method. How to solve the problem that the U disk cannot enter the boot interface when installing the system: Note: If you want to enter the PE interface when booting, you must first set the U disk as the first startup item. 1. Use the corresponding shortcut keys to enter the BIOS interface when turning on the computer. 2. Under the BOOT menu of BIO, change Secure Boot to Disabled. 3. Continue
2024-09-09
comment 0
528
How to change the background of the password input interface in win7? Tutorial on modifying the background of the login interface in win7
Article Introduction:Many friends who use the win7 system, the background they see on the login interface is the system's own. Many people want to change it to their favorite photo as the background, but they don't know how to do it. Today, the editor of the win7 tutorial will share it with you. Let’s take a look at how to set it up. I hope the things shared on the PHP Chinese website today can help everyone solve the problem. How to change the background of the password input interface in win7 1. Press the Win+R keys at the same time to open Run. 2. Enter “regedit” and click OK. 3. In the directory tree on the left, click the path HKEY_LOCAL_MACHINE\SOFTWARE\Microsoft\Windows\CurrentVersion\Authentication\Lo
2024-09-09
comment 0
638

What should I do if the Android virtual machine installed by VMware is stuck on the Android startup interface?
Article Introduction:VMware is a very easy-to-use virtual machine software. It can help users quickly use Android software on their computers. However, many users are asking why the Android virtual machine installed by VMware is stuck on the Android startup interface. manage? Let this site carefully introduce to users the analysis of the problem of the Android virtual machine stuck on the Android startup interface when installed by VMware. What should I do if the Android virtual machine installed by VMware is stuck on the Android startup interface? 1. Restart the virtual machine First, we can try to restart the virtual machine. Sometimes, VMware will have temporary problems when starting up, which may be solved by restarting the virtual machine. The specific steps are as follows: Shut down the virtual machine and ensure that the virtual machine
2024-09-14
comment 0
535
What should I do if the win10 system desktop keeps refreshing and the splash screen cannot be operated?
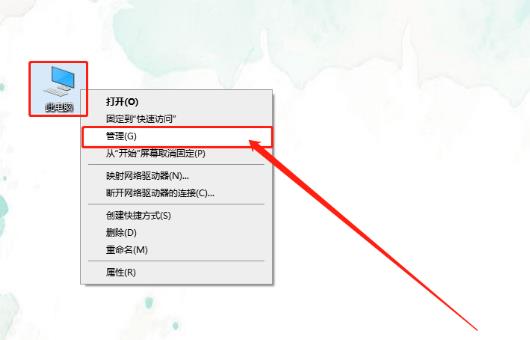
Article Introduction:Oops, my win10 system desktop keeps flashing and cannot move. What should I do? Some friends have also encountered this problem recently. The screen keeps jumping and gets stuck whenever I do any operation. Most people don’t know what to do, but today I’m going to share two solutions with you. I hope it will be useful to everyone! The solution is as follows: Method 1: 1. Right-click "This PC" on the desktop and select "Manage" in the option list. 2. After entering the new interface, click the "Services" option in "Services and Applications" on the left. 3. Then find "ProblemReportsandSolutionsControlPanelSupport" on the right side, right-click it to "Stop". 4. Ran
2024-09-10
comment 0
306

How to set Chinese on gitee. Detailed method of setting Gitte's interface language to Chinese.
Article Introduction:gitee is an online code management platform specially created for software developers. Users can also store and view code data directly through this software, which brings great convenience to users. Many users here are asking how to set Chinese on gitee? The method is very simple, and users can follow the detailed steps provided by the editor. Detailed method for setting the interface language of Gitte to Chinese: First, check what port you have configured for git, and then log in to the web page. 2. Click on the menu bar on the right and select the second to last option. 3. Enter the configuration page and select the third option from the bottom. 4. Scroll down and you will see the configuration place we are looking for. 5. Select Chinese and don’t forget to save. 6. Need to exit and re-enter
2024-09-09
comment 0
404
What's the matter with the win11 desktop that keeps refreshing and the splash screen cannot be operated?
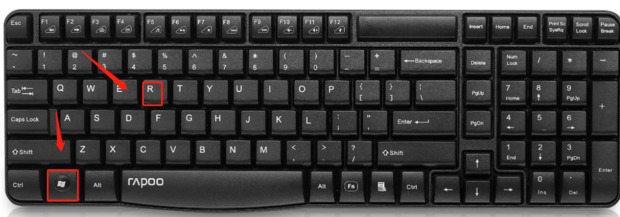
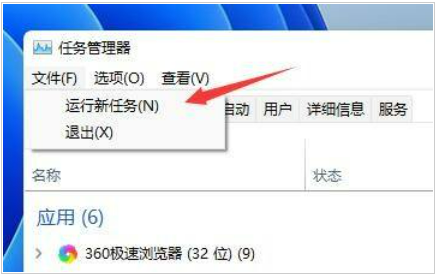
Article Introduction:Sometimes when we use win11 system, we will find that the desktop keeps flashing and is completely inoperable. What the hell is going on? We can try to uninstall the latest update, or it may be because there is a problem with the overlaylcon64.dll file. Next, let me tell you in detail the solution to the problem that the Win11 desktop keeps flashing and cannot be operated! The win11 desktop keeps refreshing and the splash screen cannot be operated. Detailed explanation: Method 1: Uninstall updates 1. First, we use the keyboard "ctrl+shift+esc" key combination to open the task manager. 2. After opening, click "File" in the upper left corner and select "Run New Task". 3. Then check the "Create this task with system administrative rights" option and enter "m
2024-09-09
comment 0
987

The graphical interface version of the Driver Verifier Manager will be disabled in future versions of Win10/Win11
Article Introduction:Hey, you know what? Microsoft recently announced that it will cancel the graphical user interface of the "Driver Verifier Manager" in Windows 10 and Windows 11 systems, which is verifiergui.exe. However, they will also retain the command line version of the "Driver Verifier Manager". If you want to use it, you only need to press the Win key plus the R key on your computer, and then enter " verifier" and press the Enter key again to see it. Microsoft said in an official announcement: Driver Verifier Manager is obsolete and will be removed in a future version of Windows. Users can use the verification command line (verifier.exe) instead of the driver
2024-09-09
comment 0
419
