

이 글에서는 참고할만한 가치가 있는 Java의 LinkedHashMap 관련 지식을 주로 소개합니다. 아래 에디터를 살펴보겠습니다
LinkedHashMap 첫 소개
대부분의 경우 Map은 스레드 안전 문제가 없는 한 기본적으로 HashMap을 사용할 수 있지만, 하지만 HashMap에는 문제가 있습니다. 즉, HashMap이 반복되는 순서가 HashMap이 배치되는 순서가 아니라 무질서하다는 것입니다. HashMap의 이러한 단점은 종종 문제를 야기합니다. 일부 시나리오에서는 순서화된 맵이 예상되기 때문입니다.
이제 LinkedHashMap이 데뷔합니다. 비록 시간과 공간의 오버헤드가 증가하지만 모든 항목에서 실행되는 이중 연결 목록을 유지함으로써 LinkedHashMap은 요소 반복 순서를 보장합니다.
LinkedHashMap의 네 가지 고민에 대한 답변
| 关 注 点 | 结 论 |
| LinkedHashMap是否允许空 | Key和Value都允许空 |
| LinkedHashMap是否允许重复数据 | Key重复会覆盖、Value允许重复 |
| LinkedHashMap是否有序 | 有序 |
| LinkedHashMap是否线程安全 | 非线程安全 |
LinkedHashMap의 기본 구조
LinkedHashMap에 대해 두 가지 사항을 언급하겠습니다.
1. LinkedHashMap은 HashMap+Linked로 간주할 수 있습니다. List 즉, HashMap을 사용하여 데이터 구조를 연산할 뿐만 아니라 LinkedList를 사용하여 삽입된 요소의 순서를 유지합니다
2.LinkedHashMap의 기본 구현 아이디어 즉---다형성입니다. 다형성을 이해하고 LinkedHashMap 원리를 이해하면 절반의 노력으로 두 배의 결과를 얻을 수 있다고 말할 수 있습니다. 반대로 LinkedHashMap 원리를 배우면 다형성에 대한 이해가 촉진되고 깊어질 수 있습니다.
이렇게 말할 수 있는 이유는 무엇입니까? 먼저 LinkedHashMap의 정의를 살펴보세요.
public class LinkedHashMap<K,V>
 extends HashMap<K,V>
 implements Map<K,V>
{
 ...
}LinkedHashMap은 당연히 HashMap의 하위 클래스이기도 합니다상속 HashMap의 모든 비공개 메소드에서. LinkedHashMap의 메서드를 살펴보겠습니다.
LinkedHashMap에는 데이터 구조를 작동하는 메서드가 없다는 것을 알 수 있습니다. 이는 LinkedHashMap이 데이터 구조(예: 데이터를 넣는 것), 데이터를 연산하는 방법은 HashMap과 완전히 동일하지만 세부적으로 약간의 차이가 있습니다.
LinkedHashMap과 HashMap의 차이점은 기본 데이터 구조에 있습니다. LinkedHashMap의 기본 데이터 구조를 살펴보세요. 항목은
private static class Entry<K,V> extends HashMap.Entry<K,V> {
 // These fields comprise the doubly linked list used for iteration.
 Entry<K,V> before, after;
Entry(int hash, K key, V value, HashMap.Entry<K,V> next) {
  super(hash, key, value, next);
 }
 ...
}K키
V값
입력
int 해시
항목
Entry
처음 4개, 즉 빨간색 부분, HashMap에서 상속됩니다. 마지막 두 부분, 즉 파란색 부분은 LinkedHashMap에 고유합니다. next와 before, after를 혼동하지 마세요. next는 HashMap의 지정된 테이블 위치에 연결된 Entry의 순서를 유지하는 데 사용됩니다. before와 After는 Entry 삽입 순서를 유지하는 데 사용됩니다.
다이어그램을 사용하여 이를 표현하고 속성을 나열해 보겠습니다.

LinkedHashMap 초기화
다음과 같은 코드가 있다고 가정합니다:
public static void main(String[] args)
{
 LinkedHashMap<String, String> linkedHashMap =
   new LinkedHashMap<String, String>();
 linkedHashMap.put("111", "111");
 linkedHashMap.put("222", "222");
}먼저 3~4번째 줄에서 새로운 LinkedHashMap이 나오고, 수행된 작업을 살펴보세요.
public LinkedHashMap() {
 super();
  accessOrder = false;
} public HashMap() {
this.loadFactor = DEFAULT_LOAD_FACTOR;
threshold = (int)(DEFAULT_INITIAL_CAPACITY * DEFAULT_LOAD_FACTOR);
table = new Entry[DEFAULT_INITIAL_CAPACITY];
init();
}void init() {
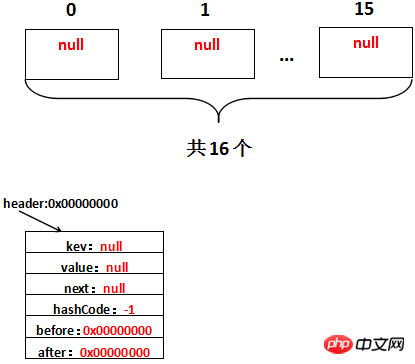
header = new Entry<K,V>(-1, null, null, null);
header.before = header.after = header;
}/** * The head of the doubly linked list. */ private transient Entry<K,V> header;
첫 번째 배수 여기에 나타납니다. 상태: init() 메서드. init() 메소드는 HashMap에 정의되어 있지만
1. LinkedHashMap은 init 메소드
를 대체합니다. 2. 인스턴스화되는 것은 LinkedHashMap
입니다. 실제로 호출됩니다. init 메서드는 LinkedHashMap에 의해 재정의된 init 메서드입니다. 헤더의 주소가 0x00000000이라고 가정하고 초기화 후 실제로는 다음과 같습니다.
LinkedHashMap이 요소를 추가합니다
계속해서 LinkedHashMap을 살펴보세요. 요소를 추가하는 것, 즉 put("111","111")이 하는 일은 물론 HashMap의 put 메서드를 호출하는 것입니다.
public V put(K key, V value) {
 if (key == null)
  return putForNullKey(value);
 int hash = hash(key.hashCode());
 int i = indexFor(hash, table.length);
 for (Entry<K,V> e = table[i]; e != null; e = e.next) {
  Object k;
  if (e.hash == hash && ((k = e.key) == key || key.equals(k))) {
   V oldValue = e.value;
   e.value = value;
   e.recordAccess(this);
   return oldValue;
  }
 }
 modCount++;
 addEntry(hash, key, value, i);
 return null;
}17행은 LinkedHashMap이 다시 작성되기 때문에 또 다른 다형성입니다. addEntry 메소드이므로 addEntry는 다시 작성된 LinkedHashMap 메소드를 호출합니다.
void addEntry(int hash, K key, V value, int bucketIndex) {
 createEntry(hash, key, value, bucketIndex);

 // Remove eldest entry if instructed, else grow capacity if appropriate
 Entry<K,V> eldest = header.after;
 if (removeEldestEntry(eldest)) {
  removeEntryForKey(eldest.key);
 } else {
  if (size >= threshold)
   resize(2 * table.length);
 }
}LinkedHashMap 자체가 삽입 순서를 유지하므로 LinkedHashMap을 캐싱에 사용할 수 있으며, 5행 ~ 7행을 지원하는 데 사용됩니다. FIFO 알고리즘을 사용하므로 당분간은 걱정할 필요가 없습니다. createEntry 메소드를 살펴보세요:
void createEntry(int hash, K key, V value, int bucketIndex) {
 HashMap.Entry<K,V> old = table[bucketIndex];
 Entry<K,V> e = new Entry<K,V>(hash, key, value, old);
 table[bucketIndex] = e;
 e.addBefore(header);
 size++;
}private void addBefore(Entry<K,V> existingEntry) {
after = existingEntry;
before = existingEntry.before;
before.after = this;
after.before = this;
}2~4행의 코드는 새로 추가된 HashMap과 다르지 않습니다. elements table[i]에 배치될 때 LinkedHashMap은 addBefore 작업도 수행한다는 차이점이 있습니다. 이 네 줄의 코드의 의미는 새 항목과 원래 연결 목록 사이에 이중 연결 목록을 생성하는 것입니다. LinkedList의 소스 코드를 잘 알고 계시다면 이해하기 어렵지 않을 것입니다. 기존 항목은 헤더를 나타냅니다. 1、after=existingEntry,即新增的Entry的after=header地址,即after=0x00000000 2、before=existingEntry.before,即新增的Entry的before是header的before的地址,header的before此时是0x00000000,因此新增的Entry的before=0x00000000 3、before.after=this,新增的Entry的before此时为0x00000000即header,header的after=this,即header的after=0x00000001 4、after.before=this,新增的Entry的after此时为0x00000000即header,header的before=this,即header的before=0x00000001 这样,header与新增的Entry的一个双向链表就形成了。再看,新增了字符串222之后是什么样的,假设新增的Entry的地址为0x00000002,生成到table[2]上,用图表示是这样的: 就不细解释了,只要before、after清除地知道代表的是哪个Entry的就不会有什么问题。 总得来看,再说明一遍,LinkedHashMap的实现就是HashMap+LinkedList的实现方式,以HashMap维护数据结构,以LinkList的方式维护数据插入顺序。 利用LinkedHashMap实现LRU算法缓存 前面讲了LinkedHashMap添加元素,删除、修改元素就不说了,比较简单,和HashMap+LinkedList的删除、修改元素大同小异,下面讲一个新的内容。 LinkedHashMap可以用来作缓存,比方说LRUCache,看一下这个类的代码,很简单,就十几行而已: 顾名思义,LRUCache就是基于LRU算法的Cache(缓存),这个类继承自LinkedHashMap,而类中看到没有什么特别的方法,这说明LRUCache实现缓存LRU功能都是源自LinkedHashMap的。LinkedHashMap可以实现LRU算法的缓存基于两点: 1、LinkedList首先它是一个Map,Map是基于K-V的,和缓存一致 2、LinkedList提供了一个boolean值可以让用户指定是否实现LRU 那么,首先我们了解一下什么是LRU:LRU即Least Recently Used,最近最少使用,也就是说,当缓存满了,会优先淘汰那些最近最不常访问的数据。比方说数据a,1天前访问了;数据b,2天前访问了,缓存满了,优先会淘汰数据b。 我们看一下LinkedList带boolean型参数的构造方法: 就是这个accessOrder,它表示: (1)false,所有的Entry按照插入的顺序排列 (2)true,所有的Entry按照访问的顺序排列 第二点的意思就是,如果有1 2 3这3个Entry,那么访问了1,就把1移到尾部去,即2 3 1。每次访问都把访问的那个数据移到双向队列的尾部去,那么每次要淘汰数据的时候,双向队列最头的那个数据不就是最不常访问的那个数据了吗?换句话说,双向链表最头的那个数据就是要淘汰的数据。 "访问",这个词有两层意思: 1、根据Key拿到Value,也就是get方法 2、修改Key对应的Value,也就是put方法 首先看一下get方法,它在LinkedHashMap中被重写: 然后是put方法,沿用父类HashMap的: 修改数据也就是第6行~第14行的代码。看到两端代码都有一个共同点:都调用了recordAccess方法,且这个方法是Entry中的方法,也就是说每次的recordAccess操作的都是某一个固定的Entry。 recordAccess,顾名思义,记录访问,也就是说你这次访问了双向链表,我就把你记录下来,怎么记录?把你访问的Entry移到尾部去。这个方法在HashMap中是一个空方法,就是用来给子类记录访问用的,看一下LinkedHashMap中的实现: 看到每次recordAccess的时候做了两件事情: 1、把待移动的Entry的前后Entry相连 2、把待移动的Entry移动到尾部 当然,这一切都是基于accessOrder=true的情况下。最后用一张图表示一下整个recordAccess的过程吧: 代码演示LinkedHashMap按照访问顺序排序的效果 最后代码演示一下LinkedList按照访问顺序排序的效果,验证一下上一部分LinkedHashMap的LRU功能: 注意这里的构造方法要用三个参数那个且最后的要传入true,这样才表示按照访问顺序排序。看一下代码运行结果: 代码运行结果证明了两点: 1、LinkedList是有序的 2、每次访问一个元素(get或put),被访问的元素都被提到最后面去了 【相关推荐】 1. Java免费视频教程 2. 全面解析Java注解 3. Java教程手册 위 내용은 LinkedHashMap이 요소 반복 순서를 보장하는 방법에 대한 자세한 설명의 상세 내용입니다. 자세한 내용은 PHP 중국어 웹사이트의 기타 관련 기사를 참조하세요!
public class LRUCache extends LinkedHashMap
{
 public LRUCache(int maxSize)
 {
  super(maxSize, 0.75F, true);
  maxElements = maxSize;
 }

 protected boolean removeEldestEntry(java.util.Map.Entry eldest)
 {
  return size() > maxElements;
 }
 private static final long serialVersionUID = 1L;
 protected int maxElements;
}
로그인 후 복사public LinkedHashMap(int initialCapacity,
float loadFactor,
boolean accessOrder) {
super(initialCapacity, loadFactor);
this.accessOrder = accessOrder;
}로그인 후 복사public V get(Object key) {
Entry<K,V> e = (Entry<K,V>)getEntry(key);
if (e == null)
return null;
e.recordAccess(this);
return e.value;
}로그인 후 복사public V put(K key, V value) {
if (key == null)
return putForNullKey(value);
int hash = hash(key.hashCode());
int i = indexFor(hash, table.length);
for (Entry<K,V> e = table[i]; e != null; e = e.next) {
Object k;
if (e.hash == hash && ((k = e.key) == key || key.equals(k))) {
V oldValue = e.value;
e.value = value;
e.recordAccess(this);
return oldValue;
}
}
modCount++;
addEntry(hash, key, value, i);
return null;
}로그인 후 복사로그인 후 복사void recordAccess(HashMap<K,V> m) {
LinkedHashMap<K,V> lm = (LinkedHashMap<K,V>)m;
if (lm.accessOrder) {
lm.modCount++;
remove();
addBefore(lm.header);
}
}로그인 후 복사private void remove() {
before.after = after;
after.before = before;
}로그인 후 복사private void addBefore(Entry<K,V> existingEntry) {
after = existingEntry;
before = existingEntry.before;
before.after = this;
after.before = this;
}로그인 후 복사로그인 후 복사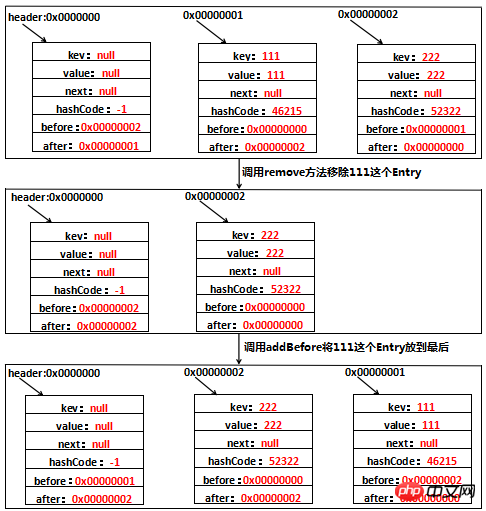
public static void main(String[] args)
{
 LinkedHashMap<String, String> linkedHashMap =
   new LinkedHashMap<String, String>(16, 0.75f, true);
 linkedHashMap.put("111", "111");
 linkedHashMap.put("222", "222");
 linkedHashMap.put("333", "333");
 linkedHashMap.put("444", "444");
 loopLinkedHashMap(linkedHashMap);
 linkedHashMap.get("111");
 loopLinkedHashMap(linkedHashMap);
 linkedHashMap.put("222", "2222");
 loopLinkedHashMap(linkedHashMap);
}

public static void loopLinkedHashMap(LinkedHashMap<String, String> linkedHashMap)
{
 Set<Map.Entry<String, String>> set = inkedHashMap.entrySet();
 Iterator<Map.Entry<String, String>> iterator = set.iterator();

 while (iterator.hasNext())
 {
  System.out.print(iterator.next() + "\t");
 }
 System.out.println();
}
로그인 후 복사111=111 222=222 333=333 444=444
222=222 333=333 444=444 111=111
333=333 444=444 111=111 222=2222
로그인 후 복사


![[웹 프런트엔드] Node.js 빠른 시작](https://img.php.cn/upload/course/000/000/067/662b5d34ba7c0227.png)


