HTML 요소를 성능 영향과 분리하는 의미론적 중요성이 점점 더 강조되면서 CSS는 HTML5 요소의 레이아웃에서 점점 더 중요한 역할을 합니다.
1. 콘텐츠 위치 지정
콘텐츠를 제어하는 가장 쉬운 방법은 위치 지정을 통해, 브라우저를 사용하여 요소 배치 방식을 변경할 수 있습니다.

1.1 위치 지정 유형 설정
위치 속성은 요소의 위치 지정 방법을 설정합니다.

위치 속성의 다른 값은 요소가 배치되는 다른 요소를 지정합니다. 요소의 오프셋을 설정하기 위해 위쪽, 아래쪽, 왼쪽 및 오른쪽 속성을 사용할 때 위치 속성으로 지정된 요소를 기준으로 한 오프셋을 나타냅니다.
<!DOCTYPE html>
<html lang="en">
<head>
    <meta charset="UTF-8">
    <title>Example</title>
    <style type="text/css">
        img {top: 15px; left: 150px; border: medium double black; width: 150px;}
    </style>
</head>
<body>
<p>
    There are lots of different kinds of fruit - there are over 500 varieties of banana alone.
    By the time we add the countless types of apples, oranges, and other well-know fruit, we are faced with thousands of choices.
</p>
<p>
    One of the most interesting aspects of fruit is the variety available in each country.
    I live near London, in an area which is know for its apples.
</p>
<img src="imgs/banana.png" id="banana" alt="small banana" />
<p>
    When travelling Asia, I was struck by how many different kinds of banana were available
    - many of which had unique flavours and which were only available within a small region.
</p>
<p>
    <button>Static</button>
    <button>Relative</button>
    <button>Absolute</button>
    <button>Fixed</button>
</p>
<script>
    var buttons = document.getElementsByTagName("button");
    for( var i = 0; i < buttons.length; i++){
        buttons[i].onclick = function(e){
            document.getElementById("banana").style.position = e.target.innerHTML;
        }
    }
</script>
</body>
</html>위 코드에서는 누른 버튼에 따라 img 요소의 위치 속성 값을 변경할 수 있는 작은 스크립트가 페이지에 추가되었습니다. 여기서 left 속성은 150px로 설정되고 top 속성은 5px로 설정됩니다. 즉, 위치 값이 정적으로 설정되지 않는 한 img 요소는 가로 축을 따라 150픽셀, 세로 축을 따라 15픽셀만큼 오프셋됩니다. 수직축. 아래 이미지는 정적 값에서 상대 값으로 변경되는 위치 값을 보여줍니다.
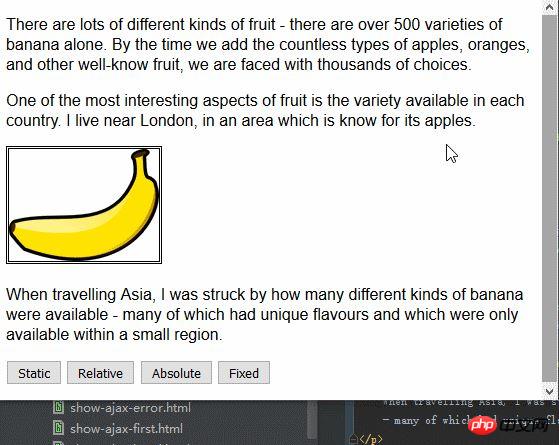
상대 값은 요소에 위쪽, 아래쪽, 왼쪽 및 오른쪽 속성을 적용하여 정적 값에 의해 결정된 위치를 기준으로 요소의 위치를 변경합니다. 그림에서 볼 수 있듯이 left 속성과 top 속성의 값을 지정하면 img 요소가 오른쪽 아래로 이동하게 됩니다.
절대값은 위치 값이 정적이 아닌 가장 가까운 상위 요소의 위치를 기준으로 요소의 위치를 지정합니다. 이 예에는 그러한 요소가 없습니다. 이는 아래와 같이 요소가 body 요소를 기준으로 배치된다는 것을 의미합니다.
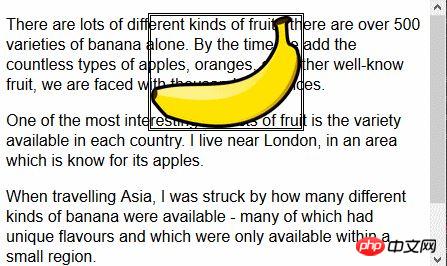
브라우저 페이지를 스크롤하면 img 요소는 나머지 콘텐츠와 함께 이동합니다. 이 상황을 고정 값과 비교할 수 있습니다. 다음 그림은 고정 값 위치 지정 효과를 보여줍니다.
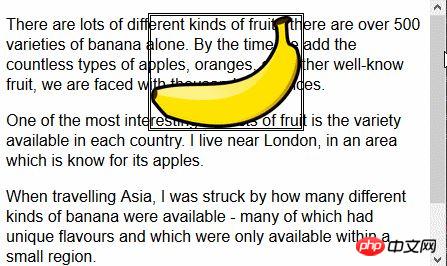
고정 값을 사용하면 요소가 브라우저 창을 기준으로 위치가 지정됩니다. 이는 나머지 콘텐츠가 위로 스크롤되는지 아래로 스크롤되는지에 관계없이 요소가 항상 동일한 위치를 차지함을 의미합니다.
1.2 요소의 스택 순서 설정
z-index 속성은 요소 표시의 스택 순서를 지정합니다.
z-index 속성의 값은 숫자값이며, 음수값이 허용됩니다. 값이 작을수록 쌓인 순서에서 더 멀어집니다. 이 속성은 요소가 겹치는 경우에만 유용합니다.
<!DOCTYPE html>
<html lang="en">
<head>
    <meta charset="UTF-8">
    <title>Example</title>
    <style type="text/css">
        img {border: medium double black; background-color: lightgray; position: fixed;}
        #banana { z-index: 1; top: 15px; left: 150px; }
        #apple { z-index: 2; top: 25px; left: 120px; }
    </style>
</head>
<body>
<p>
    There are lots of different kinds of fruit - there are over 500 varieties of banana alone.
    By the time we add the countless types of apples, oranges, and other well-know fruit, we are faced with thousands of choices.
</p>
<p>
    One of the most interesting aspects of fruit is the variety available in each country.
    I live near London, in an area which is know for its apples.
</p>
<img src="imgs/banana-small.png" id="banana" alt="small banana" />
<img src="imgs/apple.png" id="apple" alt="small apple" />
<p>
    When travelling Asia, I was struck by how many different kinds of banana were available
    - many of which had unique flavours and which were only available within a small region.
</p>
</body>
</html>이 예에서는 두 개의 고정 위치 img 요소가 생성되고 두 이미지의 일부가 겹치도록 위쪽 및 왼쪽 값이 설정됩니다. id 값이 apple인 img 요소의 z-index 값은 id 값이 바나나인 요소의 z-index 값보다 크므로 사과 이미지가 바나나 이미지 위에 표시됩니다.
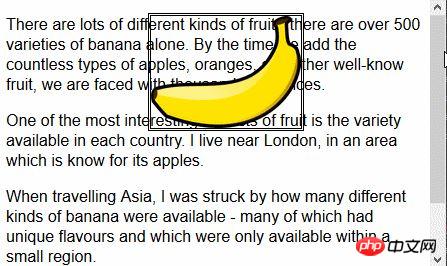
z-index 속성의 기본값은 0이므로 브라우저는 기본적으로 p 요소에 이미지를 표시합니다.
2. 다중 열 레이아웃 만들기
다단 기능을 사용하면 신문 레이아웃과 유사하게 여러 개의 세로 열로 콘텐츠를 배치할 수 있습니다.

<!DOCTYPE html>
<html lang="en">
<head>
    <meta charset="UTF-8">
    <title>Example</title>
    <style type="text/css">
        div {
            column-count: 3;
            column-fill: balance;
            column-rule: medium solid black;
            column-gap: 1.5em;
        }
        img {
            float: left;
            border: medium double black;
            background-color: lightgray;
            padding: 2px;
            margin: 2px;
        }
    </style>
</head>
<body>
<div>
    There are lots of different kinds of fruit - there are over 500 varieties of banana alone.
    By the time we add the countless types of apples, oranges, and other well-know fruit, we are faced with thousands of choices.
    <img src="imgs/banana-small.png" id="banana" alt="small banana" />
    One of the most interesting aspects of fruit is the variety available in each country.
    I live near London, in an area which is know for its apples.
    <img src="imgs/apple.png" id="apple" alt="small apple" />
    When travelling Asia, I was struck by how many different kinds of banana were available
    - many of which had unique flavours and which were only available within a small region.

    And, of course, there are fruits which are unique
    - I am put in mind of the durian, which is widely consumed in SE Asia and is know as the "king of fruits".
    The durian is largely unknow in Europe and the USA
    - if it is know at all, it is for the overwhelming smell, which is compared to a combination of almonds,
    rotten onions and gym socks.
</div>
</body>
</html>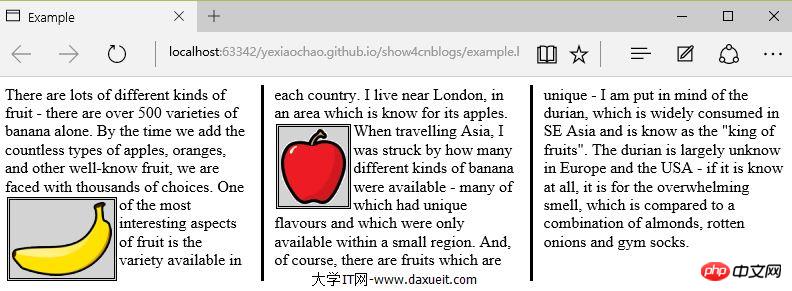
PS: 일시적으로 IE, Edge, Opera 브라우저에서 효과적으로 표시되는 것으로 나타났으나 Firefox 및 Google에서는 지원하지 않습니다. .
위 그림에서 볼 수 있듯이 div 요소의 콘텐츠는 신문의 레이아웃과 마찬가지로 한 열에서 다른 열로 흐릅니다. 이 예에서는 div 요소의 텍스트 콘텐츠가 이미지 주위를 부드럽게 둘러쌀 수 있도록 img 요소에 float 속성이 적용됩니다.
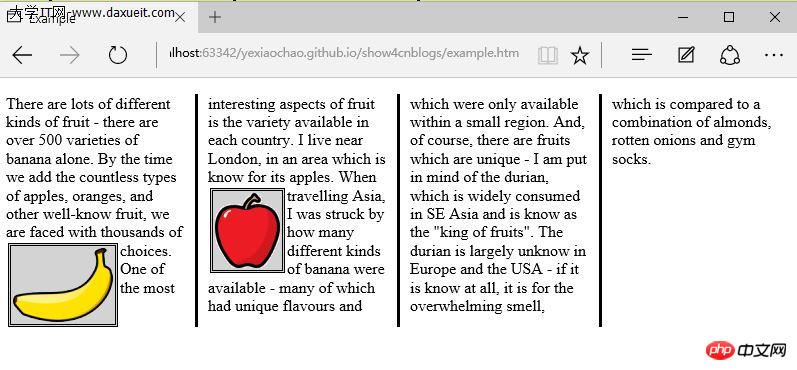
위의 예에서는 열 개수 속성을 사용하여 페이지 레이아웃을 세 개의 열로 나눕니다. 창 크기가 조정되면 브라우저는 너비 자체를 조정하여 레이아웃의 열 수를 유지합니다. 또 다른 방법은 열 너비를 지정하는 것입니다.
<style type="text/css">
    p {
        column-width: 10em;
        column-fill: balance;
        column-rule: medium solid black;
        column-gap: 1.5em;
    }
    img {
        float: left;
        border: medium double black;
        background-color: lightgray;
        padding: 2px;
        margin: 2px;
    }
</style>column-width 속성이 적용되면 브라우저는 열을 추가하거나 제거하여 지정된 너비를 유지합니다.
3. 유연한 상자 레이아웃 만들기
弹性盒布局(也称伸缩盒)在CSS3中得到了进一步加强,为display属性添加了一个新值(flexbox),并定义了其他几个属性。使用弹性布局可以创建对浏览器窗口调整响应良好的流动页面。这是通过在包含元素之间分配容器块中未使用的空间来实现的。规范为弹性布局定义了如下新属性:
* flex-align
* flex-direction
* flex-order
* flex-pack
不过建议规范和实现之间还有差异,顶定义一下弹性盒要解决的问题。下面代码展示了一个有问题的简单布局。
<!DOCTYPE html>
<html lang="en">
<head>
    <meta charset="UTF-8">
    <title>Example</title>
    <style type="text/css">
        p {
            float: left;
            width: 150px;
            border: medium double green;
        }
    </style>
</head>
<body>
<div>
    <p id="first">
        There are lots of different kinds of fruit - there are over 500 varieties of banana alone.
        By the time we add the countless types of apples, oranges, and other well-know fruit, we are faced with thousands of choices.
    </p>
    <p id="second">
        One of the most interesting aspects of fruit is the variety available in each country.
        I live near London, in an area which is know for its apples.
    </p>
    <p id="third">
        When travelling Asia, I was struck by how many different kinds of banana were available
        - many of which had unique flavours and which were only available within a small region.
    </p>
</div>
</body>
</html>在上面代码中,div元素包含了三个p元素。将p元素显示在水平行中,用float属性很容易就能做到这一点。
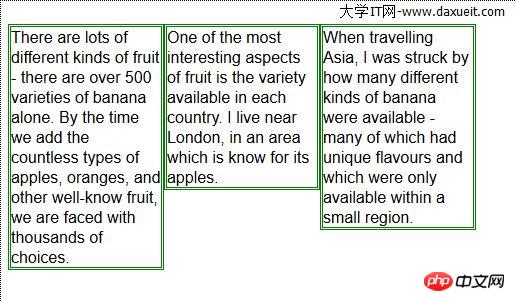
这里能使用弹性盒解决的问题是处理页面上p元素右边的空间块。解决这个问题有很多方式。在这个例子中,可以使用百分比宽度,但弹性盒解决方案更优雅,页面看起来流动性也会好很多。下表列出了实现弹性盒核心功能的三个 -webkit 属性(简单起见,表中省略了-webkit前缀):

3.1 创建简单的弹性盒
可以使用 display属性创建弹性盒。标准值是 flexbox, 不过在标准完成和实现之前,必须使用 -webkit-box 。 使用 box-flex 属性告诉浏览器如何分配元素之间的未使用空间。 display 属性的新值和 box-flex 属性如下面代码所示:
<!DOCTYPE html>
<html lang="en">
<head>
    <meta charset="UTF-8">
    <title>Example</title>
    <style type="text/css">
        p {
            width: 150px;
            border: medium double green;
            background-color: lightgray;
            margin: 2px;
        }
        #container{ display: -webkit-box;}
        #second {-webkit-box-flex: 1;}
    </style>
</head>
<body>
<div id="container">
    <p id="first">
        There are lots of different kinds of fruit - there are over 500 varieties of banana alone.
        By the time we add the countless types of apples, oranges, and other well-know fruit, we are faced with thousands of choices.
    </p>
    <p id="second">
        One of the most interesting aspects of fruit is the variety available in each country.
        I live near London, in an area which is know for its apples.
    </p>
    <p id="third">
        When travelling Asia, I was struck by how many different kinds of banana were available
        - many of which had unique flavours and which were only available within a small region.
    </p>
</div>
</body>
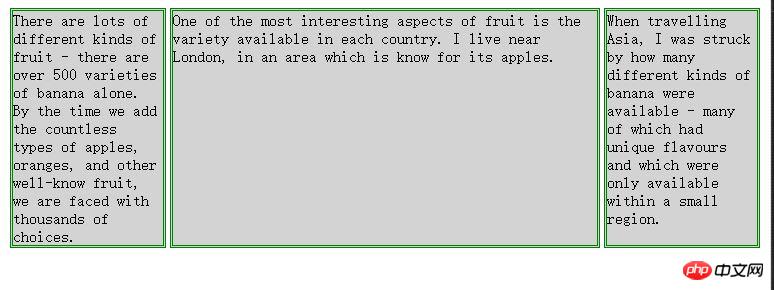
</html>display 属性会应用到弹性盒容器。弹性盒容器是具有多余空间,且想对其中的内容应用弹性布局的元素。box-flex 属性会应用到弹性盒容器内的元素,告诉浏览器当容器大小改变时哪些元素的尺寸是弹性的。在这个例子中,选择了id值为second的p元素。
PS:从p元素样式声明中删除了float属性。可伸缩元素不能包含浮动元素。
可以从下图看出浏览器如何伸缩选择元素的尺寸:
3.2 伸缩多个元素
应用box-flex 告诉浏览器伸缩多个元素的尺寸。设置的值决定了浏览器分配空间的比例。修改前面例子的CCS文件如下:
<style type="text/css">
    p {
        width: 150px;
        border: medium double green;
        background-color: lightgray;
        margin: 2px;
    }
    #container{ display: -webkit-box;}
    #first { -webkit-box-flex: 3;}
    #second {-webkit-box-flex: 1;}
</style>这里将box-flex 属性应用到了id值为first的p元素。此处box-flex属性的值是3,意思是浏览器为其分部的多余空间是为id值为second的p元素的三倍。当创建此类比例时,指的是元素的可伸缩性。只是使用这个比例来分配多余的空间,或者减少元素的尺寸,而不是改变它的首选尺寸。从下图可以看到这个比例时怎么应用到元素的。

3.3 处理垂直空间
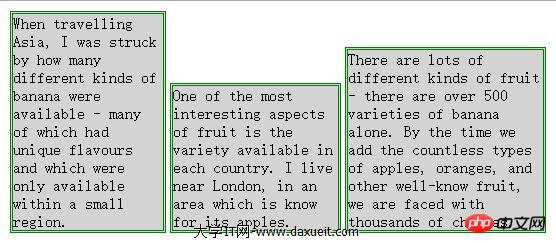
box-align 属性告诉浏览器如何处理多余的垂直空间。默认情况下垂直拉伸元素以填充多余的空间。上面的例子就是这种情况,前两个p元素的尺寸是调整过的,内容下面多出了空的空间。

下面的代码展示了元素样式变为应用box-align属性。注意这个属性应用到可伸缩容器上,而不是内容元素。
p {
    width: 150px;
    border: medium double green;
    background-color: lightgray;
    margin: 2px;
}
#container{
    display: -webkit-box;
    -webkit-box-direction: reverse;
    -webkit-box-align: end;
}
#first { -webkit-box-flex: 3;}
#second {-webkit-box-flex: 1;}此例中,使用了 end 值,这代表内容元素会沿着容器元素的底边放置,垂直方向任何多余的空间都会显示到内容元素上方。其呈现效果如下图所示:
3.4 处理最大尺寸
弹性盒伸缩时不会超过内容元素的最大尺寸。如果存在多余空间,浏览器会伸展元素,知道达到最大允许尺寸。box-pack属性定义了在所有的可伸缩元素均可达到最大尺寸的情况下,多余空间仍未分配完毕时应该如何处理。

修改前面示例的CSS文件如下:
p {
    width: 150px;
    max-width: 250px;
    border: medium double green;
    background-color: lightgray;
    margin: 2px;
}
#container{
    display: -webkit-box;
    -webkit-box-direction: reverse;
    -webkit-box-align: end;
    -webkit-box-pack: justify;
}
#first { -webkit-box-flex: 3;}
#second {-webkit-box-flex: 1;}这属性的效果如下图所示。在可伸缩p元素达到最大宽度后,浏览器开始在元素之间分配多余空间。注意,多余空间只是分配到元素与元素之间,第一个元素之前或者最后一个元素之后都没有分配。

4. 创建表格布局
使用 table 元素如此普遍的原因是它解决了一种常见的布局问题:创建承载内容的简单网格。幸好,我们可以使用CCS表格布局特性来设置页面布局,这很像使用 table 元素,但不会破坏语义重要性。创建CSS表格布局使用display属性。下表列出了跟这个特性相关的值。表中的每个值都与一个HTML元素对应。

其中几个值的用法如下面代码所示:
<!DOCTYPE html>
<html lang="en">
<head>
    <meta charset="UTF-8">
    <title>Example</title>
    <style type="text/css">
        #table { display: table;}
        div.row {display: table-row; background-color:lightgray; }
        p { display: table-cell; border: thin solid green; padding: 15px; margin: 15px;}
        img { float: left;}
    </style>
</head>
<body>
<div id="table">
    <div >
        <p id="first">
            There are lots of different kinds of fruit - there are over 500 varieties of banana alone.
            By the time we add the countless types of apples, oranges, and other well-know fruit, we are faced with thousands of choices.
        </p>
        <p id="second">
            One of the most interesting aspects of fruit is the variety available in each country.
            I live near London, in an area which is know for its apples.
        </p>
        <p id="third">
            When travelling Asia, I was struck by how many different kinds of banana were available
            - many of which had unique flavours and which were only available within a small region.
        </p>
    </div>
    <div class="row">
        <p>
            This is an apple. <img src="imgs/apple.png" alt="apple" />
        </p>
        <p>
            This is a banana. <img src="imgs/banana-small.png" alt="banana" />
        </p>
        <p>
            No picture here.
        </p>
    </div>
</div>
</body>
</html>这些取值的效果如下图所示:
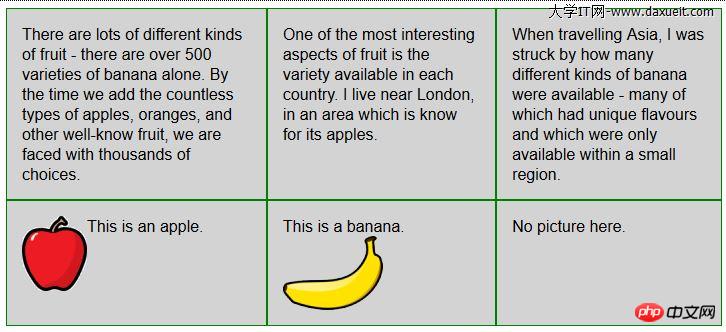
CSS表格布局的一个优点是自动调整单元格大小,因此,行是由该行中内容最高的单元格决定的,列是由该列中内容最宽的单元格决定的,这从上图也能看出来。
위 내용은 CSS를 사용하여 레이아웃 생성에 대해 자세히 알아보기의 상세 내용입니다. 자세한 내용은 PHP 중국어 웹사이트의 기타 관련 기사를 참조하세요!