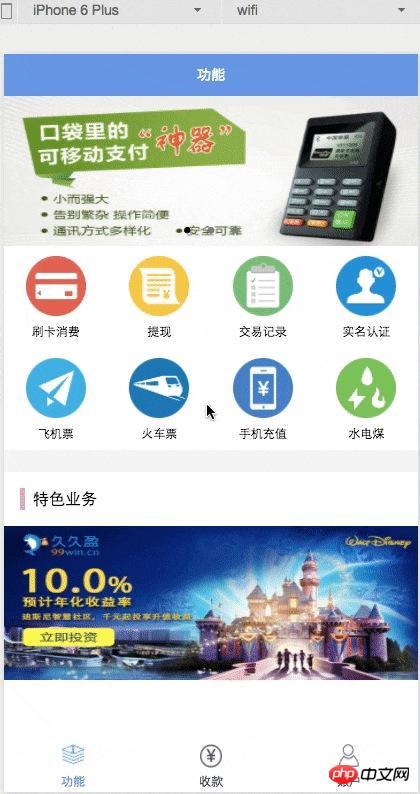
이 기사에서는 실제 예를 사용하여 WeChat 미니 프로그램 페이지를 구축하는 방법을 설명합니다. 먼저 이 기사에서 얻을 수 있는 페이지 효과를 살펴보겠습니다.

개발 도구 다운로드: WeChat에는 공식적으로 개발과 같은 기능을 통합하는 개발자 도구가 있습니다. 디버깅, 코드 편집 및 프로그램 릴리스.
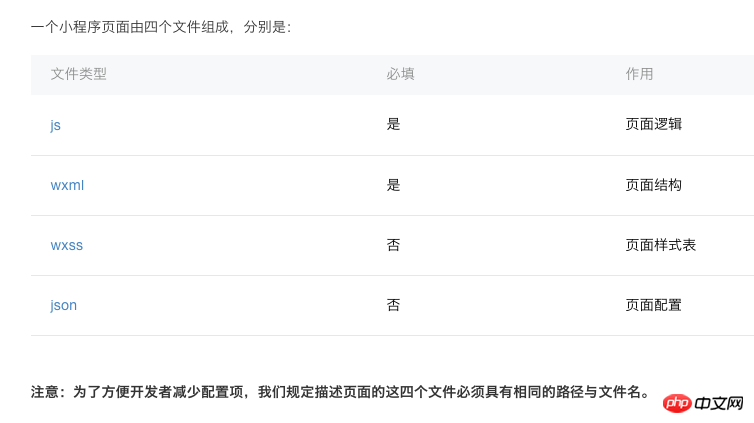
WeChat Mini 프로그램 구조:

프로그램의 기본 구조입니다. 가장 중요하고 필수적인 것은 app.js, app.json 및 app.wxss입니다. 그 중 .js 접미사는 스크립트 파일, .json 접미사는 구성 파일, .wxss 접미사는 스타일 시트 파일입니다.
하단 라벨 하단 라벨은 tabBar입니다. 구현은 비교적 간단하며 간단한 구성만 필요합니다. app.json
{
  "pages":[
    "pages/function/function",
    "pages/pay/pay",
    "pages/account/account",
    "pages/index/index",
    "pages/logs/logs"
  ],
  "tabBar":{
    "color": "#464a56",
    "selectedColor": "#6595e9",
    "backgroundColor": "#FFFFFF",
    "borderStyle": "white",
    "list": [{
        "pagePath": "pages/function/function",
        "text": "功能",
        "iconPath": "images/tab_function_default.png",
        "selectedIconPath": "images/tab_function_sel.png"
    },{
        "pagePath": "pages/pay/pay",
        "text": "收款",
        "iconPath": "images/tab_consume_default.png",
        "selectedIconPath": "images/tab_consume_sel.png"
    },{
        "pagePath": "pages/account/account",
        "text": "账户",
        "iconPath": "images/tab_account_default.png",
        "selectedIconPath": "images/tab_account_sel.png"
    }]
  },
  "window":{
    "navigationBarBackgroundColor": "#6595e9",
    "navigationBarTextStyle":"white",
    "navigationBarTitleText": "V50",
    "backgroundColor": "#eeeeee",
    "backgroundTextStyle":"light"
  }
}페이지는 배열을 허용하며, 각 항목은 미니 프로그램이 구성되는 페이지를 지정하는 문자열이라는 점에 주목할 가치가 있습니다. 각 항목은 해당 페이지의 [경로+파일명] 정보를 나타내며, 배열의 첫 번째 항목은 미니 프로그램의 초기 페이지를 나타냅니다.
미니 프로그램에서 페이지를 추가/줄이기 위해서는 페이지 배열을 수정해야 합니다.
프레임워크가 통합을 위해 .json, .js, .wxml, .wxss 경로에서 4개 파일을 자동으로 찾기 때문에 파일 이름에 파일 접미사를 쓸 필요가 없습니다.
페이지 제목:
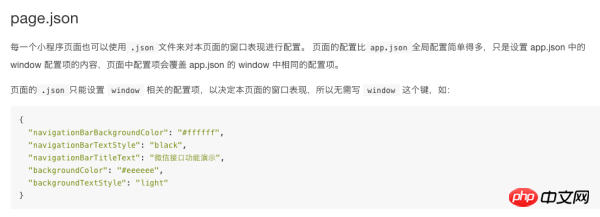
페이지 제목 이 제목을 어떻게 구현하나요? 공식 문서를 살펴보겠습니다.

이것을 보면 지정된 페이지의 json 파일에 페이지를 구성해야 한다는 것을 알아야 합니다. 계속해서 공식 문서를 확인하세요

끝입니다! 모든 페이지에 공통된 구성을 page.json에 넣은 다음 각 페이지의 .json 파일에서 각 페이지의 고유한 속성을 구성하기만 하면 됩니다. 위 app.json에서는 일반 페이지의 window 속성이 구성되어 있으므로 function.json에서 페이지 제목만 구성하면 됩니다.
{
     "navigationBarTitleText": "功能"
}Carousel Chart
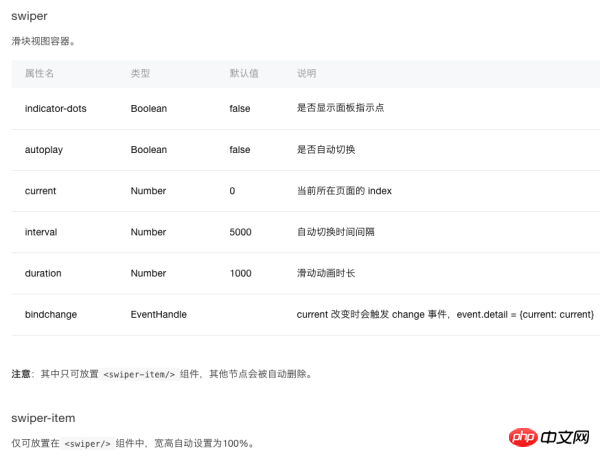
다음으로 상단 Carousel 이미지를 구현합니다. . WeChat은 캐러셀 차트를 구현하기 위한 스와이프 구성 요소를 제공합니다.

코드가 나옵니다: function.wxml
<swiper indicator-dots="{{indicatorDots}}"
autoplay="{{autoplay}}" interval="{{interval}}" duration="{{duration}}">
<block wx:for="{{imgUrls}}">
<swiper-item>
<image src="{{item}}" class="slide-image" />
</swiper-item>
</block>
</swiper>
function.js
//function.js
Page({
data: {
indicatorDots: true,
autoplay: true,
interval: 5000,
duration: 1000,
imgUrls: [
'http://img02.tooopen.com/images/20150928/tooopen_sy_143912755726.jpg',
'http://img06.tooopen.com/images/20160818/tooopen_sy_175866434296.jpg',
'http://img06.tooopen.com/images/20160818/tooopen_sy_175833047715.jpg'
],
},
})예, WeChat 애플릿의 캐러셀 이미지는 정말 간단합니다! 여기에 "캐러셀 이미지는 URL 주소를 사용합니다. 로컬 이미지를 사용하고 싶으면 어떻게 되나요? 달성할 수 있나요?"
이 공식 문서에는 소개되어 있지 않지만 테스트를 거쳐 달성 가능합니다. 코드는 다음과 같습니다
imgUrls: [
    '../../images/adv_50.png',
    '../../images/adv_60.png',
    '../../images/adv_80.png'
],중간 함수 모듈
가운데 8개의 함수 모듈은 안드로이드의 GridView 효과와 유사합니다. 이 기사에서는 다음과 같은 루프 방식을 채택하여 구현했습니다. function.wxml
<view class='function_container'>
<view class='function_item' wx:for="{{functions}}" wx:for-index="idx" wx:for-item="function">
<image class='function_img' src='{{function.pic_url}}'/>
<view class='function_name'>{{function.name}}</view>
</view>
</view>
function.js
functions: [
{
"name": "刷卡消费",
"pic_url": '../../images/icon_consume.png'
},
{
"name": "提现",
"pic_url": '../../images/icon_withdrawals.png'
},
{
"name": "交易记录",
"pic_url": '../../images/icon_records.png'
},
{
"name": "实名认证",
"pic_url": '../../images/icon_auth.png'
},
{
"name": "飞机票",
"pic_url": '../../images/icon_airplane.png'
},
{
"name": "火车票",
"pic_url": '../../images/icon_train.png'
},
{
"name": "手机充值",
"pic_url": '../../images/icon_phone_recharge.png'
},
{
"name": "水电煤",
"pic_url": '../../images/icon_water.png'
}
]
function.wxss
/**function.wxss**/
.container {
height: 650px;
}
.slide-image{
display: block;
height: 280rpx;
width:100%
}
.function_container{
display:flex;
flex-wrap: wrap;
width:100%;
}
.function_item{
width:25%;
display:flex;
flex-direction:column;
justify-content:center;
align-items:center;
font-size:12px;
box-sizing:border-box;
padding-bottom:10px;
padding-top:10px
}
.function_img{
width:60px;
height:60px;
}
.function_name{
padding-top:10px
}여기서는 width: 25%를 사용하여 각 행에 4개의 기능 버튼을 배열하는 효과를 얻었습니다.
전체 코드
다음 레이아웃은 비교적 간단합니다. 전체 코드를 업로드하면 됩니다: function.wxml
<!--function.wxml-->
<scroll-view scroll-y="true" class="container">
<swiper indicator-dots="{{indicatorDots}}"
autoplay="{{autoplay}}" interval="{{interval}}" duration="{{duration}}">
<block wx:for="{{imgUrls}}">
<swiper-item>
<image src="{{item}}" class="slide-image" />
</swiper-item>
</block>
</swiper>
<view class='function_container'>
<view class='function_item' wx:for="{{functions}}" wx:for-index="idx" wx:for-item="function">
<image class='function_img' src='{{function.pic_url}}'/>
<view class='function_name'>{{function.name}}</view>
</view>
</view>
<view class='divider' />
<view class='specialities_layout'>
<view class='view_divider' />
<text class="specialities_text">特色业务</text>
</view>
<image class='bottom-image' src='../../images/app_banner.jpg'/>
</scroll-view>
function.wxss
/**function.wxss**/
.container {
height: 650px;
}
.slide-image{
display: block;
height: 280rpx;
width:100%
}
.function_container{
display:flex;
flex-wrap: wrap;
width:100%;
}
.function_item{
width:25%;
display:flex;
flex-direction:column;
justify-content:center;
align-items:center;
font-size:12px;
box-sizing:border-box;
padding-bottom:10px;
padding-top:10px
}
.function_img{
width:60px;
height:60px;
}
.function_name{
padding-top:10px
}
.divider{
background: #f5f5f5;
height: 40rpx;
width:100%;
}
.specialities_layout{
display:flex;
flex-wrap: wrap;
width:100%;
flex-direction:row;
margin-left: 16px;
margin-top:16px;
margin-bottom: 16px;
}
.view_divider{
background: #EEA9B8;
height: 40rpx;
width:10rpx;
}
.specialities_text {
margin-left: 8px;
font-size: 16px;
height: auto;
width:auto;
margin-top: 6rpx;
}
.bottom-image{
height: 280rpx;
width:100%;
}
.Absolute-Center {
margin: auto;
position: absolute;
top: 0; left: 0; bottom: 0; right: 0;
}
function.js
//function.js
//获取应用实例
var app = getApp()
Page({
data: {
userInfo: {},
indicatorDots: true,
autoplay: true,
interval: 5000,
duration: 1000,
// imgUrls: [
// 'http://img02.tooopen.com/images/20150928/tooopen_sy_143912755726.jpg',
// 'http://img06.tooopen.com/images/20160818/tooopen_sy_175866434296.jpg',
// 'http://img06.tooopen.com/images/20160818/tooopen_sy_175833047715.jpg'
// ],
imgUrls: [
'../../images/adv_50.png',
'../../images/adv_60.png',
'../../images/adv_80.png'
],
functions: [
{
"name": "刷卡消费",
"pic_url": '../../images/icon_consume.png'
},
{
"name": "提现",
"pic_url": '../../images/icon_withdrawals.png'
},
{
"name": "交易记录",
"pic_url": '../../images/icon_records.png'
},
{
"name": "实名认证",
"pic_url": '../../images/icon_auth.png'
},
{
"name": "飞机票",
"pic_url": '../../images/icon_airplane.png'
},
{
"name": "火车票",
"pic_url": '../../images/icon_train.png'
},
{
"name": "手机充值",
"pic_url": '../../images/icon_phone_recharge.png'
},
{
"name": "水电煤",
"pic_url": '../../images/icon_water.png'
}
]
},
//事件处理函数
bindViewTap: function () {
wx.navigateTo({
url: '../logs/logs'
})
},
onLoad: function () {
console.log('onLoad')
var that = this
//调用应用实例的方法获取全局数据
app.getUserInfo(function (userInfo) {
//更新数据
that.setData({
userInfo: userInfo
})
that.update()
})
}
})WeChat 미니 프로그램 사례에 대한 자세한 설명: 페이지 구성과 관련된 기사는 비용을 지불하세요. PHP 중국어 웹사이트에 주목하세요!