지난번에 box2dweb을 사용하여 다양한 강체를 생성하는 방법을 소개했습니다. 이번에는 마우스로 강체를 드래그하는 방법, 강체 간의 충돌, 강체 간의 다양한 연결에 대해 소개하겠습니다. .
1. 마우스로 강체를 드래그합니다.
lufylegend를 사용합니다. .js 라이브러리 파일을 추가한 후 강체를 드래그하는 것은 매우 간단합니다. LSprite의 setBodyMouseJoint(true) 메소드를 호출하면 됩니다.
function add(){
	var rand = Math.random();
	if(rand < 0.33){
		cLayer = new LSprite();
		cLayer.x = 50 + Math.random()*700;
		cLayer.y = 50;
		backLayer.addChild(cLayer);
		bitmap = new LBitmap(new LBitmapData(imglist["bird1"]));
		cLayer.addChild(bitmap);
		cLayer.addBodyCircle(bitmap.getWidth()*0.5,bitmap.getHeight()*0.5,bitmap.getWidth()*0.5,1,.5,.4,.5);
		cLayer.setBodyMouseJoint(true);
	}else if(rand < 0.66){
		cLayer = new LSprite();
		backLayer.addChild(cLayer);
		bitmap = new LBitmap(new LBitmapData(imglist["bird2"]));
		cLayer.addChild(bitmap);
		var shapeArray = [
			[[0,54],[27,0],[54,54]]
		];
		cLayer.addBodyVertices(shapeArray,27,27,1,.5,.4,.5);
		cLayer.box2dBody.SetPosition(new LGlobal.box2d.b2Vec2((50 + Math.random()*700)/LGlobal.box2d.drawScale,50/LGlobal.box2d.drawScale));
		cLayer.setBodyMouseJoint(true);
	}else{
		cLayer = new LSprite();
		cLayer.x = 50 + Math.random()*700;
		cLayer.y = 50;
		backLayer.addChild(cLayer);
		bitmap = new LBitmap(new LBitmapData(imglist["stage01"]));
		cLayer.addChild(bitmap);
		cLayer.addBodyPolygon(bitmap.getWidth(),bitmap.getHeight(),1,5,.4,.2);
	}
}보시다시피, 작은 것만 추가하고 있는데 새를 사용할 때 마우스 드래그가 추가되었습니다. 테스트 연결은 다음과 같습니다
http://lufy.netne.net/lufylegend-js/lufylegend-1.4/box2d/sample01 /index4.html
두 번째, 충돌 감지
다음 코드를 사용하여 충돌 감지 이벤트를 추가합니다
LGlobal.box2d.setEvent(LEvent.BEGIN_CONTACT,beginContact);
이때 충돌은 정적 및 동적을 포함하는 모든 강체 간의 충돌입니다
편의상 lufylegend.js의 디버그 방법을 사용하여
function beginContact(contact){
	if(contact.GetFixtureA().GetBody().GetUserData().name == "bird" &&
			contact.GetFixtureB().GetBody().GetUserData().name == "bird"){
		trace("bird and bird");
	}
	trace("bird and other");
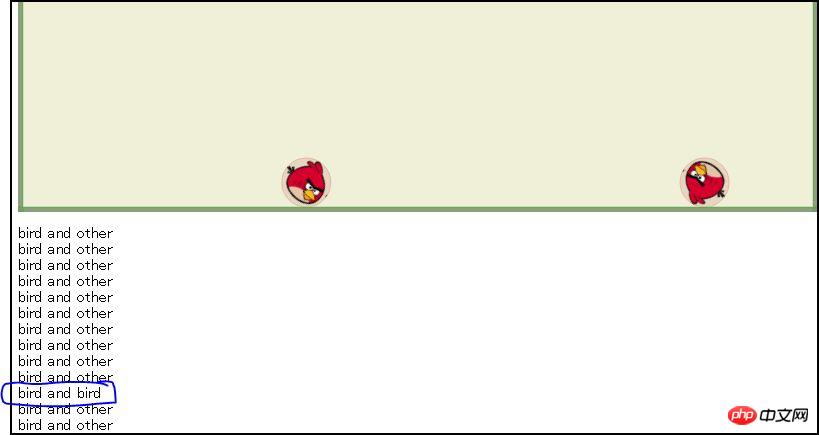
};위 방법은 충돌 감지이며, 즉, 두 마리의 새가 충돌할 때 "bird and Bird"가 출력됩니다. 새가 다른 강체와 충돌하거나 다른 강체 사이에 충돌하면 "bird and other"가 출력됩니다.
여기 테스트가 있습니다. 연결
http ://lufy.netne.net/lufylegend-js/lufylegend-1.4/box2d/sample01/index5.html
다음은 실행 결과입니다

3. 강체 간의 다양한 링크
마지막으로 살펴보겠습니다. 강체 연결 간의 다양한 링크를 살펴봅니다. 이 부분은 현재 lufylegend.js에 캡슐화되어 있지 않으며 향후에도 캡슐화될 예정이지만 이제 이러한 연결을 수동으로 구현하는 방법을 살펴보겠습니다
1, 거리 링크(b2DistanceJointDef)
b2DistanceJointDef를 사용하면 두 몸체 사이의 거리를 제한할 수 있습니다.
function add(){
	cLayer = new LSprite();
	cLayer.name = "bird";
	cLayer.x = 50 + Math.random()*700;
	cLayer.y = 50;
	backLayer.addChild(cLayer);
	bitmap = new LBitmap(new LBitmapData(imglist["bird1"]));
	cLayer.addChild(bitmap);
	cLayer.addBodyCircle(bitmap.getWidth()*0.5,bitmap.getHeight()*0.5,bitmap.getWidth()*0.5,1,.5,.4,.5);
	cLayer.setBodyMouseJoint(true);
	return cLayer;
}
var bird1 = add();
var bird2 = add();
var distanceJointDef = new LGlobal.box2d.b2DistanceJointDef();
distanceJointDef.Initialize(bird1.box2dBody, bird2.box2dBody, bird1.box2dBody.GetWorldCenter(), bird2.box2dBody.GetWorldCenter());
LGlobal.box2d.world.CreateJoint(distanceJointDef);여기는 다음과 같습니다. 테스트 연결
http://lufy.netne.net/lufylegend-js/lufylegend-1.4/box2d/sample01/index6.html
다음은 실행 결과입니다

2. 회전 링크(b2RevoluteJointDef)
b2RevoluteJointDef는 두 바디에 대한 축을 설정하고 두 몸체가 이 축을 중심으로 회전합니다.
var bird = new LSprite();
	bird.name = "bird";
	bird.x = 200;
	bird.y = 200;
	backLayer.addChild(bird);
	bitmap = new LBitmap(new LBitmapData(imglist["bird1"]));
	bird.addChild(bitmap);
	bird.addBodyCircle(bitmap.getWidth()*0.5,bitmap.getHeight()*0.5,bitmap.getWidth()*0.5,0);

	var pig = new LSprite();
	pig.name = "pig";
	pig.x = 200;
	pig.y = 150;
	backLayer.addChild(pig);
	bitmap = new LBitmap(new LBitmapData(imglist["pig2"]));
	pig.addChild(bitmap);
	pig.addBodyCircle(bitmap.getWidth()*0.5,bitmap.getHeight()*0.5,bitmap.getWidth()*0.5,1,.5,.4,.5);

	var revoluteJointDef  = new LGlobal.box2d.b2RevoluteJointDef();
	revoluteJointDef .Initialize(pig.box2dBody, bird.box2dBody, bird.box2dBody.GetWorldCenter());
	LGlobal.box2d.world.CreateJoint(revoluteJointDef );
테스트 연결은 다음과 같습니다
http://lufy.netne.net/lufylegend-js/lufylegend-1.4/box2d/ Sample01/index7.html
실행결과는 다음과 같습니다

3, 풀리링크(b2PulleyJointDef)
b2PulleyJointDef는 도르래 효과와 유사하며 사용법은 다음과 같습니다
var bird = new LSprite();
	bird.name = "bird";
	bird.x = 200;
	bird.y = 200;
	backLayer.addChild(bird);
	bitmap = new LBitmap(new LBitmapData(imglist["bird1"]));
	bird.addChild(bitmap);
	bird.addBodyCircle(bitmap.getWidth()*0.5,bitmap.getHeight()*0.5,bitmap.getWidth()*0.5,1,.5,.4,.5);
	bird.setBodyMouseJoint(true);

	var bird01 = new LSprite();
	bird01.name = "bird";
	bird01.x = 400;
	bird01.y = 150;
	backLayer.addChild(bird01);
	bitmap = new LBitmap(new LBitmapData(imglist["bird1"]));
	bird01.addChild(bitmap);
	bird01.addBodyCircle(bitmap.getWidth()*0.5,bitmap.getHeight()*0.5,bitmap.getWidth()*0.5,1,.5,.4,.5);
	bird01.setBodyMouseJoint(true);

	var anchor1 = bird.box2dBody.GetWorldCenter();
    var anchor2 = bird01.box2dBody.GetWorldCenter();

    var groundAnchor1 = new LGlobal.box2d.b2Vec2(anchor1.x, anchor1.y - (100 / LGlobal.box2d.drawScale));
    var groundAnchor2 = new LGlobal.box2d.b2Vec2(anchor2.x, anchor2.y - (100 / LGlobal.box2d.drawScale));

    var ratio = 1.0;

    var pulleyJointDef = new LGlobal.box2d.b2PulleyJointDef();
    pulleyJointDef.Initialize(bird.box2dBody, bird01.box2dBody, groundAnchor1, groundAnchor2, anchor1, anchor2, ratio);
    pulleyJointDef.maxLengthA = 300 / LGlobal.box2d.drawScale;
    pulleyJointDef.maxLengthB = 300 / LGlobal.box2d.drawScale;

LGlobal.box2d.world.CreateJoint(pulleyJointDef);테스트 연결은 다음과 같습니다
http://lufy.netne.net /lufylegend-js/lufylegend-1.4/box2d/sample01/index8.html
다음은 실행 결과입니다

나머지 연결에는 b2GearJoint, b2PrismaticJoint 및 기타 링크가 포함됩니다. 이들은 lufylegend.js에 캡슐화된 후 자세히 소개됩니다. 자세한 내용을 알고 싶은 친구는 관련 정보를 확인하세요. 🎜>
마지막으로 이 두 컨텐츠의 소스코드를 모두 공개합니다 http://fsanguo.comoj.com/download.php?i=box2d_sample01.rar위 내용은 소스코드일 뿐이라는 점 참고하세요. 이러한 소스코드를 로컬에서 실행하려면 lufylegend.js 라이브러리와 box2dweb을 직접 다운로드한 후 구성해야 합니다
위 내용은 HTML5 게임 개발 - Box2dWeb 애플리케이션(2) - 충돌 및 다양한 연결 내용입니다. PHP 중국어 홈페이지(m.sbmmt.com)를 주목해주세요!