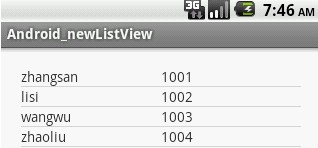
첫 번째는 레이아웃 파일입니다. 여기에는 두 개의 레이아웃 파일이 필요합니다. 하나는 레이아웃 파일인 main입니다. 문제는 ListView 컨트롤의 ID가 내장된 android:id="@android:id/를 사용해야 한다는 것입니다. list"의 Android 시스템 [양식 참고]
main.xml
<?xml version="1.0" encoding="utf-8"?>
<LinearLayout xmlns:android="http://schemas.android.com/apk/res/android"
    android:layout_width="match_parent"
    android:layout_height="match_parent"
    android:orientation="vertical" >
        <ListView
        android:id="@android:id/list"
        android:layout_width="match_parent"
        android:layout_height="match_parent"
        android:padding="20dip"/>
</LinearLayout>list_item.xml
<?xml version="1.0" encoding="utf-8"?>
<LinearLayout xmlns:android="http://schemas.android.com/apk/res/android"
    android:layout_width="match_parent"
    android:layout_height="match_parent"
    android:orientation="horizontal" >

    <TextView
        android:id="@+id/user_name"
        android:layout_width="match_parent"
        android:layout_height="match_parent"
        android:layout_weight="1"/>
    <TextView
        android:id="@+id/user_id"
        android:layout_width="match_parent"
        android:layout_height="match_parent"
        android:layout_weight="1"/>
</LinearLayout>그런 다음 MainActivity에 코드를 설정합니다. 기본 아이디어는 추가하는 것입니다. 먼저 데이터를 ArrayList에 추가한 다음 SimpleAdapter 어댑터를 설정하여 다음을 입력합니다.
package com.example.android_newlistview;
import java.util.ArrayList;
import java.util.HashMap;
import java.util.Map;
import android.os.Bundle;
import android.app.Activity;
import android.app.ListActivity;
import android.view.Menu;
import android.widget.SimpleAdapter;
public class MainActivity extends ListActivity {

    String[] from={"name","id"};              //这里是ListView显示内容每一列的列名
    int[] to={R.id.user_name,R.id.user_id};   //这里是ListView显示每一列对应的list_item中控件的id

    String[] userName={"zhangsan","lisi","wangwu","zhaoliu"}; //这里第一列所要显示的人名
    String[] userId={"1001","1002","1003","1004"};  //这里是人名对应的ID

    ArrayList<HashMap<String,String>> list=null;
    HashMap<String,String> map=null;
    @Override
    protected void onCreate(Bundle savedInstanceState) {
        // TODO Auto-generated method stub
        super.onCreate(savedInstanceState);
        setContentView(R.layout.main);       //为MainActivity设置主布局
        //创建ArrayList对象;
        list=new ArrayList<HashMap<String,String>>();
        //将数据存放进ArrayList对象中,数据安排的结构是,ListView的一行数据对应一个HashMap对象,
        //HashMap对象,以列名作为键,以该列的值作为Value,将各列信息添加进map中,然后再把每一列对应
        //的map对象添加到ArrayList中

        for(int i=0; i<4; i++){
            map=new HashMap<String,String>();       //为避免产生空指针异常,有几列就创建几个map对象
            map.put("id", userId[i]);
            map.put("name", userName[i]);
            list.add(map);
        }

        //创建一个SimpleAdapter对象
        SimpleAdapter adapter=new SimpleAdapter(this,list,R.layout.list_item,from,to);
        //调用ListActivity的setListAdapter方法,为ListView设置适配器
        setListAdapter(adapter);
    }
}
특정 행 클릭에 응답하는 또 다른 방법은 다음과 같습니다. 반환된 위치(0부터 시작)를 기반으로 onListItemClick 메서드를 재정의합니다.
@Override
 protected void onListItemClick(ListView l, View v, int position, long id) {
  // TODO Auto-generated method stub
  super.onListItemClick(l, v, position, id);
}목록 보기 사용에 대한 더 많은 안드로이드 개발 튜토리얼과 관련 기사를 보려면 PHP 중국어 웹사이트에 주목하세요!