


This article mainly introduces the problem of SpringBoot SpringSecurity handling Ajax login requests. This article introduces you very well and has reference value. Friends who need it can refer to it
I recently encountered such a problem in the project Problem: The front-end and back-end are separated. The front-end is done with Vue. All data requests use vue-resource and no forms are used. Therefore, data interaction uses JSON. Spring Boot is used in the background. Spring Security is used for permission verification because Spring was used before. Security handles pages. This time it only handles Ajax requests, so we record some problems encountered. The solution here is not only suitable for Ajax requests, but also solves mobile request verification.
Create project
First we need to create a Spring Boot project. When creating, we need to introduce Web, Spring Security, MySQL and MyBatis (database framework Actually, it’s optional. I use MyBatis here). After creation, the dependency file is as follows:
<dependency>
 <groupId>org.mybatis.spring.boot</groupId>
 <artifactId>mybatis-spring-boot-starter</artifactId>
 <version>1.3.1</version>
</dependency>
<dependency>
 <groupId>org.springframework.boot</groupId>
 <artifactId>spring-boot-starter-security</artifactId>
</dependency>
<dependency>
 <groupId>org.springframework.boot</groupId>
 <artifactId>spring-boot-starter-web</artifactId>
</dependency>
<dependency>
 <groupId>mysql</groupId>
 <artifactId>mysql-connector-java</artifactId>
 <scope>runtime</scope>
</dependency>
<dependency>
 <groupId>commons-codec</groupId>
 <artifactId>commons-codec</artifactId>
 <version>1.11</version>
</dependency>
Note that the last commons-codec dependency is I added it manually. This is an Apache open source project that can be used to generate MD5 message digests. I will briefly process the password in the following article.
Create the database and configure it
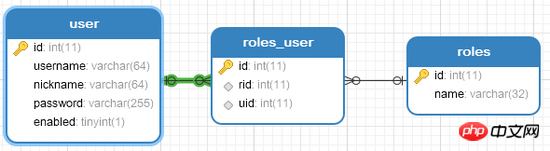
In order to simplify the logic, I created three tables here, namely user table, role table, user role The association table is as follows:
#Next we need to simply configure our database in application.properties. Here, everyone depends on their specific situation.
spring.datasource.url=jdbc:mysql:///vueblog
spring.datasource.username=root
spring.datasource.password=123
Constructing entity classes
This mainly refers to constructing user classes, here The user class is special and must implement the UserDetails interface, as follows:
public class User implements UserDetails {
 private Long id;
 private String username;
 private String password;
 private String nickname;
 private boolean enabled;
 private List<Role> roles;
 @Override
 public boolean isAccountNonExpired() {
 return true;
 }
 @Override
 public boolean isAccountNonLocked() {
 return true;
 }
 @Override
 public boolean isCredentialsNonExpired() {
 return true;
 }
 @Override
 public boolean isEnabled() {
 return enabled;
 }
 @Override
 public List<GrantedAuthority> getAuthorities() {
 List<GrantedAuthority> authorities = new ArrayList<>();
 for (Role role : roles) {
  authorities.add(new SimpleGrantedAuthority("ROLE_" + role.getName()));
 }
 return authorities;
 }
 //getter/setter省略...
}After implementing the UserDetails interface, there are several methods in this interface that we need to implement, four The methods that return Boolean are all based on their names. enabled indicates whether the schedule account is enabled. This field does exist in my database, so it is returned according to the query results. Others directly return true for simplicity. The getAuthorities method returns the role of the current user. Information, the user's role is actually the data in roles. Just convert the data in roles into ListROLE_, so you need to manually add ROLE_ here, remember.
There is also a Role entity class, which is relatively simple and can be created according to the fields of the database. I will not go into details here.
Create UserService
The UserService here is also special and needs to implement the UserDetailsService interface, as follows:
@Service
public class UserService implements UserDetailsService {
 @Autowired
 UserMapper userMapper;
 @Autowired
 RolesMapper rolesMapper;
 @Override
 public UserDetails loadUserByUsername(String s) throws UsernameNotFoundException {
  User user = userMapper.loadUserByUsername(s);
  if (user == null) {
   //避免返回null,这里返回一个不含有任何值的User对象,在后期的密码比对过程中一样会验证失败
   return new User();
  }
  //查询用户的角色信息,并返回存入user中
  List<Role> roles = rolesMapper.getRolesByUid(user.getId());
  user.setRoles(roles);
  return user;
 }
}After implementing the UserDetailsService interface, we need to implement the loadUserByUsername method in the interface, that is, query the user based on the user name. Two Mappers in MyBatis are injected here, UserMapper is used to query users, and RolesMapper is used to query roles. In the loadUserByUsername method, first query the user based on the incoming parameters (the parameter is the user name entered when the user logs in). If the found user is null, you can directly throw a UsernameNotFoundException exception, but for the convenience of processing, I returned a A User object without any value, so that the login failure will still be found in the subsequent password comparison process (you can adjust it according to your own business needs). If the user found is not null, at this time we will find it based on the Then query the user's role with the user id and put the query results into the user object. This query result will be used in the getAuthorities method of the user object.
Security configuration
Let’s take a look at my Security configuration first, and then I will explain it one by one:
@Configuration
public class WebSecurityConfig extends WebSecurityConfigurerAdapter {
 @Autowired
 UserService userService;
 @Override
 protected void configure(AuthenticationManagerBuilder auth) throws Exception {
  auth.userDetailsService(userService).passwordEncoder(new PasswordEncoder() {
   @Override
   public String encode(CharSequence charSequence) {
    return DigestUtils.md5DigestAsHex(charSequence.toString().getBytes());
   }
   /**
    * @param charSequence 明文
    * @param s 密文
    * @return
    */
   @Override
   public boolean matches(CharSequence charSequence, String s) {
    return s.equals(DigestUtils.md5DigestAsHex(charSequence.toString().getBytes()));
   }
  });
 }
 @Override
 protected void configure(HttpSecurity http) throws Exception {
  http.authorizeRequests()
    .antMatchers("/admin/**").hasRole("超级管理员")
    .anyRequest().authenticated()//其他的路径都是登录后即可访问
    .and().formLogin().loginPage("/login_page").successHandler(new AuthenticationSuccessHandler() {
   @Override
   public void onAuthenticationSuccess(HttpServletRequest httpServletRequest, HttpServletResponse httpServletResponse, Authentication authentication) throws IOException, ServletException {
    httpServletResponse.setContentType("application/json;charset=utf-8");
    PrintWriter out = httpServletResponse.getWriter();
    out.write("{\"status\":\"ok\",\"msg\":\"登录成功\"}");
    out.flush();
    out.close();
   }
  })
    .failureHandler(new AuthenticationFailureHandler() {
     @Override
     public void onAuthenticationFailure(HttpServletRequest httpServletRequest, HttpServletResponse httpServletResponse, AuthenticationException e) throws IOException, ServletException {
      httpServletResponse.setContentType("application/json;charset=utf-8");
      PrintWriter out = httpServletResponse.getWriter();
      out.write("{\"status\":\"error\",\"msg\":\"登录失败\"}");
      out.flush();
      out.close();
     }
    }).loginProcessingUrl("/login")
    .usernameParameter("username").passwordParameter("password").permitAll()
    .and().logout().permitAll().and().csrf().disable();
 }
 @Override
 public void configure(WebSecurity web) throws Exception {
  web.ignoring().antMatchers("/reg");
 }
}This is the core of our configuration, friends, listen to me one by one:
1. First of all, this is a configuration class, so remember to add @Configuration Note, because this is the configuration of Spring Security, remember to inherit WebSecurityConfigurerAdapter.
2. Inject the UserService you just created, we will use it later.
3.configure(AuthenticationManagerBuilder auth)方法中用来配置我们的认证方式,在auth.userDetailsService()方法中传入userService,这样userService中的loadUserByUsername方法在用户登录时将会被自动调用。后面的passwordEncoder是可选项,可写可不写,因为我是将用户的明文密码生成了MD5消息摘要后存入数据库的,因此在登录时也需要对明文密码进行处理,所以就加上了passwordEncoder,加上passwordEncoder后,直接new一个PasswordEncoder匿名内部类即可,这里有两个方法要实现,看名字就知道方法的含义,第一个方法encode显然是对明文进行加密,这里我使用了MD5消息摘要,具体的实现方法是由commons-codec依赖提供的;第二个方法matches是密码的比对,两个参数,第一个参数是明文密码,第二个是密文,这里只需要对明文加密后和密文比较即可(小伙伴如果对此感兴趣可以继续考虑密码加盐)。
4.configure(HttpSecurity http)用来配置我们的认证规则等,authorizeRequests方法表示开启了认证规则配置,antMatchers("/admin/**").hasRole("超级管理员")表示 /admin/** 的路径需要有‘超级管理员'角色的用户才能访问,我在网上看到小伙伴对hasRole方法中要不要加 ROLE_ 前缀有疑问,这里是不要加的,如果用hasAuthority方法才需要加。anyRequest().authenticated()表示其他所有路径都是需要认证/登录后才能访问。接下来我们配置了登录页面为login_page,登录处理路径为/login,登录用户名为username,密码为password,并配置了这些路径都可以直接访问,注销登陆也可以直接访问,最后关闭csrf。在successHandler中,使用response返回登录成功的json即可,切记不可以使用defaultSuccessUrl,defaultSuccessUrl是只登录成功后重定向的页面,使用failureHandler也是由于相同的原因。
5.configure(WebSecurity web)方法中我配置了一些过滤规则,不赘述。
6.另外,对于静态文件,如 /images/** 、 /css/** 、 /js/** 这些路径,这里默认都是不拦截的。
Controller
最后来看看我们的Controller,如下:
@RestController
public class LoginRegController {

 /**
  * 如果自动跳转到这个页面,说明用户未登录,返回相应的提示即可
  * <p>
  * 如果要支持表单登录,可以在这个方法中判断请求的类型,进而决定返回JSON还是HTML页面
  *
  * @return
  */
 @RequestMapping("/login_page")
 public RespBean loginPage() {
  return new RespBean("error", "尚未登录,请登录!");
 }
}这个Controller整体来说还是比较简单的,RespBean一个响应bean,返回一段简单的json,不赘述,这里需要小伙伴注意的是 login_page ,我们配置的登录页面是一个 login_page ,但实际上 login_page 并不是一个页面,而是返回一段JSON,这是因为当我未登录就去访问其他页面时Spring Security会自动跳转到到 login_page 页面,但是在Ajax请求中,不需要这种跳转,我要的只是是否登录的提示,所以这里返回json即可。
测试
最后小伙伴可以使用POSTMAN或者RESTClient等工具来测试登录和权限问题,我就不演示了。
Ok,经过上文的介绍,想必小伙伴们对Spring Boot+Spring Security处理Ajax登录请求已经有所了解了,好了,本文就说到这里,有问题欢迎留言讨论
以上就是本文的全部内容,希望对大家的学习有所帮助,更多相关内容请关注PHP中文网!
相关推荐:
The above is the detailed content of Issues with SpringBoot and SpringSecurity handling Ajax login requests. For more information, please follow other related articles on the PHP Chinese website!


![[Web front-end] Node.js quick start](https://img.php.cn/upload/course/000/000/067/662b5d34ba7c0227.png)


