


This article mainly introduces vue-cli webpack to create a notepad project in detail. It has certain reference value. Interested friends can refer to
vue-cli webpack notepad project usage. What is the project construction tool webpack in vue-cli2.0
Preparation work for the project:
1. Understand vue2.0
2. Understand some ES6
3. Reserve some webpack knowledge
Refer to the project address: vue2.0 Best Practice for Building Single-page Applications
We will choose to use some vue peripheral libraries vue-cli, vue -router, vue-resource, vuex
1. Use vue-cli to create the project
2. Use vue-router to implement single-page routing
3. Use vuex to manage us Data flow
4. Use vue-resource to request our node server
5. Use .vue files for component development
PS: This article is node v6. 2.2 npm v3.9.5 vue v2.1.0 vue-router v2.0.3 vuex v2.0.0
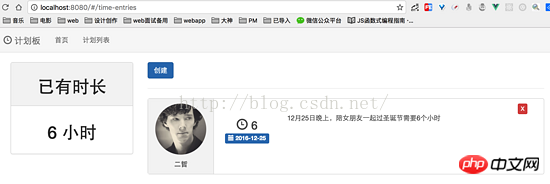
In the end we will build a small demo, no nonsense, just the picture above.
Installation
1. We will use webpack to package, preprocess and hot load our modules. If you are not familiar with webpack, it can help us package multiple js files into one entry file, and can load it on demand. This means that we don’t have to worry about too many HTTP requests due to using too many components, which is very beneficial to the product experience. But we don't just use webpack for this. We need to use webpack to compile the .vue file. If we don't use a loader to convert the style, js and html in our .vue file, the browser will not recognize it.
2. Module hot loading is a very powerful feature of webpack, which will bring great convenience to our single-page applications.
Generally speaking, when we modify the code and refresh the page, all the status in the application will be gone. This is very painful for developing a single-page application because you need to run the process again. If there is module hot loading, when you modify the code, your code will be modified directly, and the page will not be refreshed, so the state will be retained.
3.Vue also provides us with CSS preprocessing, so we can choose to write LESS or SASS in the .vue file instead of native CSS.
4. In the past, we usually needed to use npm to download a bunch of dependencies, but now we can choose Vue-cli. This is a great initiative in the Vue ecosystem. This means we don't need to manually build our project, instead it is quickly generated for us.
First, install vue-cli. (Make sure you have node and npm)
npm i -g vue-cli
Then create a webpack project and download the dependencies
vue init webpack vue-tutorial
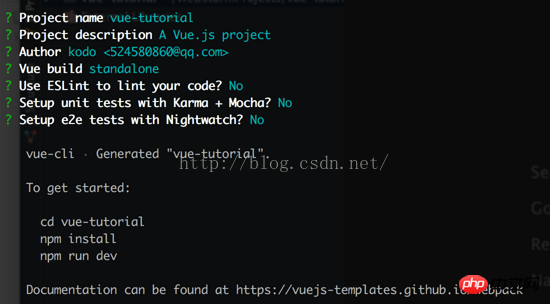
cd vue-tutorial
npm i
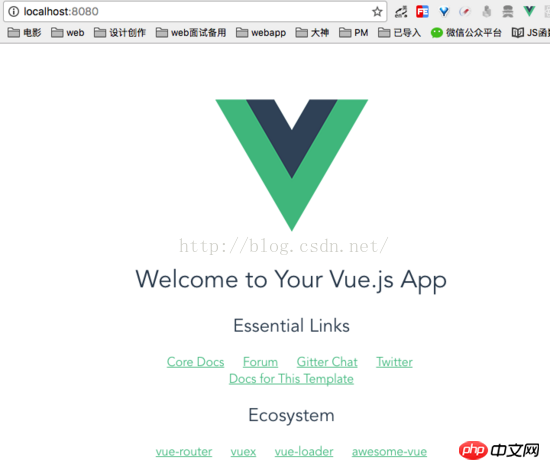
Then use npm run dev to run our application in hot reloading
This line of command means that it will find the scripts object of package.json and execute node bulid/dev-server.js. In this file, Webpack is configured, allowing it to compile the project files and run the server. We can view our application at localhost:8080.
After these are ready, we need to download three libraries for our routing, XHR requests, and data management. We can find them from the official website of vue. In addition we use bootstrap as my UI library
npm i vue-resource vue-router vuex bootstrap --save
Initialization (main.js)
Looking at our application files, we can find App.vue and main.js in the src directory. main.js will serve as the entry file for our application and App.vue will serve as the initialization component of our application. Let us first improve main.js
// src/main.js
import Vue from 'vue'
import VueRouter from 'vue-router'
import VueResource from 'vue-resource'

import App from './App'
import Home from './components/Home'
import 'bootstrap/dist/css/bootstrap.css'

Vue.use(VueRouter)
Vue.use(VueResource)

const routes = [{
 path : '/',
 component : Home
},{
 path : '/home',
 component : Home
}];

const router = new VueRouter({
 routes
});

/* eslint-disable no-new */
// 实例化我们的Vue
var app = new Vue({
 el: '#app',
 router,
 ...App,
});There are two differences from 1.0
One Please note that the parameters of vue-router routing have been changed from objects to arrays. Also, the el parameters of instantiating vue can no longer set html and body, because in vue2, the tags we specify will be replaced
2. We must specify what component to render when instantiating vue. In the past, we specified routes such as router.start(App, '#app'), but in vue2 this is no longer needed.
You can find that we use two components App.vue in main.js and Home.vue, let's implement their contents later.
And our index.html only needs to keep
. Our Vue sets el when instantiating: '#app' so it will Replace this tag with the content of our App component//index.html <p id="app"></p>
Our initialization is over here, let's start creating the component.
创建首页组件
首先我们在App.vue里为我们的应用写个顶部导航。
// src/App.vue

<template>
 <p id="wrapper">
 <nav class="navbar navbar-default">
 <p class="container">
 <a class="navbar-brand" href="#" rel="external nofollow" >
 <i class="glyphicon glyphicon-time"></i>
 计划板
 </a>
 <ul class="nav navbar-nav">
 <li><router-link to="/home">首页</router-link></li>
 <li><router-link to="/time-entries">计划列表</router-link></li>
 </ul>
 </p>
 </nav>
 <p class="container">
 <p class="col-sm-3">

 </p>
 <p class="col-sm-9">
 <router-view></router-view>
 </p>
 </p>
 </p>
</template>
除了我们的 navbar 以外,我们还需要一个 .container 去放我们其余需要展示的信息。
并且在这里我们要放一个 router-view 标签, vue-router 的切换就是通过这个标签开始显现的。
在这有个与1.0不同的地方
以前我们可以直接通过写a标签 然后写v-link属性进行路由跳转,在vue2中改为了写
接着,我们需要创建一个 Home.vue 作为我们的首页
// src/components/Home.vue

<template>
 <p class="jumbotron">
 <h1>任务追踪</h1>
 <p>
 <strong>
 <router-link to="/time-entries">创建一个任务</router-link>
 </strong>
 </p>
 </p>
</template>
不出意外的话,你可以看见如下效果

创建侧边栏组件
目前我们首页左侧还有一块空白,我们需要它放下一个侧边栏去统计所有计划的总时间。
// src/App.vue

 //...

 <p class="container">
 <p class="col-sm-3">
 <sidebar></sidebar>
 </p>
 <p class="col-sm-9">
 <router-view></router-view>
 </p>
 </p>

 //...
<script>
import Sidebar from './components/Sidebar.vue'
export default {
components: { 'sidebar': Sidebar },
}
</script>在 Sidebar.vue 我们需要通过store去获取总时间,我们的总时间是共享的数据
// src/components/Sidebar.vue
<template>
 <p class="panel panel-default">
 <p class="panel-heading">
 <h1 class="text-center">已有时长</h1>
 </p>

 <p class="panel-body">
 <h1 class="text-center">{{ time }} 小时</h1>
 </p>

 </p>
</template>

<script>
 export default {
 computed: {
 time() {
 return this.$store.state.totalTime
 }
 }
 }
</script>创建计划列表组件
然后我们需要去创建我们的时间跟踪列表。
// src/components/TimeEntries.vue
<template>
<p>
//`v-if`是vue的一个指令
//`$route.path`是当前路由对象的路径,会被解析为绝对路径当
//`$route.path !== '/time-entries/log-time'`为`true`是显示,`false`,为不显示。
//to 路由跳转地址
<router-link
v-if="$route.path !== '/time-entries/log-time'"
to="/time-entries/log-time"
class="btn btn-primary">
创建
</router-link>
<p v-if="$route.path === '/time-entries/log-time'">
<h3>创建</h3>
</p>
<hr>
<router-view></router-view>
<p class="time-entries">
<p v-if="!plans.length"><strong>还没有任何计划</strong></p>
<p class="list-group">
<--
v-for循环,注意参数顺序为(item,index) in items
-->
<a class="list-group-item" v-for="(plan,index) in plans">
<p class="row">
<p class="col-sm-2 user-details">
<--
`:src`属性,这个是vue的属性绑定简写`v-bind`可以缩写为`:`
比如a标签的`href`可以写为`:href`
并且在vue的指令里就一定不要写插值表达式了(`:src={{xx}}`),vue自己会去解析
-->
<img :src="plan.avatar" class="avatar img-circle img-responsive" />
<p class="text-center">
<strong>
{{ plan.name }}
</strong>
</p>
</p>
<p class="col-sm-2 text-center time-block">
<h3 class="list-group-item-text total-time">
<i class="glyphicon glyphicon-time"></i>
{{ plan.totalTime }}
</h3>
<p class="label label-primary text-center">
<i class="glyphicon glyphicon-calendar"></i>
{{ plan.date }}
</p>
</p>
<p class="col-sm-7 comment-section">
<p>{{ plan.comment }}</p>
</p>
<p class="col-sm-1">
<button
class="btn btn-xs btn-danger delete-button"
@click="deletePlan(index)">
X
</button>
</p>
</p>
</a>
</p>
</p>
</p>
</template>关于template的解释,都写在一起了,再看看我们的 script
// src/components/TimeEntries.vue
<script>
export default {
name : 'TimeEntries',
computed : {
plans () {
// 从store中取出数据
return this.$store.state.list
}
},
methods : {
deletePlan(idx) {
// 稍后再来说这里的方法
// 减去总时间
this.$store.dispatch('decTotalTime',this.plans[idx].totalTime)
// 删除该计划
this.$store.dispatch('deletePlan',idx)
}
}
}
</script>别忘了为我们的组件写上一些需要的样式
// src/components/TimeEntries.vue

<style>
 .avatar {
 height: 75px;
 margin: 0 auto;
 margin-top: 10px;
 margin-bottom: 10px;
 }
 .user-details {
 background-color: #f5f5f5;
 border-right: 1px solid #ddd;
 margin: -10px 0;
 }
 .time-block {
 padding: 10px;
 }
 .comment-section {
 padding: 20px;
 }
</style>既然我们的数据是共享的,所以我们需要把数据存在 store 里
我们在src下创建个目录为 store
在 store 下分别创建4个js文件 actions.js , index.js , mutation-types.js , mutations.js
看名字也就知道这4个分别是做啥用的了,建议大家多阅读阅读 vuex 的文档,多姿势多动手实践,慢慢的也就能理解了。
// src/store/index.js
import Vue from 'vue'
import Vuex from 'vuex'

Vue.use(Vuex);

// 先写个假数据
const state = {
 totalTime: 0,
 list: [{
 name : '二哲',
 avatar : 'https://sfault-avatar.b0.upaiyun.com/147/223/147223148-573297d0913c5_huge256',
 date : '2016-12-25',
 totalTime : '6',
 comment : '12月25日完善,陪女朋友一起过圣诞节需要6个小时'
 }]
};

export default new Vuex.Store({
 state,
})由于新增了页面和store 在我们的入口js文件里配置下
// src/main.js
import store from './store'
import TimeEntries from './components/TimeEntries.vue'
//...

const routes = [{
 path : '/',
 component : Home
},{
 path : '/home',
 component : Home
},{
 path : '/time-entries',
 component : TimeEntries,
}];

var app = new Vue({
 el: '#app',
 router,
 store,
 ...App,
});不出意外的话,你可以在 /time-entries 路由下看见这样的页面

通过 vue-Devtools 我们可以发现我们的store已经构造好了并且成功从store获取了数据
创建任务组件
这个比较简单我们直接给出代码
// src/components/LogTime.vue
<template>
<p class="form-horizontal">
<p class="form-group">
<p class="col-sm-6">
<label>日期</label>
<input
type="date"
class="form-control"
v-model="date"
placeholder="Date"
/>
</p>
<p class="col-sm-6">
<label>时间</label>
<input
type="number"
class="form-control"
v-model="totalTime"
placeholder="Hours"
/>
</p>
</p>
<p class="form-group">
<p class="col-sm-12">
<label>备注</label>
<input
type="text"
class="form-control"
v-model="comment"
placeholder="Comment"
/>
</p>
</p>
<button class="btn btn-primary" @click="save()">保存</button>
<router-link to="/time-entries" class="btn btn-danger">取消</router-link>
<hr>
</p>
</template>
<script>
export default {
name : 'LogTime',
data() {
return {
date : '',
totalTime : '',
comment : ''
}
},
methods:{
save() {
const plan = {
name : '二哲',
image : 'https://sfault-avatar.b0.upaiyun.com/888/223/888223038-5646dbc28d530_huge256',
date : this.date,
totalTime : this.totalTime,
comment : this.comment
};
this.$store.dispatch('savePlan', plan)
this.$store.dispatch('addTotalTime', this.totalTime)
this.$router.go(-1)
}
}
}
</script>这个组件很简单就3个input输入而已,然后就两个按钮,保存我们就把数据push进我们store的列表里
LogTime 属于我们 TimeEntries 组件的一个子路由,所以我们依旧需要配置下我们的路由,并且利用webpack让它懒加载,减少我们首屏加载的流量
// src/main.js
//...
const routes = [{
 path : '/',
 component : Home
},{
 path : '/home',
 component : Home
},{
 path : '/time-entries',
 component : TimeEntries,
 children : [{
 path : 'log-time',
 // 懒加载
 component : resolve => require(['./components/LogTime.vue'],resolve),
 }]
}];

//...vuex部分
在vue2.0中废除了使用事件的方式进行通信,所以在小项目中我们可以使用Event Bus,其余最好都使用vuex,本文我们使用Vuex来实现数据通信
相信你刚刚已经看见了我写了很多 this.$store.dispatch('savePlan', plan) 类似这样的代码,我们再次统一说明。
仔细思考一下,我们需要两个全局数据,一个为所有计划的总时间,一个是计划列表的数组。
src/store/index.js 没啥太多可介绍的,其实就是传入我们的 state , mutations, actions 来初始化我们的Store。如果有需要的话我们还可能需要创建我们的 getter在本例中就不用了。
接着我们看 mutation-types.js ,既然想很明确了解数据,那就应该有什么样的操作看起,当然这也看个人口味哈
// src/store/mutation-types.js

// 增加总时间或者减少总时间
export const ADD_TOTAL_TIME = 'ADD_TOTAL_TIME';
export const DEC_TOTAL_TIME = 'DEC_TOTAL_TIME';

// 新增和删除一条计划
export const SAVE_PLAN = 'SAVE_PLAN';
export const DELETE_PLAN = 'DELETE_PLAN';
// src/store/mutations.js
import * as types from './mutation-types'

export default {
 // 增加总时间
 [types.ADD_TOTAL_TIME] (state, time) {
 state.totalTime = state.totalTime + time
 },
 // 减少总时间
 [types.DEC_TOTAL_TIME] (state, time) {
 state.totalTime = state.totalTime - time
 },
 // 新增计划
 [types.SAVE_PLAN] (state, plan) {
 // 设置默认值,未来我们可以做登入直接读取昵称和头像
 const avatar = 'https://sfault-avatar.b0.upaiyun.com/147/223/147223148-573297d0913c5_huge256';

 state.list.push(
 Object.assign({ name: '二哲', avatar: avatar }, plan)
 )
 },
 // 删除某计划
 [types.DELETE_PLAN] (state, idx) {
 state.list.splice(idx, 1);
 }
};最后对应看我们的 actions 就很明白了
// src/store/actions.js

import * as types from './mutation-types'

export default {
 addTotalTime({ commit }, time) {
 commit(types.ADD_TOTAL_TIME, time)
 },
 decTotalTime({ commit }, time) {
 commit(types.DEC_TOTAL_TIME, time)
 },
 savePlan({ commit }, plan) {
 commit(types.SAVE_PLAN, plan);
 },
 deletePlan({ commit }, plan) {
 commit(types.DELETE_PLAN, plan)
 }
};我们的 actions 其实就是去触发事件和传入参数啦
加了这三个文件后我们的store终于完整了,更新下我们的代码
// src/store/index.js 完整代码

import Vue from 'vue'
import Vuex from 'vuex'
import mutations from './mutations'
import actions from './actions'

Vue.use(Vuex);

const state = {
 totalTime: 0,
 list: []
};

export default new Vuex.Store({
 state,
 mutations,
 actions
})this.$store.dispatch('savePlan', plan) 当执行了这样的方法就会调用 actions.js 里的 savePlan 方法,而 savePlan 又会触发 mutations 里的 types.SAVE_PLAN 最后修改数据视图更新
PS:在这有个技巧就是,在 mutations 里都是用大写下划线连接,而我们的 actions 里都用小写驼峰对应。
个人理解这其实就是一个发布订阅的模式
mutation-types 记录我们所有的事件名
mutations 注册我们各种数据变化的方法
actions 则可以编写异步的逻辑或者是一些逻辑,再去 commit
我们的事件
如果有 getter 我们可以把一些需要处理返回的数据放在这即可,不进行业务操作
最后别忘了在我们的 main.js 里使用我们的 store
// src/store/main.js

import store from './store'
// ...

var app = new Vue({
 el: '#app',
 router,
 store,
 ...App,
});开始体验下你自己的任务计划板吧!
最后
通过本文,我们可以学习到许多关于vue的特性。
1.了解了vue-cli脚手架
2.初步对webpack有了一些了解和认识
3.如何用.vue愉快的开发
4.使用vuex进行组件通信
5.路由(子路由)的应用
6.使用 vue-devtools 观察我们的数据
个人网站 : http://www.meckodo.com
github地址: https://github.com/MeCKodo/vu...
以上就是本文的全部内容,希望对大家的学习有所帮助,更多相关内容请关注PHP中文网!
相关推荐:
The above is the detailed content of vue-cli and webpack notepad project creation. For more information, please follow other related articles on the PHP Chinese website!
 How to make charts and data analysis charts in PPT
 Android voice playback function implementation method
 AC contactor use
 The difference between vscode and visual studio
 The difference between Java and Java
 Introduction to hard disk interface types
 nagios configuration method
 How to delete a folder in linux


![[Web front-end] Node.js quick start](https://img.php.cn/upload/course/000/000/067/662b5d34ba7c0227.png)


