This article mainly introduces the method of using automatic generator in ionic2. Friends who need it can refer to it
ionic generator is a command line function. ionic2 automatically helps us create applications, thus saving a lot of money. time and increase our speed to develop critical parts of a project.
ionic generator allows us to automatically create the following parts:
•component
•directive
•page
•provider
1. Create a page: ionic g page [PageName]
Create a new page through this command. This command is used the most in the ionic2 project
We only need to enter our command line , and run the following command:
ionic g page login
# Results:
√ Create app/pages/login/login.html
√ Create app/pages/login/login.scss
√ Create app/pages/login/login.ts
login.ts:
import {Component} from '@angular/core';
import {NavController} from 'ionic-angular';
@Component({
 templateUrl: 'build/pages/login/login.html',
})
export class LoginPage {
 constructor(public nav: NavController) {}
}login.html:
<ion-header>
 <ion-navbar>
 <ion-title>
  login
 </ion-title>
 </ion-navbar>
</ion-header>
<ion-content padding class="login">
</ion-content>
2. Create component: ionic g component [ComponentName ]
A component is a piece of code that can be used in any part of our application
Create a component with this command:
ionic g component myComponent
# Results:
√ Create app/components/my-component/my-component.html
√ Create app/components/my-component/my-component.ts
my-component.ts :
import {Component} from '@angular/core';
@Component({
 selector: 'my-component',
 templateUrl: 'build/components/my-component/my-component.html'
})
export class MyComponent {
 text: string = "";
 constructor() {
 this.text = 'Hello World';
 }
}3. Create directive: ionic g directive [DirectiveName]
directive, our application can use the modifier attribute on any element.
ionic g directive myDirective
# Results:
√ Create app/components/my-directive/my-directive.ts
my-directive.ts:
import {Directive} from '@angular/core';
@Directive({
 selector: '[my-directive]' // Attribute selector
})
export class MyDirective {
 constructor() {
 console.log('Hello World');
 }
}4. Create a service provider: ionic g provider [ProviderName]
Now create a new service ( Provider), the provider is responsible for handling data connections to REST APIs, local storage, SQLite, etc.
To create it, we go to our terminal and run the following command:
ionic g provider userService
# Results:
√ Create app/providers/user-service/user-service.ts
The service code is as follows:
user-service.ts:
import {Injectable} from '@angular/core';
import {Http} from '@angular/http';
import 'rxjs/add/operator/map';
@Injectable()
export class UserService {
 data: any = null;
 constructor(public http: Http) { }
 load() { if (this.data) {
 }
 return new Promise(resolve => {
 this.http.get('path/to/data.json')
  .map(res => res.json())
  .subscribe(data => {
  this.data = data;
  resolve(this.data);
  });
 });
 }
}5. Create a pipeline pipe: ionic g pipe [PipeName]
Variations of this pipe, we can use our template for any data, such as displaying text in uppercase letters, displaying currency values, dates format etc.
ionic g pipe myPipe
# Results:
√ Create app/pipes/myPipe.ts
The code of our pipeline is as follows
myPipe.ts:
import {Injectable, Pipe} from '@angular/core';
@Pipe({
 name: 'my-pipe'
})
@Injectable()
export class MyPipe {
 transform(value: string, args: any[]) {
 value = value + ''; // make sure it's a string
 return value.toLowerCase();
 }
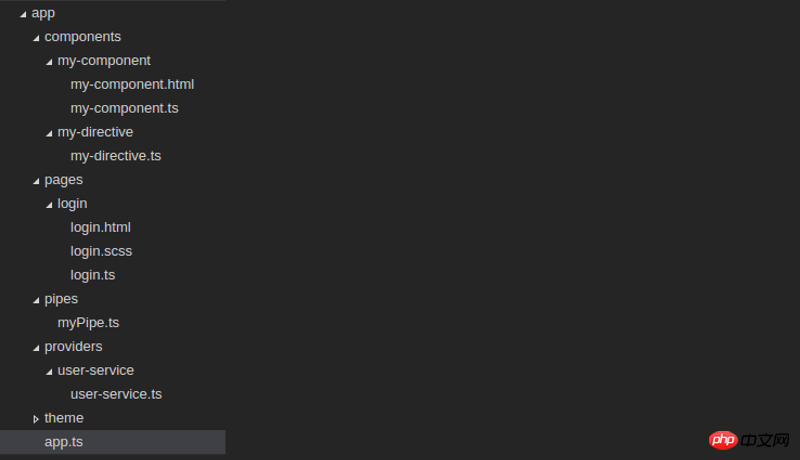
}Finally, the application structure we generated is as follows:

The above is what I compiled for everyone. I hope it will be helpful to everyone in the future.
Related articles:
Angular uses the operation event command ng-click to pass multiple parameters Example
JavaScript code to upload txt files Preview function
Angularjs summary of examples of communication methods between controllers
The above is the detailed content of What are the steps to use automatic generators in ionic2?. For more information, please follow other related articles on the PHP Chinese website!


