This time I will bring you a detailed explanation of the steps for Jquery to implement cross-domain asynchronous file upload. What are the precautions for Jquery to implement cross-domain asynchronous file upload? . Here is a practical case, let's take a look.
Let me explain first
We use the Jquery.form plug-in for this cross-domain asynchronous upload function, which is very effective in asynchronous forms, and for cross-domain we will Add access-control-allow-method to the HTTP response header. Of course, this header tag is only supported by IE10, Firefox and Google. For browsers below IE10, we cannot use this method. We need to change our thinking. For this matter, let the server rewrite to our client, and the client (under the same domain as the File Upload page) will return the relevant data.
Do things again
1 Use of Jquery.form
<form method="post" action="http://127.0.0.1:801/Home/UploadResult" enctype="multipart/form-data" id="form1">
 <input name="qdctvfile" id="qdctvfile11" type="file" onchange="eventStart()">
</form>
<script type="text/javascript">
 $("#form1").ajaxForm({
  beforeSerialize: function () {
   var filepath = $("#qdctvfile11").val()
   var extStart = filepath.lastIndexOf(".");
   var ext = filepath.substring(extStart, filepath.length).toUpperCase();
   if (ext != ".PNG" && ext != ".JPG") {
    alert("图片仅支持png,jpg格式");
    $("#qdctvfile11").val("");
    return false;
   }
  },
  success: function (data) {
   alert(data);
  }
 });
 function eventStart(obj) {
  $("#form1").submit();
}Note that in the code The eventStart method refers to automatically submitting the form after selecting a file, while ajaxForm indicates that submitting the form is an exception, and the success callback method refers to the return value of the form address asynchronously.
2 Initial implementation of cross-domain
To solve domain access, we can add Access-Control-Allow-Origin to the response header of the server and Access-Control-Allow-Methods are enough. These features are not supported by browsers below IE10, which is very frustrating.
 /// <summary>
 /// MVC模式下跨域访问
 /// </summary>
 public class MvcCorsAttribute : ActionFilterAttribute
 {
  public override void OnActionExecuting(ActionExecutingContext filterContext)
  {
   Dictionary<string, string> headers = new Dictionary<string, string>();
   headers.Add("Access-Control-Allow-Origin", "*");
   headers.Add("Access-Control-Allow-Methods", "*");
   foreach (var item in headers.Keys)
   {
    filterContext.RequestContext.HttpContext.Response.Headers.Add(item, headers[item]);
   }
   base.OnActionExecuting(filterContext);
  }
}Note that in a production environment, our Access-Control-Allow-Origin should specify a legal domain name. * means that all websites are open to access, which is dangerous.
3 Solve the problem that IE10 and below cannot cross domains
There is really nothing to say about the IE browser, although I really like Microsoft stuff, but for IE, I can only say NO. I really don’t want to talk about it too much. Let’s first look at IE’s solution to cross-domain uploading: the client does not return data directly, but Rewrite the callback address to the client, and the callback returns the final data like the ajaxForm method, thus solving the direct cross-domain problem.
  /// <summary>
  /// 第三方的服务端
  /// </summary>
  /// <param name="name"></param>
  /// <returns></returns>
  [HttpPost]
  public ActionResult UploadResult()
  {
   string data = "{'code':'OK','thumpImgUrl':'http://127.0.0.1/images/1.jpg'}";
   return Redirect("http://localhost:9497/Home/UploadCallback?data=" + data);
  }
  /// <summary>
  /// 可能是服务端来调用它
  /// </summary>
  /// <returns></returns>
  public ActionResult UploadCallback(string data)
  {
   return Content(data);
}Sometimes, when we are thinking about a solution to a problem, if we can't go through one path, we can change our thinking, and we may get unexpected gains!
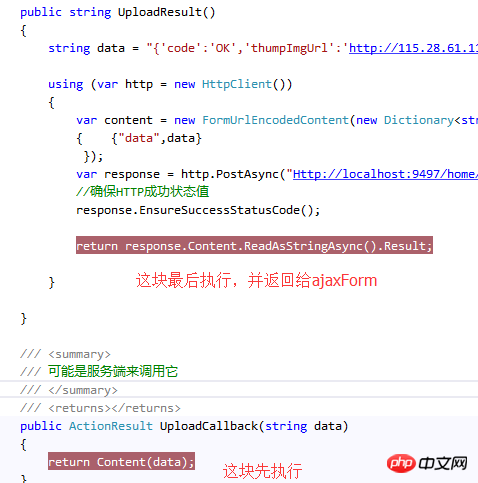
Someone asked whether it is possible to use POST to transfer data between the server and the client. The uncle said: No, because after the POST is submitted to the client, the client processes it and then sends the result. Return to the server, and finally the server returns the result to ajaxform. This is back to the cross-domain problem at the beginning, haha!


I believe you have mastered the method after reading the case in this article. For more exciting information, please pay attention to other related articles on the php Chinese website!
Recommended reading:
The Uploadify plug-in makes batch uploading with a progress bar function
How does the jQuery EasyUI plug-in create a menu link Button
The above is the detailed content of Detailed explanation of the steps to implement cross-domain asynchronous file upload with Jquery. For more information, please follow other related articles on the PHP Chinese website!


