This article mainly introduces the implementation code of JavaScriptWaterfall flow layout in detail. It has certain reference value. Interested friends can refer to it
Let’s first talk about what waterfall flow layout is.
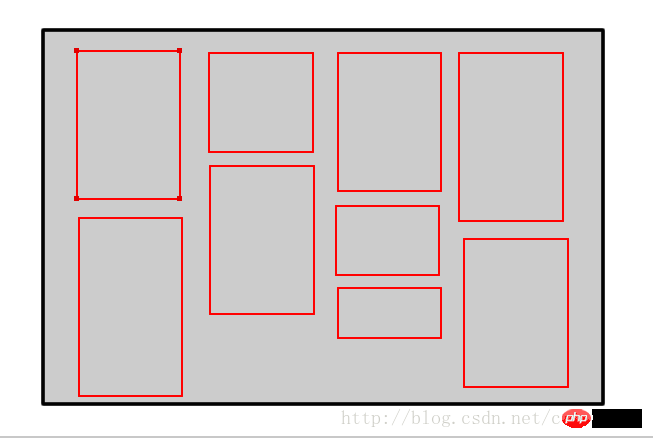
is a page composed of a bunch of data blocks with equal width and different heights, as shown in the picture:

First of all, to implement it, you need to understand how it is arranged.
The number of columns in each row is calculated based on the ratio between the width of the image and the width of the page. .
The first row is arranged in order, and the other data blocks are sorted from the lowest column in each column.
framework.
<p id = "main">
 <p class = "box">
  <p class = "pic">
   <img  src = "images/0.jpg" alt="Using JavaScript to implement waterfall flow layout effect code" >
  </p>
 </p>
 <p class = "box">
  <p class = "pic">
   <img  src = "images/1.jpg" alt="Using JavaScript to implement waterfall flow layout effect code" >
  </p>
 </p>
 <p class = "box">
  <p class = "pic">
   <img  src = "images/2.jpg" alt="Using JavaScript to implement waterfall flow layout effect code" >
  </p>
 </p>
 <p class = "box">
  <p class = "pic">
   <img  src = "images/3.jpg" alt="Using JavaScript to implement waterfall flow layout effect code" >
  </p>
 </p>
 <p class = "box">
  <p class = "pic">
   <img  src = "images/4.jpg" alt="Using JavaScript to implement waterfall flow layout effect code" >
  </p>
 </p>
 <p class = "box">
  <p class = "pic">
   <img  src = "images/5.jpg" alt="Using JavaScript to implement waterfall flow layout effect code" >
  </p>
 </p>
 <p class = "box">
  <p class = "pic">
   <img  src = "images/6.jpg" alt="Using JavaScript to implement waterfall flow layout effect code" >
  </p>
 </p>
 <p class = "box">
  <p class = "pic">
   <img  src = "images/7.jpg" alt="Using JavaScript to implement waterfall flow layout effect code" >
  </p>
 </p>

 <p class = "box">
  <p class = "pic">
   <img  src = "images/8.jpg" alt="Using JavaScript to implement waterfall flow layout effect code" >
  </p>
 </p>
 <p class = "box">
  <p class = "pic">
   <img  src = "images/9.jpg" alt="Using JavaScript to implement waterfall flow layout effect code" >
  </p>
 </p>
 <p class = "box">
  <p class = "pic">
   <img  src = "images/10.jpg" alt="Using JavaScript to implement waterfall flow layout effect code" >
  </p>
 </p>
 <p class = "box">
  <p class = "pic">
   <img  src = "images/11.jpg" alt="Using JavaScript to implement waterfall flow layout effect code" >
  </p>
 </p>
 <p class = "box">
  <p class = "pic">
   <img  src = "images/12.jpg" alt="Using JavaScript to implement waterfall flow layout effect code" >
  </p>
 </p>
 <p class = "box">
  <p class = "pic">
   <img  src = "images/13.jpg" alt="Using JavaScript to implement waterfall flow layout effect code" >
  </p>
 </p>
 <p class = "box">
  <p class = "pic">
   <img  src = "images/14.jpg" alt="Using JavaScript to implement waterfall flow layout effect code" >
  </p>
 </p>
</p>
attribute of class= box and an attribute of class= “pic”. Its style is defined in css:
*{
  padding: 0px;
  margin: 0px;
 }

 #main{
  position: relative;

 }
 .box{
/*  display: inline-block;*/
  padding: 15px 0px 0px 15px;
  float: left;

 }
 .pic{
  padding: 10px;
  border-radius: 5px;
  border:1px solid #ccc;
  box-shadow: 0 0 5px #ccc;
 }

 .pic img{
  width: 165px;
  height: auto;
 }
 </style>
js. Before writing the code, since the box attribute needs to be used, and there is no direct way to get the class defined in js, we have to write a method to get the class here:
function getByClass(parent,className){

 var boxArr = new Array();//用来获取所有class为box的元素

 oElement = parent.getElementsByTagName('*');

 for (var i = 0; i <oElement.length; i++) {

  if(oElement[i].className == className){

   boxArr.push(oElement[i]);

  }
 };
 return boxArr;
}function:
//首先在onload函数中调用函数
window.onload = function(){
waterFull('main','box');
}
function waterFull(parent,children){
//先获得父元素及其底下所有的class = box的元素
var oParent = document.getElementById(parent);
var oBoxs = getByClass(oParent,children);
//我们在前面说过,数据块的列数我们是希望不变的。由于每个数据块都是等宽的,所以可以以第一个数据块的宽度为准,获得数据块的宽度。再计算数据块的列数,向下取整。
var oBoxW = oBoxs[0].offsetWidth;
var cols = Math.floor(document.documentElement.clientWidth/oBoxW);
接下来设置父元素的样式,我们需要获得它的宽度,并且使其居中
oParent.style.cssText = 'width:' cols * oBoxW + 'px; margin: 0 auto';
//在定义好了所有的样式之后,就是排列数据块。首先第一行是直接排列的。定义一个数组存放每一列的高度,从第二行开始,使得每一个数据块都排在高度最低的那一列。首先得遍历所有的box,即oBoxs
var arrH = []; //定义数组存放每一列的高度
for(var i = 0; i< oBoxs.length; i++){
//当是第一行时,直接将数据块依次排列,并在数组中记录每一列的高度
if(i < cols){
arrH[i] = oBoxs[i].offsetHeight;
}
//当i>cols时,即要对前面的所有列的高度进行遍历,将下一个图片放在合适的位置。
else{
//首先在数组中找到高度最低的列数。我们都知道有Math.min可以找到最小的数字,但是它接受的参数必须是一组数字,所以在这里我们要用Math.min.apply()方法
var minH = Math.min.apply(null, arrH); //定义一个变量,存放数组中最小的高度
//在找出了最小高度之后,我们需要知道它的索引,才能够为接下来的数据块找到合适的位置,所以在下面又定义了一个找出最小值下标的函数。
//定义一个变量去接受getMinhIndex函数的返回值
var minIndex = getMinhIndex(arrH,minH);
//在获得了高度最小的列数的索引后,就可以将下一个元素放到合适的位置
oBoxs[i].style.position = 'absolute';
oBoxs[i].style.top = minH + 'px';
oBoxs[i].style.left = minIndex * oBoxW + 'px';
//将当前的数据块终于都放到了合适的位置,但不要忘了更新arrH数组
arrH[minIndex] += oBoxs[i].offsetHeight;
}
}
}
//获取当前最小值得下标
function getMinhIndex(array,min){
for(var i in array){
if(array[i] == min)
return i;
}
}
window.onload = function(){
waterFull('main','box');
}
function waterFull(parent,children){
var oParent = document.getElementById(parent);
//var oBoxs = parent.querySelectorAll(".box");
var oBoxs = getByClass(oParent,children);
//计算整个页面显示的列数
var oBoxW = oBoxs[0].offsetWidth;
var cols = Math.floor(document.documentElement.clientWidth/oBoxW);
//设置main的宽度,并且居中
oParent.style.cssText = 'width:'+oBoxW * cols +'px; margin: 0 auto';
//找出高度最小的图片,将下一个图片放在下面
//定义一个数组,存放每一列的高度,初始化存的是第一行的所有列的高度
var arrH = [];
for(var i = 0; i< oBoxs.length ; i++){
if(i < cols){
arrH.push(oBoxs[i].offsetHeight);
}
else{
var minH = Math.min.apply(null,arrH);
var minIndex = getMinhIndex(arrH,minH);
oBoxs[i].style.position = 'absolute';
oBoxs[i].style.top= minH + 'px';
oBoxs[i].style.left = minIndex * oBoxW + 'px';
// oBoxs[i].style.left = arrH[minIndex].;
arrH[minIndex] += oBoxs[i].offsetHeight;
}
}
}
function getByClass(parent,className){
var boxArr = new Array();//用来获取所有class为box的元素
oElement = parent.getElementsByTagName('*');
for (var i = 0; i <oElement.length; i++) {
if(oElement[i].className == className){
boxArr.push(oElement[i]);
}
};
return boxArr;
}
//获取当前最小值得下标
function getMinhIndex(array,min){
for(var i in array){
if(array[i] == min)
return i;
}
}瀑布流布局