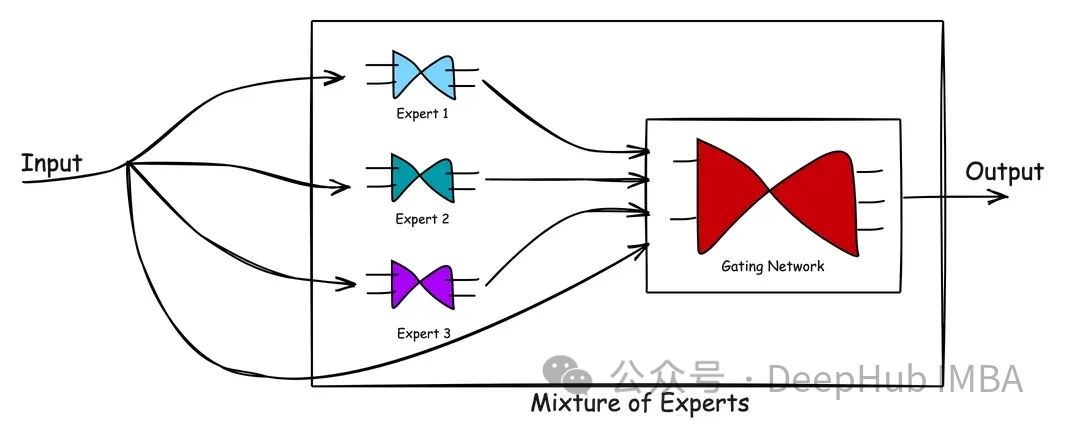
Mixtral 8x7B の発表は、オープン AI 分野、特に誰もがよく知っている専門家混合 (MoE) の概念で幅広い注目を集めました。ハイブリッド エキスパート (MoE) の概念は、協調的な知性を象徴し、全体は部分の合計よりも優れているという考えを具体化しています。 MoE モデルは、複数のエキスパート モデルの利点を統合して、より正確な予測を提供します。これはゲート ネットワークと一連のエキスパート ネットワークで構成されており、各エキスパート ネットワークは特定のタスクのさまざまな側面を処理するのが得意です。タスクと重みを適切に割り当てることで、MoE モデルは専門家の専門知識を活用し、全体的な予測パフォーマンスを向上させることができます。この協調的なインテリジェント モデルは、AI 分野の発展に新たなブレークスルーをもたらし、将来のアプリケーションで重要な役割を果たすでしょう。
この記事では、PyTorch を使用して MoE モデルを実装します。具体的なコードを紹介する前に、ハイブリッド エキスパートのアーキテクチャを簡単に紹介しましょう。
MoE は、(1) エキスパート ネットワークと (2) ゲート ネットワークの 2 種類のネットワークで構成されます。
エキスパート ネットワークは、データのサブセットに対して適切なパフォーマンスを発揮する独自のモデルを使用する方法です。その中心的なコンセプトは、補完的な強みを備えた複数の専門家を通じて問題領域をカバーし、問題の包括的な解決策を確保することです。各エキスパート モデルは独自の機能と経験をもとにトレーニングされているため、システム全体のパフォーマンスと有効性が向上します。専門家ネットワークを利用することで、複雑なタスクやニーズに効果的に対処し、より良いソリューションを提供できます。
ゲート ネットワークは、専門家の貢献を指示、調整、または管理するために使用されるネットワークです。さまざまなタイプの入力に対するさまざまなネットワークの機能を学習および比較検討することにより、どのネットワークが特定の入力の処理に最適であるかを決定します。十分に訓練されたゲート ネットワークは、新しい入力ベクトルを評価し、熟練度に基づいて最も適切な専門家または専門家の組み合わせに処理タスクを割り当てることができます。ゲーティング ネットワークは、専門家の出力と現在の入力の関連性に基づいて重みを動的に調整し、パーソナライズされた応答を保証します。重みを動的に調整するこのメカニズムにより、ゲート ネットワークはさまざまな状況やニーズに柔軟に適応できます。

#上図は MoE における処理の流れを示しています。混合エキスパート モデルの利点は、そのシンプルさです。 MoE モデルは、複雑な問題空間と、問題を解決する際の専門家の反応を学習することで、1 人の専門家よりも優れた解決策を生み出すのに役立ちます。ゲーティング ネットワークは効果的なマネージャーとして機能し、シナリオを評価し、最良の専門家にタスクを渡します。新しいデータが入力されると、モデルは新しい入力に対して専門家の強みを再評価することで適応できるため、柔軟な学習アプローチが実現します。 つまり、MoE モデルは複数の専門家の知識と経験を活用して、複雑な問題を解決します。ゲート ネットワークの管理を通じて、モデルはさまざまなシナリオに従ってタスクを処理するのに最適な専門家を選択できます。このアプローチの利点は、1 人の専門家よりも優れたソリューションを生成できることと、新しい入力データに適応できる柔軟性です。全体として、MoE モデルは、さまざまな複雑な問題を解決するために使用できる効果的でシンプルな方法です。
MoE は、機械学習モデルの導入に大きなメリットをもたらします。ここでは 2 つの注目すべき利点を紹介します。
MoE の中核的な強みは、専門家による多様で専門的なネットワークにあります。 MoE の設定により、単一モデルでは実現が難しい複数分野の問題に高精度に対応できます。
MoE は本質的にスケーラブルです。タスクの複雑さが増すにつれて、より多くのエキスパートをシステムにシームレスに統合でき、他のエキスパート モデルを変更することなく専門知識の範囲を拡大できます。言い換えれば、MoE は、事前トレーニングを受けた専門家を機械学習システムにパッケージ化し、システムが増大するタスク要件に対処できるようにすることができます。
ハイブリッド エキスパート モデルは、レコメンダー システム、言語モデリング、さまざまな複雑な予測タスクなど、多くの分野で応用できます。 GPT-4は複数の専門家で構成されているという噂がある。確認はできませんが、MoE アプローチを通じて複数のモデルの力を活用することで、gpt-4 のようなモデルが最良の結果を提供します。
ここでは、Mixtral 8x7B のような大規模モデルで使用される MOE テクノロジについては説明しませんが、単純なカスタム コードを作成します。あらゆるタスクに適用できる MOE。コードを通じて MOE がどのように動作するかを理解でき、大規模モデルで MOE がどのように動作するかを理解するのに非常に役立ちます。
以下では、PyTorch のコード実装を 1 つずつ紹介します。
インポート ライブラリ:
import torch import torch.nn as nn import torch.optim as optim
エキスパート モデルの定義:
class Expert(nn.Module): def __init__(self, input_dim, hidden_dim, output_dim): super(Expert, self).__init__() self.layer1 = nn.Linear(input_dim, hidden_dim) self.layer2 = nn.Linear(hidden_dim, output_dim) def forward(self, x): x = torch.relu(self.layer1(x)) return torch.softmax(self.layer2(x), dim=1)
ここで For を定義しますシンプルなエキスパート モデルですが、これは 2 層の mlp であり、relu アクティベーションを使用し、最後にソフトマックスを使用して分類確率を出力していることがわかります。
ゲート モデルの定義:
# Define the gating model class Gating(nn.Module): def __init__(self, input_dim,num_experts, dropout_rate=0.1): super(Gating, self).__init__() # Layers self.layer1 = nn.Linear(input_dim, 128) self.dropout1 = nn.Dropout(dropout_rate) self.layer2 = nn.Linear(128, 256) self.leaky_relu1 = nn.LeakyReLU() self.dropout2 = nn.Dropout(dropout_rate) self.layer3 = nn.Linear(256, 128) self.leaky_relu2 = nn.LeakyReLU() self.dropout3 = nn.Dropout(dropout_rate) self.layer4 = nn.Linear(128, num_experts) def forward(self, x): x = torch.relu(self.layer1(x)) x = self.dropout1(x) x = self.layer2(x) x = self.leaky_relu1(x) x = self.dropout2(x) x = self.layer3(x) x = self.leaky_relu2(x) x = self.dropout3(x) return torch.softmax(self.layer4(x), dim=1)
门控模型更复杂,有三个线性层和dropout层用于正则化以防止过拟合。它使用ReLU和LeakyReLU激活函数引入非线性。最后一层的输出大小等于专家的数量,并对这些输出应用softmax函数。输出权重,这样可以将专家的输出与之结合。
说明:其实门控网络,或者叫路由网络是MOE中最复杂的部分,因为它涉及到控制输入到那个专家模型,所以门控网络也有很多个设计方案,例如(如果我没记错的话)Mixtral 8x7B 只是取了8个专家中的top2。所以我们这里不详细讨论各种方案,只是介绍其基本原理和代码实现。
完整的MOE模型:
class MoE(nn.Module): def __init__(self, trained_experts): super(MoE, self).__init__() self.experts = nn.ModuleList(trained_experts) num_experts = len(trained_experts) # Assuming all experts have the same input dimension input_dim = trained_experts[0].layer1.in_features self.gating = Gating(input_dim, num_experts) def forward(self, x): # Get the weights from the gating network weights = self.gating(x) # Calculate the expert outputs outputs = torch.stack([expert(x) for expert in self.experts], dim=2) # Adjust the weights tensor shape to match the expert outputs weights = weights.unsqueeze(1).expand_as(outputs) # Multiply the expert outputs with the weights and # sum along the third dimension return torch.sum(outputs * weights, dim=2)
这里主要看前向传播的代码,通过输入计算出权重和每个专家给出输出的预测,最后使用权重将所有专家的结果求和最终得到模型的输出。
这个是不是有点像“集成学习”。
下面我们来对我们的实现做个简单的测试,首先生成一个简单的数据集:
# Generate the dataset num_samples = 5000 input_dim = 4 hidden_dim = 32 # Generate equal numbers of labels 0, 1, and 2 y_data = torch.cat([ torch.zeros(num_samples // 3), torch.ones(num_samples // 3), torch.full((num_samples - 2 * (num_samples // 3),), 2)# Filling the remaining to ensure exact num_samples ]).long() # Biasing the data based on the labels x_data = torch.randn(num_samples, input_dim) for i in range(num_samples): if y_data[i] == 0: x_data[i, 0] += 1# Making x[0] more positive elif y_data[i] == 1: x_data[i, 1] -= 1# Making x[1] more negative elif y_data[i] == 2: x_data[i, 0] -= 1# Making x[0] more negative # Shuffle the data to randomize the order indices = torch.randperm(num_samples) x_data = x_data[indices] y_data = y_data[indices] # Verify the label distribution y_data.bincount() # Shuffle the data to ensure x_data and y_data remain aligned shuffled_indices = torch.randperm(num_samples) x_data = x_data[shuffled_indices] y_data = y_data[shuffled_indices] # Splitting data for training individual experts # Use the first half samples for training individual experts x_train_experts = x_data[:int(num_samples/2)] y_train_experts = y_data[:int(num_samples/2)] mask_expert1 = (y_train_experts == 0) | (y_train_experts == 1) mask_expert2 = (y_train_experts == 1) | (y_train_experts == 2) mask_expert3 = (y_train_experts == 0) | (y_train_experts == 2) # Select an almost equal number of samples for each expert num_samples_per_expert = \ min(mask_expert1.sum(), mask_expert2.sum(), mask_expert3.sum()) x_expert1 = x_train_experts[mask_expert1][:num_samples_per_expert] y_expert1 = y_train_experts[mask_expert1][:num_samples_per_expert] x_expert2 = x_train_experts[mask_expert2][:num_samples_per_expert] y_expert2 = y_train_experts[mask_expert2][:num_samples_per_expert] x_expert3 = x_train_experts[mask_expert3][:num_samples_per_expert] y_expert3 = y_train_experts[mask_expert3][:num_samples_per_expert] # Splitting the next half samples for training MoE model and for testing x_remaining = x_data[int(num_samples/2)+1:] y_remaining = y_data[int(num_samples/2)+1:] split = int(0.8 * len(x_remaining)) x_train_moe = x_remaining[:split] y_train_moe = y_remaining[:split] x_test = x_remaining[split:] y_test = y_remaining[split:] print(x_train_moe.shape,"\n", x_test.shape,"\n", x_expert1.shape,"\n", x_expert2.shape,"\n", x_expert3.shape)
这段代码创建了一个合成数据集,其中包含三个类标签——0、1和2。基于类标签对特征进行操作,从而在数据中引入一些模型可以学习的结构。
数据被分成针对个别专家的训练集、MoE模型和测试集。我们确保专家模型是在一个子集上训练的,这样第一个专家在标签0和1上得到很好的训练,第二个专家在标签1和2上得到更好的训练,第三个专家看到更多的标签2和0。
我们期望的结果是:虽然每个专家对标签0、1和2的分类准确率都不令人满意,但通过结合三位专家的决策,MoE将表现出色。
模型初始化和训练设置:
# Define hidden dimension output_dim = 3 hidden_dim = 32 epochs = 500 learning_rate = 0.001 # Instantiate the experts expert1 = Expert(input_dim, hidden_dim, output_dim) expert2 = Expert(input_dim, hidden_dim, output_dim) expert3 = Expert(input_dim, hidden_dim, output_dim) # Set up loss criterion = nn.CrossEntropyLoss() # Optimizers for experts optimizer_expert1 = optim.Adam(expert1.parameters(), lr=learning_rate) optimizer_expert2 = optim.Adam(expert2.parameters(), lr=learning_rate) optimizer_expert3 = optim.Adam(expert3.parameters(), lr=learning_rate)
实例化了专家模型和MoE模型。定义损失函数来计算训练损失,并为每个模型设置优化器,在训练过程中执行权重更新。
训练的步骤也非常简单
# Training loop for expert 1 for epoch in range(epochs):optimizer_expert1.zero_grad()outputs_expert1 = expert1(x_expert1)loss_expert1 = criterion(outputs_expert1, y_expert1)loss_expert1.backward()optimizer_expert1.step() # Training loop for expert 2 for epoch in range(epochs):optimizer_expert2.zero_grad()outputs_expert2 = expert2(x_expert2)loss_expert2 = criterion(outputs_expert2, y_expert2)loss_expert2.backward()optimizer_expert2.step() # Training loop for expert 3 for epoch in range(epochs):optimizer_expert3.zero_grad()outputs_expert3 = expert3(x_expert3)loss_expert3 = criterion(outputs_expert3, y_expert3)loss_expert3.backward()
每个专家使用基本的训练循环在不同的数据子集上进行单独的训练。循环迭代指定数量的epoch。
下面是我们MOE的训练
# Create the MoE model with the trained experts moe_model = MoE([expert1, expert2, expert3]) # Train the MoE model optimizer_moe = optim.Adam(moe_model.parameters(), lr=learning_rate) for epoch in range(epochs):optimizer_moe.zero_grad()outputs_moe = moe_model(x_train_moe)loss_moe = criterion(outputs_moe, y_train_moe)loss_moe.backward()optimizer_moe.step()
MoE模型是由先前训练过的专家创建的,然后在单独的数据集上进行训练。训练过程类似于单个专家的训练,但现在门控网络的权值在训练过程中更新。
最后我们的评估函数:
# Evaluate all models def evaluate(model, x, y):with torch.no_grad():outputs = model(x)_, predicted = torch.max(outputs, 1)correct = (predicted == y).sum().item()accuracy = correct / len(y)return accuracy
evaluate函数计算模型在给定数据上的精度(x代表样本,y代表预期标签)。准确度计算为正确预测数与预测总数之比。
结果如下:
accuracy_expert1 = evaluate(expert1, x_test, y_test) accuracy_expert2 = evaluate(expert2, x_test, y_test) accuracy_expert3 = evaluate(expert3, x_test, y_test) accuracy_moe = evaluate(moe_model, x_test, y_test) print("Expert 1 Accuracy:", accuracy_expert1) print("Expert 2 Accuracy:", accuracy_expert2) print("Expert 3 Accuracy:", accuracy_expert3) print("Mixture of Experts Accuracy:", accuracy_moe) #Expert 1 Accuracy: 0.466 #Expert 2 Accuracy: 0.496 #Expert 3 Accuracy: 0.378 #Mixture of Experts Accuracy: 0.614可以看到
专家1正确预测了测试数据集中大约46.6%的样本的类标签。
专家2表现稍好,正确预测率约为49.6%。
专家3在三位专家中准确率最低,正确预测的样本约为37.8%。
而MoE模型显著优于每个专家,总体准确率约为61.4%。
我们测试的输出结果显示了混合专家模型的强大功能。该模型通过门控网络将各个专家模型的优势结合起来,取得了比单个专家模型更高的精度。门控网络有效地学习了如何根据输入数据权衡每个专家的贡献,以产生更准确的预测。混合专家利用了各个模型的不同专业知识,在测试数据集上提供了更好的性能。
同时也说明我们可以在现有的任务上尝试使用MOE来进行测试,也可以得到更好的结果。
以上がPyTorch を使用した混合エキスパート モデル (MoE) の実装の詳細内容です。詳細については、PHP 中国語 Web サイトの他の関連記事を参照してください。