
CSS を使用して派手なテキスト効果を実現するにはどうすればよいですか?次の記事では、背景シリーズ属性を使用して派手なテキスト効果を実現する方法を紹介します。
この記事では、background 一連のプロパティを使用して、派手なテキスト効果を巧みに実現する方法について説明します。この記事を通じて、次のことを学ぶことができます。
background-size と background-position
、background-position、background-clip を使用して、テキストが徐々に表示される効果を実現します。
テキストの段階的な外観効果を実感
10 Masterively Designed Websites には、非常にクリエイティブな Web サイト 10 個がリストされています。
レッドブル レーシングのウェブサイトの 1 つは、F1 レッドブル レーシング チームを紹介するホームページです。非常に興味深いホバー アニメーション効果があります:テキスト全体に一度に全体の効果を与えるのではなく、テキスト全体の の部分に徐々に効果を適用する方法です。
背景を使用してテキストの下線効果を実現するここで、この記事の前の記事を思い出しました--CSS テキスト装飾 text-decoration & text-emphasis、下線の効果をシミュレートするために背景を使用したを導入しました。
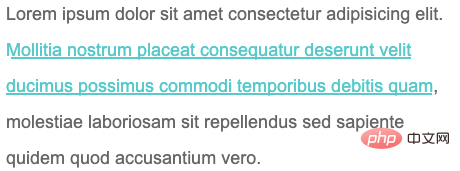
簡単なデモを見てください。background を使用して、テキストの下線効果をシミュレートします。
<p>Lorem ipsum dolor sit amet consectetur adipisicing elit. <a>Mollitia nostrum placeat consequatur deserunt velit ducimus possimus commodi temporibus debitis quam</a>, molestiae laboriosam sit repellendus sed sapiente quidem quod accusantium vero.</p>
p {
    width: 600px;
    font-size: 24px;
    color: #666;
}
a {
    background: linear-gradient(90deg, #0cc, #0cc);
    background-size: 100% 3px;
    background-repeat: no-repeat;
    background-position: 100% 100%;
    color: #0cc;
}background を使用して、テキストの下線効果をシミュレートします。
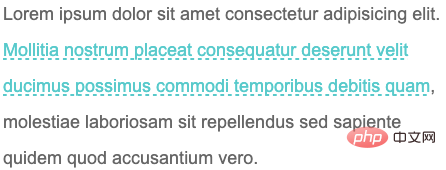
 ##または、
を使用して点線の下線をシミュレートします: <div class="code" style="position:relative; padding:0px; margin:0px;"><pre class="brush:css;toolbar:false;">a {
background: linear-gradient(90deg, #0cc 50%, transparent 50%, transparent 1px);
background-size: 10px 2px;
background-repeat: repeat-x;
background-position: 100% 100%;
}</pre><div class="contentsignin">ログイン後にコピー</div></div>
background#https://codepen.io/Chokcoco/pen/YzNQKwm
もちろんこれは最も基本的で賢い使い方
のさまざまな属性を使用すると、さまざまな興味深い効果を実現できます。
background-position でテキスト ホバー効果を実現 プロパティと background-position プロパティを使用すると、非常に興味深いテキスト ホバー効果を実現できます。 まず、このようなデモを見てみましょう。コア コードは、
タグでラップされた <a> タグで動作します。 background: Linear-gradient(90deg, #ff3c41, #fc0, #0ebeff)
background-size: 0 3px でした。ホバー時に background-size: 100% 3px を 0 3px から に変更します。 100% 3px 変換。これは、ゼロからのストレッチ効果です。 最終的な効果を見てください:
セット 
0 100% であるため、セット background-position が 100% 100% の場合、逆の効果を得ることができます:
<p>Lorem ipsum dolor sit amet consectetur adipisicing elit. <a>Mollitia nostrum placeat consequatur deserunt velit ducimus possimus commodi temporibus debitis quam</a>, molestiae laboriosam sit repellendus sed sapiente quidem quod accusantium vero.</p>
効果をもう一度見てください。上記のアニメーションを比較できます。具体的な違いを確認するには: 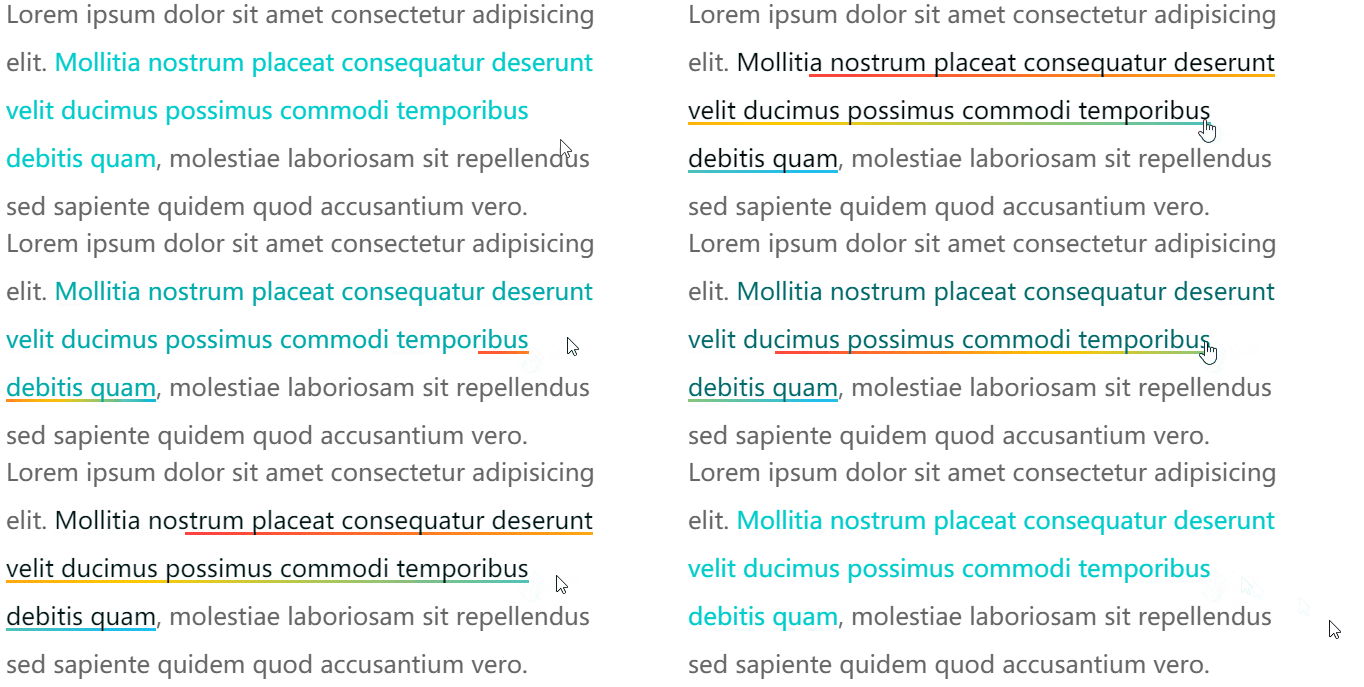 CodePen デモ -- 背景の下線アニメーション
OK、background-position## を使用します。 # 値を指定すると、より興味深い下線のホバー効果が得られます。background
を使用して 2 つの重複する下線を実装する場合は、上記の 2 つの異なる
CSS 代码示意,注意看两条使用 background 模拟的下划线的 background-position 的值是不一样的:
a {
    background:
        linear-gradient(90deg, #0cc, #0cc),
        linear-gradient(90deg, #ff3c41, #fc0, #8500d8);
    background-size: 100% 3px, 0 3px;
    background-repeat: no-repeat;
    background-position: 100% 100%, 0 100%;
    transition: 0.5s all;
    color: #0cc;
}
a:hover {
    background-size: 0 3px, 100% 3px;
    color: #000;
}可以得到这样一种效果,其实每次 hover, 都有两条下划线在移动:
CodePen Demo -- background 下划线动画
https://codepen.io/Chokcoco/pen/MWJogjQ
background-size 与 background-position 配合 background-clip 实现文字的渐现上述一大段都在围绕 -- 下划线。
回归到本文一开始提到的 Gif 效果,我们能否实现在一段文字中,实现文字的渐现效果呢?
上述技巧利用的是 background,那么 background 背景色能否改变文字的颜色的?答案是可以的,只需要借助 background-clip。
我们稍微改造下代码,实现利用 background-clip 实现 hover 的时候部分文字逐渐改变颜色:
<p>
Lorem ipsum dolor sit amet consectetur adipisicing elit.
<a>Mollitia nostrum placeat consequatur deserunt velit ducimus possimus commodi temporibus debitis quam, </a>
molestiae laboriosam sit repellendus sed sapiente quidem quod accusantium vero.
</p>
p {
    color: #666;
    cursor: pointer;
}

a {
    background: linear-gradient(90deg, #fc0, #fc0);
    background-size: 0 100px;
    background-repeat: no-repeat;
    background-position: 0 100%;
    background-clip: text;
    transition: .6s all linear;
}

p:hover a {
    background-size: 100% 100%;
    color: transparent;
}看看效果,通过 background-clip: text 的遮罩裁剪,我们将 background: linear-gradient(90deg, #fc0, #fc0) 背景色作用给了文字,同时利用 color: transparent 让文字展示出背景色的色值:
CodePen Demo -- background-size 与 background-position 以及 background-clip 实现文字逐个渐现
https://codepen.io/Chokcoco/pen/qBjmvdq?editors=1100
当然,稍微对上述代码变形,我们就可以演化出几种不同的效果。
第一种就是从透明到有颜色,逐渐展现,这里我们只需要让 color 一直是 transparent 即可(下述效果借助了一个按钮去触发效果):
<div class="button">Button</div>
<p><a>Lorem ipsum dolor sit amet consectetur adipisicing elit. Mollitia nostrum placeat consequatur deserunt velit ducimus possimus commodi temporibus debitis quam, molestiae laboriosam sit repellendus sed sapiente quidem quod accusantium vero.</a></p>
a {
    background: linear-gradient(90deg, #fc0, #fc0);
    background-size: 0 100px;
    background-repeat: no-repeat;
    background-position: 0 100%;
    color: transparent;
    background-clip: text;
}
.button:hover ~ p a {
    transition: .8s all linear;
    background-size: 0 100px, 100% 100%;
}效果如下:
还可以实现文字从一种颜色到另外一种颜色的逐个转变,只需要添加多一层 background-image 渐变。
<div class="button">Button</div>
<p><a>Lorem ipsum dolor sit amet consectetur adipisicing elit. Mollitia nostrum placeat consequatur deserunt velit ducimus possimus commodi temporibus debitis quam, molestiae laboriosam sit repellendus sed sapiente quidem quod accusantium vero.</a></p>
a {
    background:
        linear-gradient(90deg, #999, #999),
        linear-gradient(90deg, #fc0, #fc0);
    background-size: 100% 100%, 0 100px;
    background-repeat: no-repeat;
    background-position: 100% 100%, 0 100%;
    color: transparent;
    background-clip: text;
}
.button:hover ~ p a {
    transition: .8s all linear;
    background-size: 0 100px, 100% 100%;
}这里需要解释一下,虽然设置了 color: transparent,但是文字默认还是有颜色的,默认的文字颜色,是由第一层渐变赋予的 background: linear-gradient(90deg, #999, #999), linear-gradient(90deg, #fc0, #fc0),也就是这一层:linear-gradient(90deg, #999, #999)。
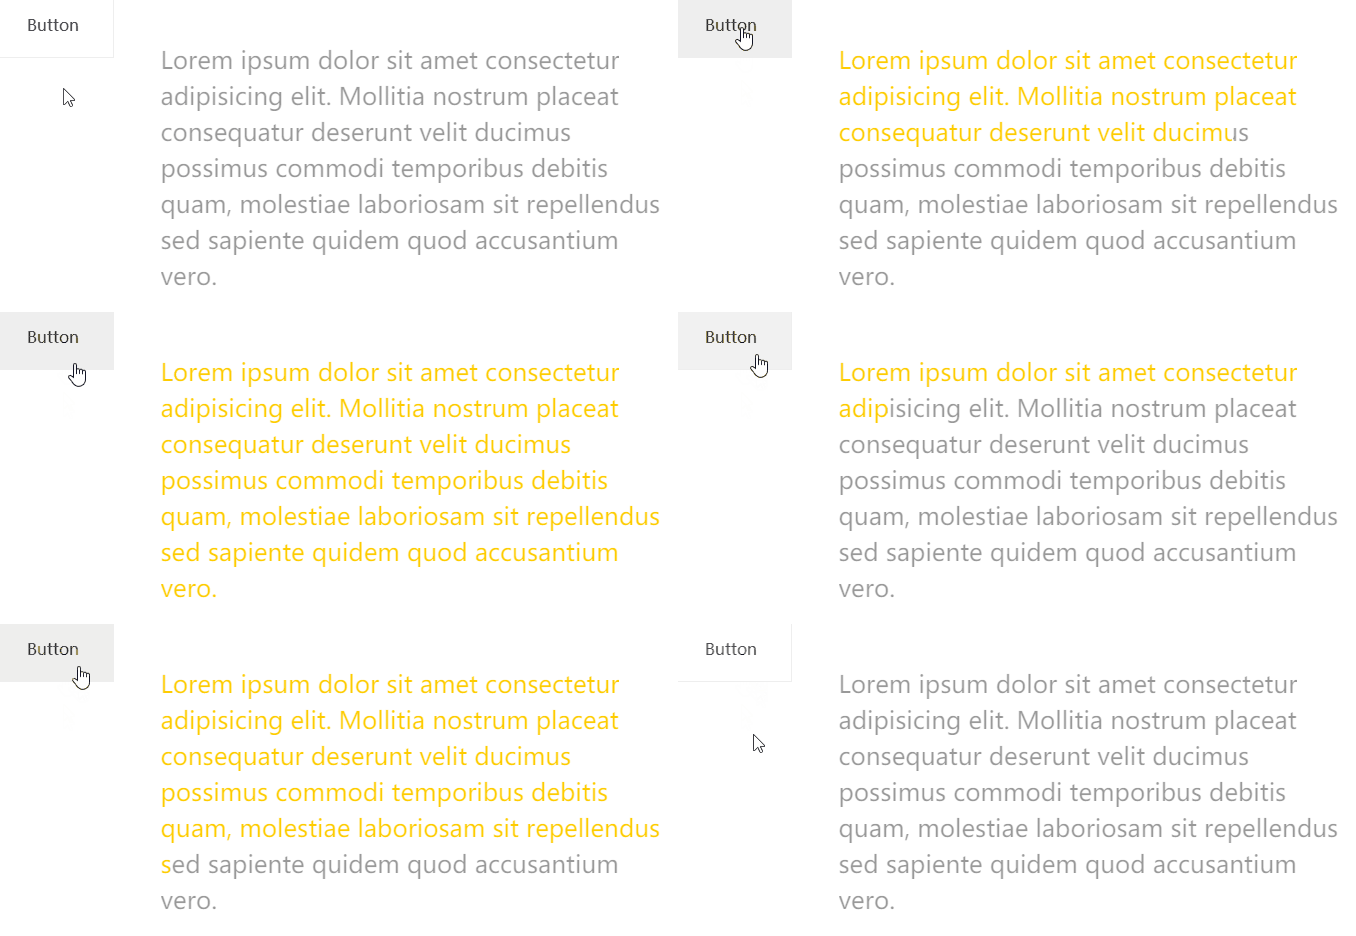
当 hover 触发时,linear-gradient(90deg, #999, #999) 这一层渐变逐渐消失,而另外一层 linear-gradient(90deg, #fc0, #fc0)` 逐渐出现,借此实现上述效果。
CodePen -- background-clip 文字渐现效果
https://codepen.io/Chokcoco/pen/XWgpyqz
这里,我们简单利用这个技巧模拟一下文章一开始列出的 Gif 的效果:
这个效果原作者的技巧是:
将每个单词作为一个对象,包裹一个特殊的 class
利用 animation-delay 将动画逐渐赋予每个单词
这里,我们将整段文本统一处理,简单还原:
<div class="button">Button</div>
<p><a>Lorem ipsum dolor sit amet consectetur adipisicing elit. Mollitia nostrum placeat consequatur deserunt velit ducimus possimus commodi temporibus debitis quam, molestiae laboriosam sit repellendus sed sapiente quidem quod accusantium vero.</a></p>
/** 动画核心 background、line-height、opacity **/
a {
    background:
        linear-gradient(90deg, #ff5722, #ff5722),
        linear-gradient(90deg, #aaa, #aaa);
    background-size: 100% 100%, 0 100px;
    background-repeat: no-repeat;
    background-position: 100% 100%, 0 100%;
    cursor: pointer;
    color: transparent;
    background-clip: text;
    line-height: 3;
    opacity: 0;
}
.button:hover ~ p a {
    transition: 1.2s background .3s ease-out, .8s line-height ease-out, .6s opacity ease-in;
    background-size: 0 100px, 100% 100%;
    color: transparent;
    line-height: 1;
    opacity: 1;
}
/ ** 简单控制半透明黑色遮罩出现 **/
a::before {
    content: "";
    position: fixed;
    background: rgba(0, 0, 0, .8);
    top: 0;
    left: 0;
    right: 0;
    bottom: 0;
    z-index: -1;
    transition: .3s all linear;
    opacity: 0;
}
.button:hover ~ p a::before {
    opacity: 1;
}效果如下:
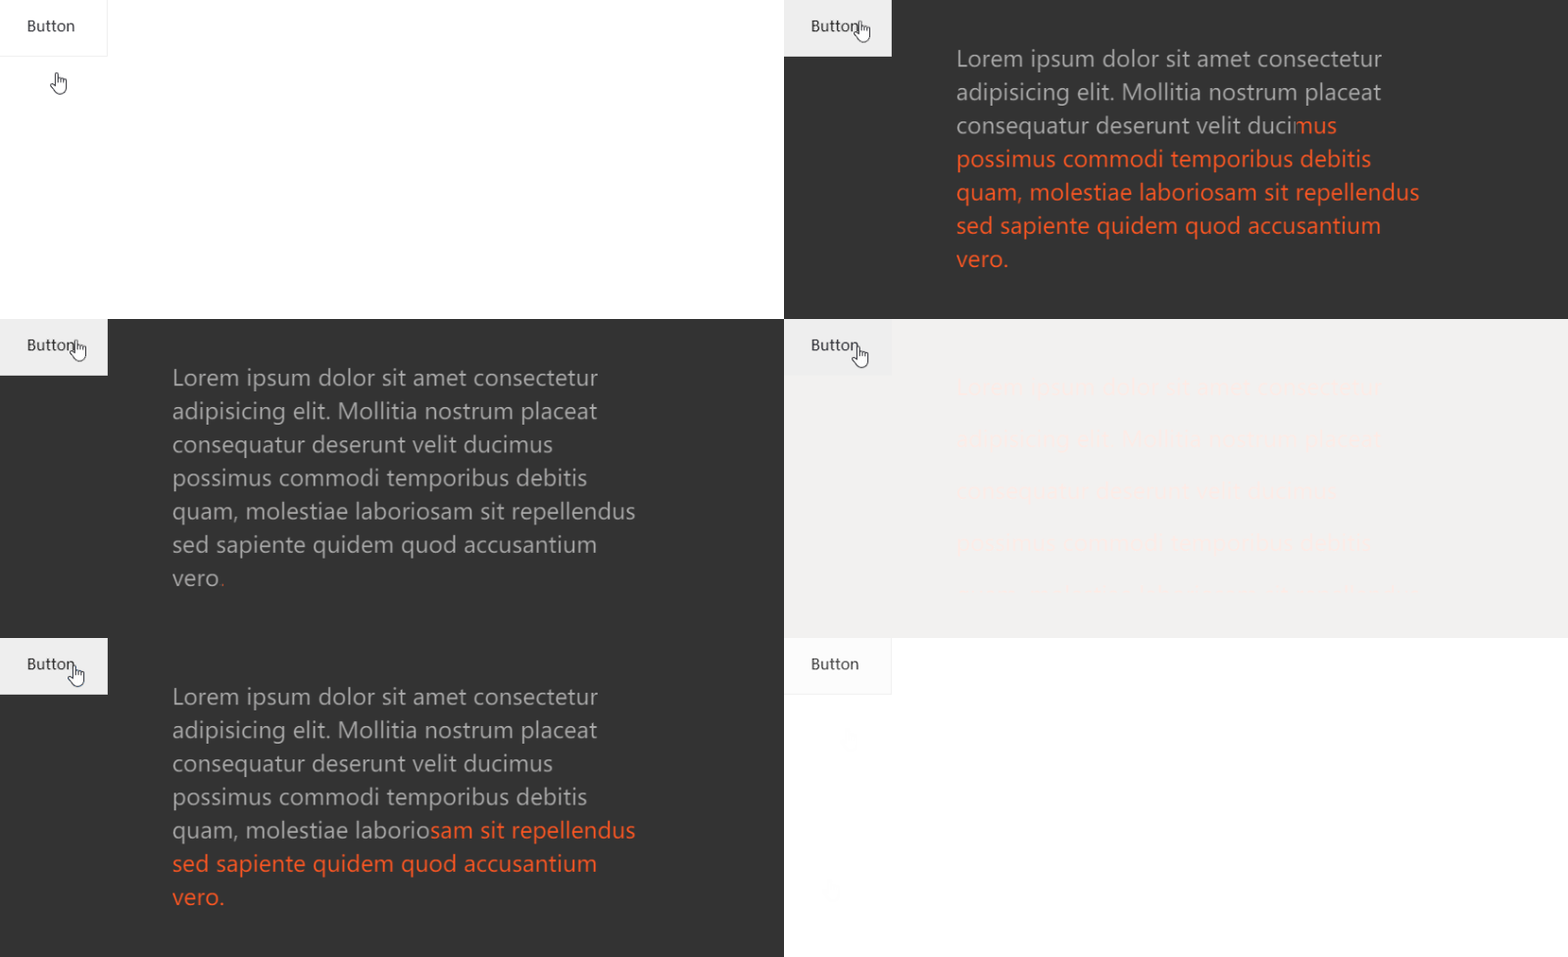
可以看到,由于是整体控制整段文本,效果上没有逐个单词控制的好,但是优点是代码量非常少。对于一些简单卡片类的 hover 场景,足以。
background-image、background-clip 实现文字渐现效果
https://codepen.io/Chokcoco/pen/abwWMJm
当然,题图效果使用纯 CSS 也是不在话下的。只不过就不是简单能够统一处理的了。
这里,我们需要对每一个单词进行精细化的处理,并且使用每个单词的伪元素进行额外的动画。
简单的结构如下:
<div class="button">Button</div>
<div class="g-wrap"></div>
<p>
    <span data-text="Lorem">Lorem</span>
    <span data-text="ipsum">ipsum</span>
    <span data-text="dolor">dolor</span>
    <span data-text="sit">sit</span>
    <span data-text="amet">amet</span>
    // ... 类似结构
</p>可以看到,每个单词都被 <span> 包裹,并且添加了 data-text,方便伪元素拿到当前单词。
接下来,就是设定动画,并且通过顺序给每个 <span> 添加相应递增的 animation-delay 以实现没个单词动画的差异性。核心的伪代码如下:
p {
    position: relative;
    width: 500px;
    overflow: hidden;
}

p span {
    position: relative;
    display: inline-block;
    opacity: 0;
    transform: translateY(15px) translateZ(0);
    transition-property: transform, opacity;
    transition-duration: .3s, .2s;
}

.button:hover ~ p span {
    opacity: 1;
    color: #ddd;
    transform: translateY(0) translateZ(0);
    transition-duration: 1s, .2s;
}

p span:after,
p span:before {
    position: absolute;
    content: attr(data-text);
    top: 0;
    left: 0;
    z-index: 1;
    transform: translateZ(0);
}

p span:after {
    color: #e62541;
    transition-property: opacity;
    transition-duration: .1s;
}

.button:hover ~ p span:after {
    opacity: 0;
    transition-property: opacity;
    transition-duration: .4s;
}

@for $i from 1 to 21 {
    p span:nth-child(#{$i}) {
        transition-delay: #{$i * 0.04}s;

        &::after {
            transition-delay: #{$i * 0.04 + 0.2}s;
        }
    }
}其实动画本身不太复杂,主要讲两点:
hover 状态下和非 hover 状态下的 transition-duration 是不一样的,是因为取消 hover 过程中,动画消失过程的时间通常是要求更短的;
借助了 SASS 的循环 @for $i from 1 to 21 {} 递增给每个 span 和它的伪元素添加了递增的 transition-delay;
最终,我们可以得到如下的结果:
完整的代码,你可以参看 -- CSS 灵感 - 利用 animation-delay 实现文字渐现效果
https://csscoco.com/inspiration/#/./animation/animation-delay-control-text-effect
原文地址:https://segmentfault.com/a/1190000040693286
作者:chokcoco
更多编程相关知识,请访问:编程视频!!
以上がCSS 背景シリーズ プロパティを使用して派手なテキスト効果を実現する方法の詳細内容です。詳細については、PHP 中国語 Web サイトの他の関連記事を参照してください。
