このプロジェクトは、メイン ブランチへのプッシュ時のアプリケーションのビルド、テスト、ステージング環境へのデプロイメント プロセスの自動化を示す簡単なサンプル プロジェクトです。
CI/CD パイプラインを適切にデモンストレーションするために、最小限のコードでシンプルな Python プロジェクトを作成し、それを GitHub Actions に統合します。
前に述べたように、パイプラインで使用する単純なプロジェクトを作成します。特に理由はありませんが、他のプログラミング言語を使用することもできます。このプロジェクトの主な目的は、パイプラインをデモンストレーションすることです。
それでは、プロジェクト フォルダーを作成し、そのフォルダーに移動します。
mkdir automated-testing
cd automated-testing
ここで、簡単な Python アプリケーションを作成します。プロジェクト フォルダーに新しいファイル app.py を作成します。
touch app.py
以下のコード ブロックをファイルに追加します:
def hello():
  return "Hello, World!"

if __name__ == "__main__":
  print(hello())
これは、CI パイプラインでテストできる基本機能の例として機能する、非常に単純な Python の「Hello world」関数です。
def hello() は、引数を取らない hello という名前の関数を定義します。この関数が呼び出されると、文字列「Hello, World!」が返されます。
if __name__ == "__main__" は、ファイルが直接実行された場合 (モジュールとしてインポートされた場合ではない) にのみ特定のコードが実行されるようにするために使用される標準の Python 構造です。これは、スクリプトのエントリ ポイントとして機能します。
app.py が直接実行されると (例: python app.py を実行することにより)、スクリプトは hello() 関数を呼び出し、結果「Hello, World!」を出力します。
一般的なプロジェクトには依存関係があり、Python プロジェクトでは依存関係は通常、requirements.txt ファイルで定義されます。
新しいファイルrequirements.txtを作成します
touch requirements.txt
これをファイルに追加します:
pytest
ここで、app.py の関数をテストするために、基本的なテスト ファイル test_app.py を追加します。以下をファイルに追加します:
from app import hello

def test_hello():
  assert hello() == "Hello, World!"
これでパイプラインを作成する準備が整いました。
GitHub アクションを構成するには、リポジトリ内に .github/workflows フォルダーを作成する必要があります。これが、リポジトリ内の CI/CD パイプラインを GitHub に通知する方法です。
新しいファイルを作成します:
mkdir -p .github/workflows
1 つのリポジトリに複数のパイプラインを含めることができるため、.github/workflows フォルダーにファイル proj.yml を作成します。ここで、Python プロジェクトを構築、テスト、デプロイするための手順を定義します。
以下のコードをファイルに追加します:
name: Build, Test and Deploy

# Trigger the workflow on pushes to the main branch
on:
  push:
    branches:
      - main

jobs:
  build-and-test:
    runs-on: ubuntu-latest

    steps:
    # Checkout the code from the repository
    - name: Checkout repo
      uses: actions/checkout@v4

    # Set up Python environment
    - name: Setup Python
      uses: actions/setup-python@v5
      with:
        python-version: '3.x'

    # Install dependencies
    - name: Install Dependecies
      run: |
        python -m pip install --upgrade pip
        pip install -r requirements.txt

    # Build (this project deosn't require a build but we will simulate a build by creating a file)
    - name: Build Project
      run: |
        mkdir -p build
        # Simulate build output by creating a file
        touch build/output_file.txt

    # Run tests using pytest
    - name: Run tests
      run:
        pytest

    # Upload the build output as an artifact (we created a file in the build step to simulate an artifact)
    - name: Upload build artifact
      uses: actions/upload-artifact@v4
      with:
        name: build-artifact
        path: build/

  deploy:
    runs-on: ubuntu-latest
    needs: build-and-test
    if: success()

    steps:
    # Download the artifact from the build stage
    - name: Download build artifact
      uses: actions/download-artifact@v4
      with:
        name: build-artifact
        path: build/

    - name: Simulate Deployment
      run: |
        echo "Deploying to staging..."
        ls build/
If you haven't already, you need to initialize a git repository using the commands below:
git init
git add .
git commit -m "Create project as well as CI/CD pipeline"
Now we push to GitHub. Create a GitHub repository and push your code using the below commands:
git remote add origin <your-repo-url>
git push -u origin main
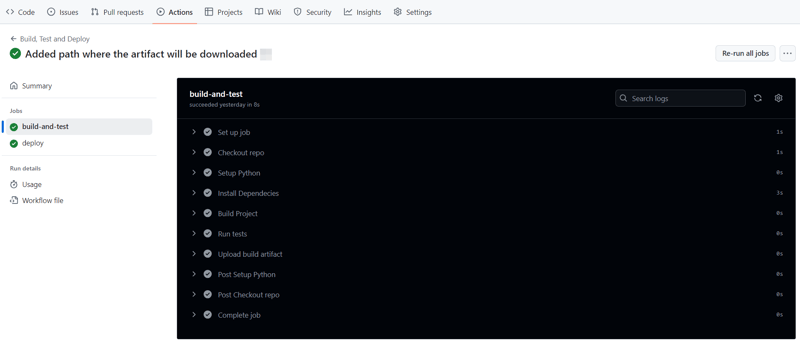
After pushing the code, you can visit the Actions tab in your GitHub repository. You should see the pipeline triggered, running the steps defined in your proj.yml file.
If everything is set up correctly, the pipeline will build, test, and simulate deployment. You can changes things around in your project and make new pushes to see the the pipeline works, create errors intentional so you can see how the pipeline works when the tests fail.
On a successful run this is how your Actions tab should look.

And that's it, this setup provides a working example of a CI/CD pipeline for a very basic Python project. If you found this helpful, please share with your connection and if you have any questions, do not hesitate to drop the question in the comments.
以上がGitHub アクションを使用してビルド、テスト、デプロイのプロセスを自動化するの詳細内容です。詳細については、PHP 中国語 Web サイトの他の関連記事を参照してください。