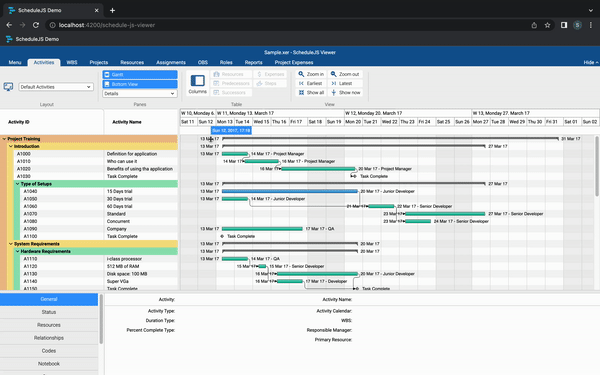
ガント アクティビティ レンダラは、ScheduleJS ビューアのメイン レンダラです。この記事では、このアクティビティ レンダラーの構築方法とその特徴について説明します。
レンダラー クラスを構築する最初のステップは、上位フレームワーク クラスを拡張して属性とメソッドを継承することです。
タスクの開始時間と終了時間のディメンションのみでタスクを表現したいと考えています。これを行うための ScheduleJS の基本レンダラー クラスは、ActivityBarRenderer クラスです。
カスタム Row クラスと Activity クラスによって提供される属性とメソッドにアクセスできるように、カスタム タイプの引数を ActivityBarRenderer クラスに提供する必要があります。基本クラス API を使用します。
ScheduleJsViewerTaskActivityRenderer クラスを作成して、すべての ScheduleJsViewerTaskActivity をそれぞれの ScheduleJsViewerTaskRow に描画しましょう。
// Import the base ActivityBarRenderer class from ScheduleJS
import {ActivityBarRenderer} from "schedule";

// Import our custom Activity and Row types
import {ScheduleJsViewerTaskActivity} from "...";
import {ScheduleJsViewerTaskRow} from "...";

// Create our custom renderer by extending the ActivityBarRenderer class
export class ScheduleJsViewerTaskActivityRenderer extends ActivityBarRenderer<ScheduleJsViewerTaskActivity, ScheduleJsViewerTaskRow> { }
そのままでは、ActivityBarRenderer のデフォルトの動作を使用してアクティビティを描画するためにレンダラーをすでに登録できます。では、カスタマイズ方法を見ていきましょう。
ScheduleJS では、ActivityRenderer は、グラフィック API を使用してプログラムで登録し、行 上に特定の アクティビティ を描画するクラスです。 ScheduleJsViewerTaskActivityRenderer を整理するために、コードを 3 つのセクションに分割します。
属性は、レンダラー全体で再利用される定数です。現状では、これらのプロパティはレンダラー コード内でのみ直接編集されます。ユーザーが UI でこれらの設定を直接変更できる特定の画面を想像できます。
// Attributes

// Pixels sizings
private readonly _parentActivityTrianglesWidthPx: number = 5;
private readonly _parentActivityTrianglesHeightPx: number = 8;
private readonly _defaultLineWidthPx: number = 0.5;

// Colors palette
private readonly _parentActivityColor: string = Color.GRAY.toCssString();
private readonly _strokeColor: string = Color.BLACK.toCssString();
private readonly _defaultActivityGreen: Color = Color.rgb(28, 187, 158);
private readonly _defaultActivityBlue: Color = Color.rgb(53, 152, 214);
private readonly _onHoverFillColor: string = Color.ORANGE.toCssString();

// Opacity ratio for baseline activities
private readonly _baselineOpacityRatio: number = 0.6;
コンストラクターはレンダラーのライフサイクル メソッドと密接に結合されています。 ScheduleJS ビューアでは、ユーザーが画面を切り替えるたびにレンダラーをインスタンス化して詳細を定義し、このレンダラーを実装するすべてのタブでコードを再利用することにしました。これは、ユーザーがこのレンダラーを備えた画面を選択するたびにコンストラクター関数が実行されることを意味します。
// Constructor

// The renderer requires the graphics and the current tab variable
constructor(graphics: GraphicsBase<ScheduleJsViewerTaskRow>,
            private _currentRibbonMenuTab: ScheduleJsViewerRibbonMenuTabsEnum) {

  // The ActivityBarRenderer class requires the graphics and a name for the renderer
  super(graphics, ScheduleJsViewerRenderingConstants.taskActivityRendererName);

  // Default fill color when hovering an activity
  this.setFillHover(Color.web(this._onHoverFillColor));

  // Default stroke color when hovering an activity
  this.setStrokeHover(Color.BLACK);

  // Default stroke color
  this.setStroke(Color.BLACK);

  // Default thickness
  this.setLineWidth(this._defaultLineWidthPx);

  // Default bar height
  this.setBarHeight(8);

  // Default fill color based on current tab
  switch (_currentRibbonMenuTab) {
    // Change color for the WBS tab
    case ScheduleJsViewerRibbonMenuTabsEnum.WBS:
      this._parentActivityColor = ScheduleJsViewerColors.brown;
      this.setFill(this._defaultActivityBlue);
      break;
    default:
      this._parentActivityColor = Color.GRAY.toCssString();
      this.setFill(this._defaultActivityGreen);
      break;
  }

}
setFill、setStroke、setFillHover、setStrokeHover、setLineWidth、および setBarHeight は継承され、ActivityBarRenderer クラスのデフォルトのレンダリング特性を変更するために使用されます。
このレンダラーのデフォルトの機能は次のとおりです:
フレームワークは自動的にdrawActivityメソッドを呼び出して、キャンバス上にアクティビティをレンダリングします。すべてのパラメータは動的に入力されるため、アクティビティの現在の状態にリアルタイムで反応できます。
// Main drawing method

drawActivity(activityRef: ActivityRef<ScheduleJsViewerTaskActivity>,
             position: ViewPosition,
             ctx: CanvasRenderingContext2D,
             x: number,
             y: number,
             w: number,
             h: number,
             selected: boolean,
             hover: boolean,
             highlighted: boolean,
             pressed: boolean
            ): ActivityBounds {    // This method has to return ActivityBounds

    // True if current activity includes a comparison task
    const hasModifications = !!activityRef.getActivity().diffTask;

    // True if current row has children
    const isParent = activityRef.getRow().getChildren().length;

    // Set colors dynamically
    this._setActivityColor(activityRef, hasModifications);

    // Draw text
    this._drawActivityText(activityRef, ctx, x, y, w, h, hasModifications);

    // Run a custom method to draw parent activities or delegate to the default method
    return isParent
      ? this._drawParentActivity(activityRef, ctx, x, y, w, h, hover, hasModifications)
      : super.drawActivity(activityRef, position, ctx, x, y, w, h, selected, hover, highlighted, pressed);
  }
描画は次のように行われます:
_drawParentActivity メソッドを使用して独自のメソッドを設計し、アクティビティを自由に描画する方法を詳しく見てみましょう。
// Draw the parent activity

private _drawParentActivity(activityRef: ActivityRef<ScheduleJsViewerTaskActivity>,
                            ctx: CanvasRenderingContext2D,
                            x: number,
                            y: number,
                            w: number,
                            h: number,
                            hover: boolean,
                            hasModifications: boolean
                           ): ActivityBounds {

    // Set padding
    const topPadding = h / 3.5;
    const leftPadding = 1;

    // Set CanvasRenderingContext2D
    ctx.lineWidth = this._defaultLineWidthPx;
    if (hover) {
      ctx.fillStyle = this._onHoverFillColor;
      ctx.strokeStyle = ScheduleJsViewerColors.brown;
    } else if (hasModifications) {
      ctx.fillStyle = Color.web(this._parentActivityColor).withOpacity(this._baselineOpacityRatio).toCssString();
      ctx.strokeStyle = `rgba(0,0,0,${this._baselineOpacityRatio})`;
    } else {
      ctx.fillStyle = this._parentActivityColor;
      ctx.strokeStyle = this._strokeColor;
    }

    // Draw elements
    ScheduleJsViewerTaskActivityRenderer._drawParentActivityStartTriangle(ctx, x + leftPadding, y + topPadding, this._parentActivityTrianglesWidthPx, this._parentActivityTrianglesHeightPx);
    ScheduleJsViewerTaskActivityRenderer._drawParentActivityBody(ctx, x + leftPadding, y + topPadding, w, this._parentActivityTrianglesWidthPx, this._parentActivityTrianglesHeightPx);
    ScheduleJsViewerTaskActivityRenderer._drawParentActivityEndTriangle(ctx, x + leftPadding, y + topPadding, w, this._parentActivityTrianglesWidthPx, this._parentActivityTrianglesHeightPx);

    // Return positions to update where your activity should be responsive
    return new ActivityBounds(activityRef, x, y, w, h);
  }
ここでは、HTMLCanvas API を直接使用して、CanvasRenderingContex2D を設定することで描画戦略を定義します。このメソッドで行われる唯一のフレームワーク関連の操作は、現在の親 Activity に対して新しい ActivityBounds を作成することです。
フレームワークは、内部で ActivityBounds を使用してマップを作成し、画面上のすべてのアクティビティを登録します。このマップは、HTMLCanvas API のパフォーマンスを活用しながら、正確な情報に基づいて高度なユーザー エクスペリエンスを構築する要素のようなロジックを提供することで開発者を支援します。
The draw elements methods like _drawParentActivityStartTriangle rely on the CanvasRenderingContext2D API to draw at the pixel level.
// Draw the start triangle element of the parent activity

private static _drawParentActivityStartTriangle(ctx: CanvasRenderingContext2D,
                                                x: number,
                                                y: number,
                                                triangleWidth: number,
                                                triangleHeight: number): void {
    ctx.beginPath();
    ctx.moveTo(x, y);
    ctx.lineTo(x , y + triangleHeight);
    ctx.lineTo(x + triangleWidth, y);
    ctx.lineTo(x, y);
    ctx.fill();
    ctx.stroke();
    ctx.closePath();
}
To register your brand-new renderer, use the graphics.setActivityRenderer method:
// Register the renderer

graphics.setActivityRenderer(ScheduleJsViewerTaskActivity, GanttLayout, new ScheduleJsViewerTaskActivityRenderer(graphics, currentRibbonMenuTab));

To see the video of the final result you can go to see: Building an ActivityRenderer
以上がActivityRenderer の構築の詳細内容です。詳細については、PHP 中国語 Web サイトの他の関連記事を参照してください。