

This time I will bring you a detailed explanation of JS image processing and synthesis. What are the precautions for JS image processing and synthesis? The following is a practical case, let's take a look.
IntroductionImage processing has now become a necessity in our lives, and I think everyone often has this need. In actual front-end business, there are often many projects that require image processing and processing. Due to the company's business needs in the past period, I have accumulated some useful information in this area. I will take advantage of this period after the year to summarize it into a series of articles to share with you. I hope it can inspire and help everyone who is working hard on front-end children's shoesThis series is divided into the following 4 parts: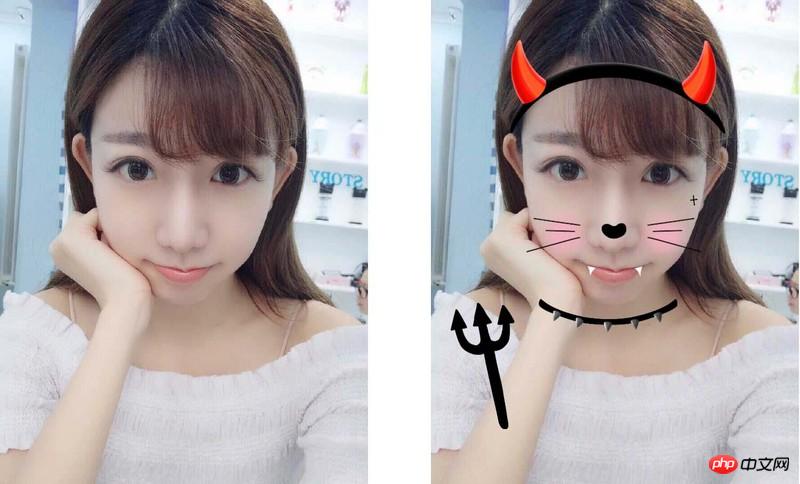
RGBAChange the channel value, etc., for example, we use photshop or Meitu Xiuxiu and other tools to perform beauty/filter/black and white/cutout/blur operations on the picture. This type of The focus is mainly on the algorithm and performance levels. For example, commonly used makeup functions:
canvas capability. There are no performance and compatibility issues and it can meet online operation standards. I will roughly divide the basic types of image processing into the following types. These types can basically cover all daily business scenarios:
1. Cross-domain images
First of all, image loading and drawing involve cross-domain issues of images, so if it is an online image, it needs to be included in the image Set the cross-domain header on the server, and set thecrossOrigin of the <img> tag to * before loading the image on the front end, otherwise it will be drawn to the canvas. Report cross-domain errors.
crossOrigin needs to be set strictly, both online pictures only When the local path or base64 is set, it must not be set, otherwise an error will be reported under some systems, causing the image to fail to load;
App, the crossOrigin value is invalid. The security mechanism of webview will cause it to fail regardless of whether the value is set or not. Report cross-domain errors. The solution is: all pictures need to be converted to base64 to draw them correctly;The
crossOrigin value must be set before loading the image, that is, before assigning a value to <img>src, otherwise Invalid;
#2. Image loading
Since the drawing of canvas requires the image that has been loaded, We need to ensure that the drawn material image has been loaded, so we need to use the onload event of <img>, you can use html# An existing image in ##, or use js to create an image object:
function loadImage(image, loader, error){
 // 创建 image 对象加载图片;
 let img = new Image();

 // 当为线上图片时,需要设置 crossOrigin 属性;
 if(image.indexOf('http') == 0)img.crossOrigin = '*';
 img.onload = () => {
 loaded(img);

 // 使用完后清空该对象,释放内存;
 setTimeout(()=>{
  img = null;
 },1000);
 };
 img.onerror = () => {
 error('img load error');
 };
 img.src = image;
}canvas, you can check the correspondingAPIdocument. This article will no longer explainCanvasBasicsAPIwill be explained in detail.
1. Image scaling
The most common scenario for image scaling is image compression. By reasonably reducing the image size while ensuring that the image is clear, the size of the image can be greatly reduced. In practical application scenarios, it has a wide range of uses. For example, when uploading a picture, the picture uploaded by the user may be of a very large size. For example, the size of photos taken by mobile phones can often reach the size of1920*2560, and the size may exceed 5M. In the project, we may not need to use such a large size. At this time, the compression of the image can greatly optimize the loading speed and save bandwidth;
canvas Canvas, set the width and height to the size that needs to be compressed;
let imgRatio = img.naturalWidth / img.naturalHeight;
// 创建一个画布容器;
let cvs = document.createElement('canvas');
// 获取容器中的画板;
let ctx = cvs.getContext('2d');
cvs.width = 1000;
cvs.height = cvs.width / imgRatio;base64;
ctx.drawImage(image, dx, dy, dw, dh): This method can actually receive up to 9 parameters. To achieve compression, you only need to use 5 of them, and the remaining parameters are in other parameters. I will explain in detail some of the uses later;
HTMLImageElement, HTMLCanvasElement or HTMLVideoElement; dx / dy: coordinates of the drawing starting point relative to the upper left corner of the canvas; dw / dh: width and height of the drawing, the width-to-height ratio is not locked, and the picture can be deformed;
cvs. toDataURL(type, quality): This method is used to export the content on the canvas into a picture in base64 format. Two parameters can be configured;
image/png or image/jpeg. When the image does not contain transparency, it is recommended to use jpeg, which can greatly reduce the size of the exported image; quality : Picture quality, you can use any value between 0~1; after testing, it is more appropriate to set this value to 0.9, which can effectively reduce the size of the picture file and basically has no impact. Image clarity, the exported base64 is a compressed image;
jpg3. Convert images in multiple formats toformat, you must useimage/jpeg, cannot useimage/jpg;// 将原图等比例绘制到缩放后的画布上; ctx.drawImage(image, 0, 0, cvs.width, cvs.height); // 将绘制后的图导出成 base64 的格式; let b64 = cvs.toDataURL('image/jpeg', 0.9);Copy after login
base64;
tag, and what we get at this time is the image in the format of File, the image The formats are different and the size is large, we should compress them before using them.
FileReader:
let file = e.files[0];
if(window.FileReader) {
 let fr = new FileReader();
 fr.onloadend = e => {
 let b64 = e.target.result;

 // b64即为base64格式的用户上传图;
 };
 fr.readAsDataURL(file);
}canvas method just now to compress the base64 image;
EXIF information of the image will affect the display of the image. In IOS, the width and height of the image will differ from the image's width and height. The problem of orientation mismatch requires special processing to correct the orientation of the image. Solution:
exif.js to obtain the Orientation attribute in the image information, and use the rotation drawing of canvas to correct it;
canvasResize.js plug-in that can solve all problems from File to base64.
2. Cropping of pictures
在实际项目中,由于图片的宽高比例各式各样,而展示和使用一般需要一个较为固定的比例,此时便需要将图片裁剪成我们需要的宽高比例,使用到的方式其实和图片的缩放基本一致,主要是通过调整 drawImage 的dx, dy参数来实现。原理其实是,将drawImage的绘制起始点(dx, dy)向上偏移,此时由于canvas已被我们设置成期望裁剪后的尺寸,而超出画布的部分不会绘制,从而达到裁剪的目的;通过灵活的设置值,基本可以完成各种图片裁剪需求,简单示例图(黑色框代表创建的画布的尺寸):
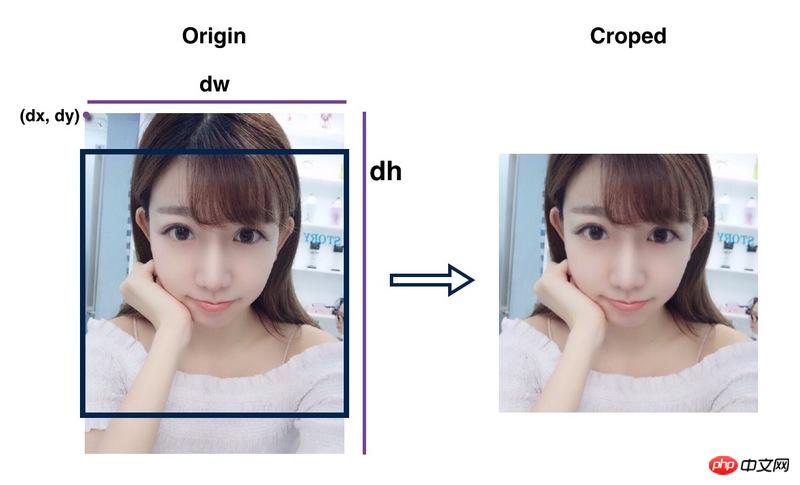
此处以需要将一张600*800的长方形图竖直居中裁剪为600*600的正方形图为例, 简单封装成一个功能函数:
// 使用方式:
let b64 = cropImage(img, {
 width : 600,
 height : 600,
});
// 居中裁剪
function cropImage(img, ops){
 // 图片原始尺寸;
 let imgOriginWidth = img.naturalWidth,
 imgOriginHeight = img.naturalHeight;

 // 图片长宽比,保证图片不变形;
 let imgRatio = imgOriginWidth / imgOriginHeight;

 // 图片裁剪后的宽高, 默认值为原图宽高;
 let imgCropedWidth = ops.width || imgOriginWidth,
 imgCropedHeight = ops.height || imgOriginHeight;

 // 计算得出起始坐标点的偏移量, 由于是居中裁剪,因此等于 前后差值 / 2;
 let dx = (imgCropedWidth - imgOriginWidth) / 2,
 dy = (imgCropedHeight - imgOriginHeight) / 2;
 // 创建画布,并将画布设置为裁剪后的宽高;
 let cvs = document.createElement('canvas');
 let ctx = cvs.getContext('2d');
 cvs.width = imgCropedWidth;
 cvs.height = imgCropedHeight;

 // 绘制并导出图片;
 ctx.drawImage(img, dx, dy, imgCropedWidth, imgCropedWidth / imgRatio);
 return cvs.toDataURL('image/jpeg', 0.9);
}三、图片的旋转
图片的旋转的原理同样也是将图片绘制到画布上进行旋转后再导出。其实使用到的是canvas的rotate方法;
let cvs = document.createElement('canvas');
let ctx = cvs.getContext('2d');
// 将参照点移动到画板的中心点;
ctx.translate(ctx.width/2, ctx.height/2);
// 旋转画板;
ctx.rotate = 90;
// 绘制图片;
ctx.drawImage(img);
// 导出得到旋转后的图片;
cvs.toDataURL();这里有个比较特别的部分,就是这里旋转的是画布的画板部分,并不是整个画布容器,而画布容器外面不会被绘制,因此这里就会出现一个图像四个角被裁剪掉的问题:
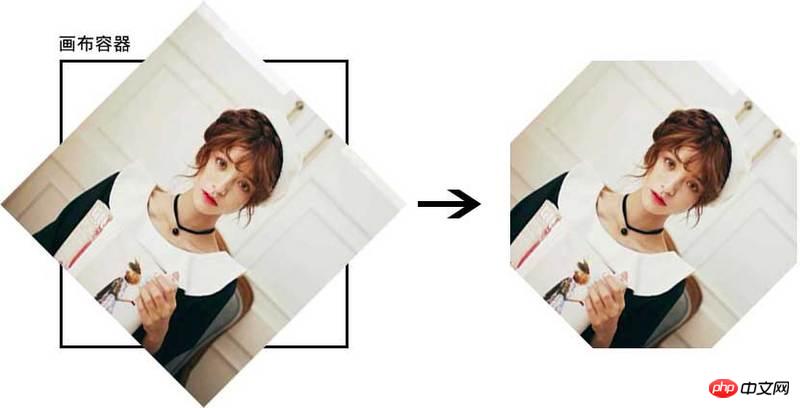
解决的方式就是:
将画布容器放大,变成:
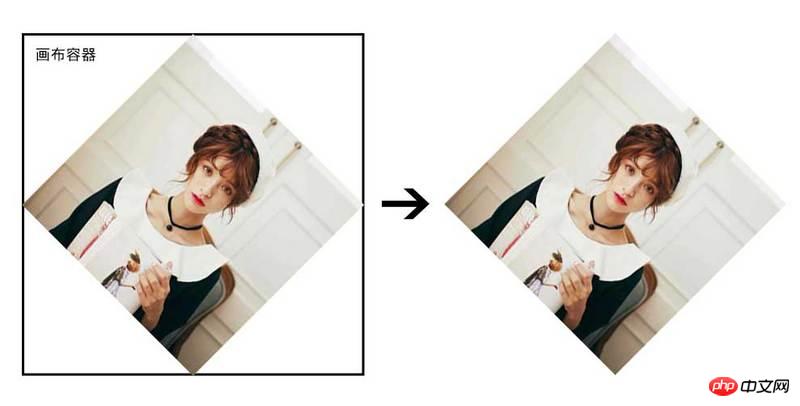
上面这个例子中,由于图片是正方形,因此将容器的宽高放大1.5倍便可保证图片不会被裁剪,而现实中的图片由于宽高比例不定,因此这个放大系数是一个动态的值:
Tips: 由于我们将画板基点移动到画布中心了,因此在绘制的时候,要相对于基点调整dx与dy;
// 创建画布,获取画板;
...
// 放大系数为
let iw = img.width, ih = img.height;
let ir = iw > ih ? iw / ih : ih / iw;
cvs.width = iw * ir * 1.5;
cvs.height = ih * ir * 1.5;
// 将参照点移动到画板的中心点;
ctx.translate(cvs.width/2, cvs.height/2);
// 旋转画板;
ctx.rotate = 90;
// 绘制图片;
ctx.drawImage(img, -cvs.width/2, -cvs.height/2);
// 导出图片;
...
总结
本文主要介绍了一些前端图片处理的前置知识:
图片处理技术分类;
基础类型图片处理技术;算法类型图片处理技术; 图片的跨域;图片的加载;
还有讲解了属于基础类型图片处理中最简单的两类:
图片的缩放;图片的裁剪;图片的旋转;
相信大家已经对图片的处理有了个大致的了解了。下篇文章,我们将继续深入研究基础类型中的图片合成,也是各种干货满满,美不胜收。
相信看了本文案例你已经掌握了方法,更多精彩请关注php中文网其它相关文章!
推荐阅读:
The above is the detailed content of Detailed explanation of JS image processing and synthesis. For more information, please follow other related articles on the PHP Chinese website!


![[Web front-end] Node.js quick start](https://img.php.cn/upload/course/000/000/067/662b5d34ba7c0227.png)


