

This time I will show you how to use the automaticgeneratorin ionic2. What are theprecautionsfor using the automatic generator in ionic2. The following is a practical case. Let’s take a look. .
ionic generator is a command line function, ionic2 automatically helps us create applications, thus saving a lot of time and increasing our speed to develop key parts of a project.
ionic generator allows us to automatically create the following parts:
•component
•directive
•page
•provider
1. Create a page: ionic g page [PageName]
Create a new page through this command. This command is used the most in the ionic2 project
We only need to enter our command line , and run the following command:
ionic g page login # Results: √ Create app/pages/login/login.html √ Create app/pages/login/login.scss √ Create app/pages/login/login.ts
login.ts:
import {Component} from '@angular/core'; import {NavController} from 'ionic-angular'; @Component({ templateUrl: 'build/pages/login/login.html', }) export class LoginPage { constructor(public nav: NavController) {} }
login.html:
login
2. Create component: ionic g component [ComponentName ]
A component is a piece of code that can be used in any part of our application
Create a component with this command:
ionic g component myComponent # Results: √ Create app/components/my-component/my-component.html √ Create app/components/my-component/my-component.ts
my-component.ts :
import {Component} from '@angular/core'; @Component({ selector: 'my-component', templateUrl: 'build/components/my-component/my-component.html' }) export class MyComponent { text: string = ""; constructor() { this.text = 'Hello World'; } }
3. Create directive: ionic g directive [DirectiveName]
directive, our application can use the modifierattribute on any element.
ionic g directive myDirective # Results: √ Create app/components/my-directive/my-directive.ts
my-directive.ts:
import {Directive} from '@angular/core'; @Directive({ selector: '[my-directive]' // Attribute selector }) export class MyDirective { constructor() { console.log('Hello World'); } }
4. Create a service provider: ionic g provider [ProviderName]
Now Create a new service (provider), the provider is responsible for handling data connections to REST API, local storage, SQLite, etc.
To create it, we go to our terminal and run the following command:
ionic g provider userService # Results: √ Create app/providers/user-service/user-service.ts
The service code is as follows:
user-service.ts:
import {Injectable} from '@angular/core'; import {Http} from '@angular/http'; import 'rxjs/add/operator/map'; @Injectable() export class UserService { data: any = null; constructor(public http: Http) { } load() { if (this.data) { } return new Promise(resolve => { this.http.get('path/to/data.json') .map(res => res.json()) .subscribe(data => { this.data = data; resolve(this.data); }); }); } }
5. Create a pipeline pipe: ionic g pipe [PipeName]
Variations of this pipe, we can use our template for any data, such as displaying text in uppercase letters, displaying currency values, dates format etc.
ionic g pipe myPipe # Results: √ Create app/pipes/myPipe.ts
The code of our pipeline is as follows
myPipe.ts:
import {Injectable, Pipe} from '@angular/core'; @Pipe({ name: 'my-pipe' }) @Injectable() export class MyPipe { transform(value: string, args: any[]) { value = value + ''; // make sure it's a string return value.toLowerCase(); } }
Finally, the application structure we generated is as follows:
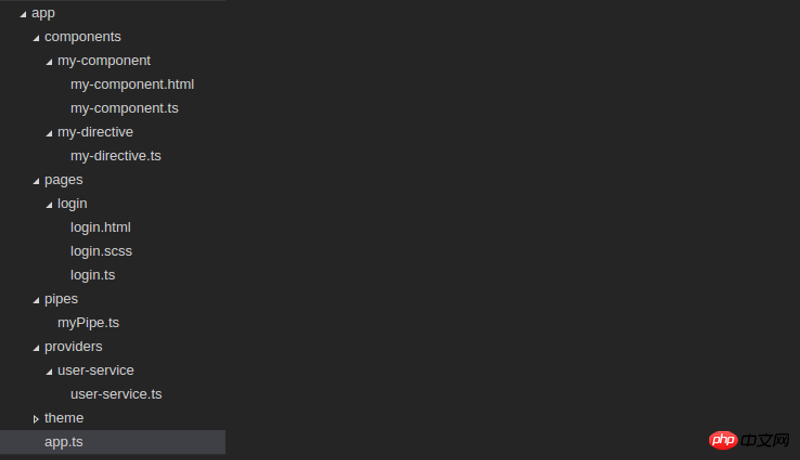
Our projects will be stored in a more organized and controlled way. This can all be achieved manually, but doing it with the ionic generator saves valuable time creating this content.
I believe you have mastered the method after reading the case in this article. For more exciting information, please pay attention to other related articles on the php Chinese website!
Recommended reading:
Use H5 to add a prohibition on scaling
H5 method of reading files and uploading to the server
The above is the detailed content of How to use automatic generator in ionic2. For more information, please follow other related articles on the PHP Chinese website!
 How to use row function
 The difference between xls and xlsx in excel
 mysql paging
 How to solve an error in the script of the current page
 How to turn two pages into one word document
 jsreplace function usage
 Douyin cannot download and save videos
 What to do if Linux prompts No such file or directory when executing a file


![[Web front-end] Node.js quick start](https://img.php.cn/upload/course/000/000/067/662b5d34ba7c0227.png)


