Cette fois, je vais vous apporter une explication détaillée des étapes pour utiliser React-Navigation. Quelles sont les précautions lors de l'utilisation de React-Navigation. Voici des cas pratiques, jetons un coup d'œil.
1. Composants principaux
Il est principalement divisé en trois parties selon la forme d'utilisation :
StackNavigator : Semblable au Navigator ordinaire, la barre de navigation en haut de l'écran
TabNavigator : est équivalent au TabBarController dans iOS, et la barre d'onglets en bas de l'écran
DrawerNavigator : Effet tiroir, coulissant sur le côté
2. Utilisez
1. Créez un nouveau projet
react-native init ComponentDemo
2. Installez cette bibliothèque dans l'application
npm install --save react-navigation
Après l'installation, il a été constaté qu'il s'agissait d'une version bêta. version (v1.0.0-beta.7), mais il y a un piège ?! Nous parlerons de cet écueil en détail dans un instant~
3 Test TabNavigator, StackNavigator et DrawerNavigator
(1) Créez un nouveau HomePage.js
import React from 'react';
import {
StyleSheet,
View,
Text,
Button,
Image
} from 'react-native';
import {
StackNavigator,
TabNavigator
} from 'react-navigation';
import ChatScreen from './ChatScreen';
import MinePage from './MinePage';
class HomePage extends React.Component{
static navigationOptions={
title: '首页',//设置标题内容
header:{
backTitle: ' ',//返回按钮标题内容(默认为上一级标题内容)
}
}
constructor(props) {
super(props);
}
render() {
const {navigate} = this.props.navigation;
return (
<View style={styles.container}>
<Text style={{padding:10}}>Hello, Navigation!</Text>
<Button
onPress={() => navigate('Chat',{user:'Sybil'})}
title="点击跳转"/>
</View>
)
}
}
const MainScreenNavigator = TabNavigator({
Home: {
screen: HomePage,
navigationOptions: {
tabBar: {
label: '首页',
icon: ({tintColor}) => (
<Image
source={require('./image/bar_home_nomarl@3x.png')}
style={[{tintColor: tintColor},styles.icon]}
/>
),
},
}
},
Certificate: {
screen: MinePage,
navigationOptions: {
tabBar: {
label: '我的',
icon: ({tintColor}) => (
<Image
source={require('./image/bar_center_normal@3x.png')}
style={[{tintColor: tintColor},styles.icon]}
/>
),
},
}
},
}, {
animationEnabled: false, // 切换页面时不显示动画
tabBarPosition: 'bottom', // 显示在底端,android 默认是显示在页面顶端的
swipeEnabled: false, // 禁止左右滑动
backBehavior: 'none', // 按 back 键是否跳转到第一个 Tab, none 为不跳转
tabBarOptions: {
activeTintColor: '#008AC9', // 文字和图片选中颜色
inactiveTintColor: '#999', // 文字和图片默认颜色
showIcon: true, // android 默认不显示 icon, 需要设置为 true 才会显示
indicatorStyle: {height: 0}, // android 中TabBar下面会显示一条线,高度设为 0 后就不显示线了
style: {
backgroundColor: '#fff', // TabBar 背景色
},
labelStyle: {
fontSize: 12, // 文字大小
},
},
});
const styles = StyleSheet.create({
container:{
flex: 1,
backgroundColor:'#fff'
},
icon: {
height: 22,
width: 22,
resizeMode: 'contain'
}
});
const SimpleApp = StackNavigator({
Home: {screen: MainScreenNavigator},
Chat:{screen:ChatScreen},
});
export default SimpleApp;. (2) Créez un nouveau ChatScreen js
import React from 'react';
import {
Button,
Image,
View,
Text
} from 'react-native';
class ChatScreen extends React.Component {
static navigationOptions = {
title:'聊天',
};
render() {
const {params} = this.props.navigation.state;
return (
<View style={{backgroundColor:'#fff',flex:1}}>
<Text style={{padding:20}}>Chat with {params.user}</Text>
</View>
);
}
}
export default ChatScreen;(3) Créez un nouveau MinePage.js
import React,{Component} from 'react';
import {
Button,
Image,
View,
Text,
StyleSheet
} from 'react-native';
import {
DrawerNavigator
} from 'react-navigation';
import MyNotificationsScreen from './MyNotificationsScreen';
class MinePage extends Component{
static navigationOptions = {
title:'我的',
drawerLabel: '我的',
// Note: By default the icon is only shown on iOS. Search the showIcon option below.
drawerIcon: ({ tintColor }) => (
<Image
source={require('./image/chat@3x.png')}
style={[styles.icon, {tintColor: tintColor}]}
/>
),
};
render(){;
return(
<View style={{backgroundColor:'#fff',flex:1}}>
<Text style={{padding:20}}>Sybil</Text>
<Button
style={{padding:20}}
onPress={() => this.props.navigation.navigate('DrawerOpen')}
title="点击打开侧滑菜单"
/>
</View>
);
}
}
const styles = StyleSheet.create({
icon: {
width: 24,
height: 24,
},
});
const MyChatNavigator = DrawerNavigator({
MyChat: {
screen: MinePage,
},
Notifications: {
screen: MyNotificationsScreen,
},
},{
drawerWidth: 220, // 抽屉宽
drawerPosition: 'left', // 抽屉在左边还是右边
// contentComponent: CustomDrawerContentComponent, // 自定义抽屉组件
contentOptions: {
initialRouteName: MinePage, // 默认页面组件
activeTintColor: '#008AC9', // 选中文字颜色
activeBackgroundColor: '#f5f5f5', // 选中背景颜色
inactiveTintColor: '#000', // 未选中文字颜色
inactiveBackgroundColor: '#fff', // 未选中背景颜色
style: { // 样式
}
}
});
export default MyChatNavigator;(4) Écrivez MyNotificationsScreen.js
import React from 'react';
import {
StyleSheet,
View,
Text,
Button,
Image
} from 'react-native';
class MyNotificationsScreen extends React.Component {
static navigationOptions = {
title:'通知',
drawerLabel: '通知',
drawerIcon: ({ tintColor }) => (
<Image
source={require('./image/notif@3x.png')}
style={[styles.tabIcon, {tintColor: tintColor}]}
/>
),
};
render() {
return (
<View style={{backgroundColor:'#fff'}}>
<Button
style={{padding:20}}
onPress={() => this.props.navigation.navigate('DrawerOpen')}
title="点击打开侧滑菜单"
/>
<Button
onPress={() => this.props.navigation.goBack()}
title="返回我的界面"
/>
</View>
);
}
}
const styles = StyleSheet.create({
tabIcon: {
width: 24,
height: 24,
},
});
export default MyNotificationsScreen;(5) Exécuter
Vous avez signalé une erreur ? C'est la fosse que nous avons mentionnée ci-dessus~
Quelle est la raison ? Il s'avère qu'il s'agit d'un bug dans la version bêta. Recherchez la ligne 12 de node_modules/react-navigation/src/views/Header.js dans le répertoire et tout ira bien~
Ps : Malheureusement. , je n'ai pas cette erreur. Laissez une photo ~ Lorsque je suis sur le point de publier cet article, la dernière version est devenue (v1.0.0-beta.9), et la dernière version a modifié le bug ci-dessus !
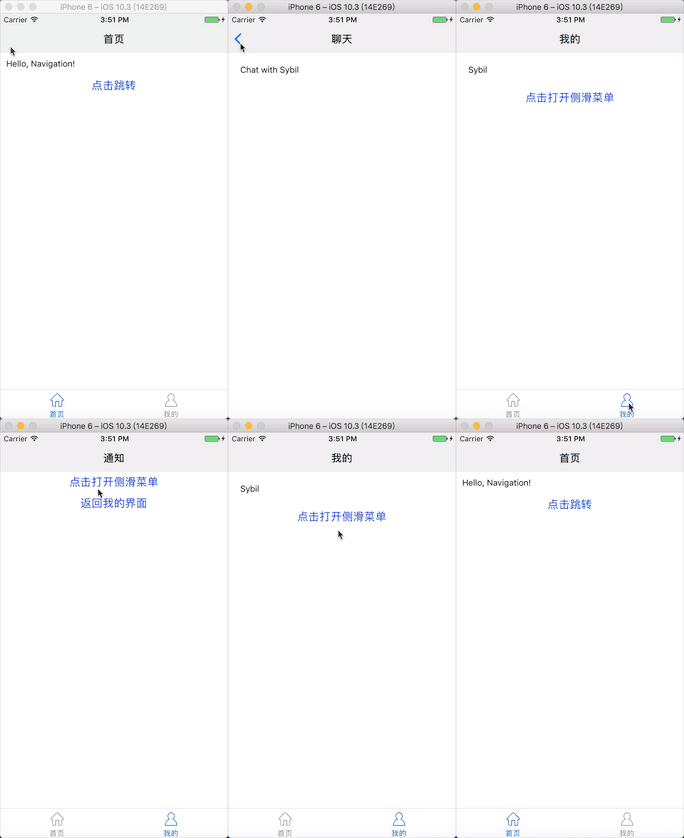
D'accord, relancez-le~
Dernier rendu dynamique :

Je crois que vous maîtrisez la méthode après avoir lu le cas dans ce Pour un contenu plus passionnant, veuillez prêter attention aux autres articles connexes sur le site Web chinois de php !
Lecture recommandée :
Explication détaillée de l'utilisation du composant multi-niveaux Vue provide/inject
Ce qui précède est le contenu détaillé de. pour plus d'informations, suivez d'autres articles connexes sur le site Web de PHP en chinois!
 Quel fichier est Windows.old ?
 Quelle est la raison de l'échec de la connexion au serveur ?
 utilisation de la fonction de rééchantillonnage
 Comment obtenir le numéro d'entrée en Java
 Quelle devise est l'USDT ?
 lien du serveur émule
 Comment résoudre le problème de l'impossibilité de créer un nouveau dossier dans Win7
 La différence entre fprintf et printf