Cette fois, je vais vous amener JS pour implémenter la fonction de boîte d'invite bloquée. Quelles sont les précautions pour implémenter la fonction de boîte d'invite bloquée dans JS Voici un cas pratique, jetons un coup d'œil.
Scénario métier : lorsque la souris se déplace dans un élément, une boîte de dialogue s'affiche pour l'introduction. Il disparaîtra automatiquement lorsque la souris sera retirée. Introduisez ToolTip.js et ToolTip.css
Méthode principale : ToolTip.show (identifiant de l'élément qui doit être invité, tant qu'il n'est pas répété, texte html à inviter, largeur (facultatif), height (facultatif) );
ToolTip.show(obj, id, html, width, height);
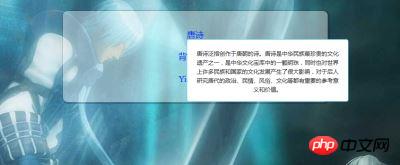
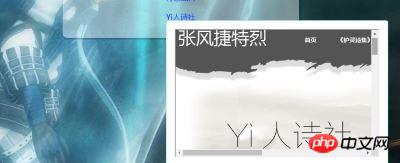
L'effet est le suivant :
Afficher le texte :

2 : Afficher les images

3 : Afficher le site Web

code js : F ; >
Je crois l'avoir vu. Vous maîtrisez la méthode dans le cas de cet article. Pour des informations plus intéressantes, veuillez prêter attention aux autres articles connexes sur le site Web chinois de php !(function () {
var ToolTip = {};
/**
* 显示函数
*/
ToolTip._showTip = function (parentId, childId, html, width, height) {
var parent = document.getElementById(parentId)//要提示的元素
var child = document.getElementById(childId);
if (child === null) {//创建
var toolTip = document.createElement("p");
toolTip.classList = "ui-tooltip-box";
toolTip.id = childId;
toolTip.innerHTML = html;
parent.appendChild(toolTip);
toolTip.style.width = width ? width + "px" : "auto"
toolTip.style.height = height ? height + "px" : "auto"
//定位:
toolTip.style.position = "absolute";
toolTip.style.display = "block";
var left = parent.offsetLeft;
var top = parent.offsetTop;
if (left + toolTip.offsetWidth > document.body.clientWidth) {
left = document.body.clientWidth / 2;
}
toolTip.style.left = left + "px";
toolTip.style.top = top + 20 + "px";
parent.onmouseleave = function (ev) {
setTimeout(function () { //延迟:
document.getElementById(childId).style.display = "none";//隐藏
}, 300);
}
} else {
//显示
document.getElementById(childId).style.display = "block";
}
},
/**
* 调用入口
*/
ToolTip.show = function (parentId, childId, html, width, height) {
var parent = document.getElementById(obj)
parent.onmouseenter = function (ev) {
ToolTip._showTip(parentId, childId, html, width, height)
}
}
window.ToolTip = ToolTip;
})();//为防止污染,将方法写在匿名函数中Lecture recommandée :
<!DOCTYPE html>
<html lang="en">
<head>
 <meta charset="UTF-8">
 <title>提示框</title>
 <link rel="stylesheet" type="text/css" href="ToolTip.css" rel="external nofollow" >
</head>
<body>
<p class="ui-tooltip-demo">
 <p><a class="ui-tooltip" id="tooltip-text">唐诗</a></p>
 <p><a class="ui-tooltip" id="tooltip-photo">背景图片</a></p>
 <p><a class="ui-tooltip" id="tooltip-poem">Yi人诗社</a></p>
</p>
<script src="js/ToolTip.js"></script>
<script>
//调用方式
 ToolTip.show("tooltip-text", "01", "唐诗泛指创作于唐朝的诗" +
 "。唐诗是中华民族最珍贵的文化遗产之一,是" +
 "中华文化宝库中的一颗明珠," +
 "同时也对世界上许多民族和国家的文化发展产生了很大影响," +
 "对于后人研究唐代的政治、民情、风俗、" +
 "文化等都有重要的参考意义和价值。",300,90);
 ToolTip.show("tooltip-photo", "02", "<img src=\"imgs/bg.jpg\" height=\"80px\">",150,80);
 var html='<iframe src="http://www.toly.top" width="480px" height="300px"/>'
 ToolTip.show("tooltip-poem", "03", html);
</script>
</body>
</html>Ce que les novices doivent savoir sur vue-cli 3.0
body {
 font-size: 14px;
 line-height: 1.8;
 background-image: url("imgs/bg.jpg");
}
.ui-tooltip-demo {
 width: 500px;
 margin: 30px auto;
 padding: 20px 30px;
 background-color: rgba(100%, 100%, 100%, 0.4);
 border-radius: 10px;
 text-align: center;
 box-shadow: 2px 1px 0px 3px rgba(0, 0, 0, 0.2);
}
.ui-tooltip-demo .ui-tooltip {
 color: #03f;
 font-size: 18px;
 cursor: help;
}
.ui-tooltip-box {
 display: block;
 background: #fff;
 line-height: 1.6;
 border: 1px solid #6cf;
 color: #333;
 padding: 20px;
 font-size: 12px;
 border-radius: 5px;
 overflow: auto;
}
Étapes détaillées pour la modularisation de l'application AngularJS
Ce qui précède est le contenu détaillé de. pour plus d'informations, suivez d'autres articles connexes sur le site Web de PHP en chinois!