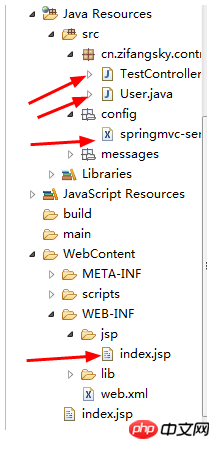
Cette fois, je vais vous présenter la méthode de requête asynchrone Ajax pour JSON dans l'environnement SpringMVC. Quelles sont les précautions pour la requête asynchrone Ajax de JSON dans l'environnement SpringMVC. jetons un coup d'oeil.
Construction de l'environnement
Le premier est la construction conventionnelle de l'environnement Spring MVC. Inutile de dire qu'il faut noter que Jackson doit le faire. être introduit ici. jar package, puis ajouter la configuration liée à l'analyse json dans le fichier de configuration spring "springmvc-servlet.xml". Mon code complet ici est le suivant :
<?xml version="1.0" encoding="UTF-8"?>
<beans xmlns="http://www.springframework.org/schema/beans"
xmlns:xsi="http://www.w3.org/2001/XMLSchema-instance" xmlns:context="http://www.springframework.org/schema/context"
xmlns:mvc="http://www.springframework.org/schema/mvc"
xsi:schemaLocation="http://www.springframework.org/schema/beans
http://www.springframework.org/schema/beans/spring-beans-4.0.xsd
http://www.springframework.org/schema/context
http://www.springframework.org/schema/context/spring-context-4.0.xsd
http://www.springframework.org/schema/mvc
http://www.springframework.org/schema/mvc/spring-mvc-4.0.xsd">
<!-- 避免IE执行AJAX时,返回JSON出现下载文件 -->
<bean id="mappingJacksonHttpMessageConverter"
class="org.springframework.http.converter.json.MappingJacksonHttpMessageConverter">
<property name="supportedMediaTypes">
<list>
<value>text/html;charset=UTF-8</value>
<value>application/json;charset=UTF-8</value>
</list>
</property>
<property name="objectMapper">
<bean class="org.codehaus.jackson.map.ObjectMapper">
<property name="dateFormat">
<bean class="java.text.SimpleDateFormat">
<constructor-arg type="java.lang.String" value="yyyy-MM-dd HH:mm:ss"></constructor-arg>
</bean>
</property>
</bean>
</property>
</bean>
<!-- 启动Spring MVC的注解功能,完成请求和注解POJO的映射 -->
<bean
class="org.springframework.web.servlet.mvc.annotation.AnnotationMethodHandlerAdapter">
<property name="messageConverters">
<list>
<ref bean="mappingJacksonHttpMessageConverter" /><!-- json转换器 -->
</list>
</property>
</bean>
<mvc:annotation-driven
content-negotiation-manager="contentNegotiationManager" />
<bean id="contentNegotiationManager"
class="org.springframework.web.accept.ContentNegotiationManagerFactoryBean">
<!-- true,开启扩展名支持,false关闭支持 -->
<property name="favorPathExtension" value="false" />
<!-- 用于开启 /userinfo/123?format=json的支持 -->
<property name="favorParameter" value="true" />
<!-- 设置为true以忽略对Accept Header的支持 -->
<property name="ignoreAcceptHeader" value="false" />
<property name="mediaTypes">
<value>
atom=application/atom+xml
html=text/html
json=application/json
xml=application/xml
*=*/*
</value>
</property>
</bean>
<context:annotation-config />
<!-- 启动自动扫描该包下所有的Bean(例如@Controller) -->
<context:component-scan base-package="cn.zifangsky.controller" />
<mvc:default-servlet-handler />
<!-- 定义视图解析器 -->
<bean id="jspViewResolver"
class="org.springframework.web.servlet.view.InternalResourceViewResolver">
<property name="requestContextAttribute" value="rc" />
<property name="viewClass"
value="org.springframework.web.servlet.view.JstlView" />
<property name="prefix" value="/WEB-INF/jsp/" />
<property name="suffix" value=".jsp" />
<property name="order" value="1"></property>
</bean>
</beans>

Remarque : Le package jar complet que j'ai utilisé pour les tests ici : http://pan.baidu.com/s/1dEUwdmL
Deux exemples de tests
(1) Créer un nouveau fichier index.jsp dans le répertoire WEB-INF/jsp, incluant un simple ajax jQuery requête pour demander des données Le format est JSON, et le code spécifique est le suivant :<%@ page language="java" contentType="text/html; charset=UTF-8"
pageEncoding="UTF-8"%>
<%
String path = request.getContextPath();
String basePath = request.getScheme() + "://" + request.getServerName() + ":" + request.getServerPort()
+ path + "/";
%>
<html>
<head>
<meta http-equiv="Content-Type" content="text/html; charset=UTF-8">
<base href="<%=basePath%>">
<script type="text/javascript" src="scripts/jquery/jquery-1.6.2.min.js"></script>
<script type="text/javascript" src="scripts/jquery/jquery.i18n.properties-min-1.0.9.js"></script>
<script type="text/javascript" src="scripts/jquery/jquery.autocomplete.js"></script>
<script type="text/javascript" src="scripts/jquery/jquery.loadmask.js"></script>
<script type="text/javascript" src="scripts/jquery/jquery.form.js"></script>
<script type="text/javascript" src="scripts/jquery/jquery.timers.js"></script>
<title>jQuery i18n</title>
<script type="text/javascript">
$().ready(
function() {
$("#sub").click(
function() {
var name = $("#username").val();
var age = 18;
var user = {"username":name,"age":age};
$.ajax({
url : 'hello.json',
type : 'POST',
data : JSON.stringify(user), // Request body
contentType : 'application/json; charset=utf-8',
dataType : 'json',
success : function(response) {
//请求成功
alert("你好" + response.username + "[" + response.age + "],当前时间是:" + response.time + ",欢迎访问:http://www.zifangsky.cn");
},
error : function(msg) {
alert(msg);
}
});
});
});
</script>
</head>
<body>
<input type="text" id="username"
style="width: 100px; height: 30px; font-size: 20px; font-weight: bold;">
<input type="button" id="sub" value="Go"
style="height: 40px; height: 30px;">
<br>
</body>
</html>package cn.zifangsky.controller;
public class User {
private String username;
private int age;
public String getUsername() {
return username;
}
public void setUsername(String username) {
this.username = username;
}
public int getAge() {
return age;
}
public void setAge(int age) {
this.age = age;
}
}package cn.zifangsky.controller;
import java.text.Format;
import java.text.SimpleDateFormat;
import java.util.Date;
import java.util.HashMap;
import java.util.Map;
import org.springframework.context.annotation.Scope;
import org.springframework.stereotype.Controller;
import org.springframework.web.bind.annotation.RequestBody;
import org.springframework.web.bind.annotation.RequestMapping;
import org.springframework.web.bind.annotation.RequestMethod;
import org.springframework.web.bind.annotation.ResponseBody;
import org.springframework.web.servlet.ModelAndView;
@Controller
@Scope("prototype")
public class TestController {
/**
* 转到页面
*/
@RequestMapping(value = "/hello.html")
public ModelAndView list() {
ModelAndView view = new ModelAndView("index");
return view;
}
/**
* ajax异步请求, 请求格式是json
*/
@RequestMapping(value = "/hello.json", method = { RequestMethod.POST })
@ResponseBody
public Map<String, String> hello(@RequestBody User user) {
// 返回数据的Map集合
Map<String, String> result = new HashMap<String, String>();
Format format = new SimpleDateFormat("yyyy-MM-dd HH:mm:ss");
// 返回请求的username
result.put("username", user.getUsername());
// 返回年龄
result.put("age", String.valueOf(user.getAge()));
// 返回当前时间
result.put("time", format.format(new Date()));
return result;
}
}
Comment transmettre plusieurs paramètres à l'aide d'ajax
Construire AJAX pour implémenter la méthode de conversion de formulaire JSON
Ce qui précède est le contenu détaillé de. pour plus d'informations, suivez d'autres articles connexes sur le site Web de PHP en chinois!