
前言
最近几个月一直在看VUE,然后试着只用原生js+vue实现某些组件。
PC端时间选择组件 这是最开始实现的pc上的时间选择,平时移动端也在做,所以就想实现一下移动端的时间选择器,下面分享一下我实现移动端滚轮特效时间选择器的思路和过程。整个组件是基于vue-cli来进行构建的
功能
1.时间选择[
A.年月日选择
B.年月日小时分钟选择
C.小时分钟选择 D.分钟选择]
2.滚轮效果[
A.构成一个圆环首尾相连
B.不构成首尾相连]
3.时间选择范围设置(所选时间超过范围将弹窗提示),分钟间隔设置
4.多语言设置
5.时间格式设置 满足 yyyy/MM/dd HH:mm 这一类的设置规则
6.UE上做到接近ios原生效果
7.扩展 不仅仅只能选择时间,可以传入自定义联动选择数据
这里主要讲讲无限滚轮的实现
数据准备1
这里拿
天
来做说明
获取一个月有多少天的一个巧妙的方法。
dayList () { /* get currentMonthLenght */ let currentMonthLength = new Date(this.tmpYear, this.tmpMonth + 1, 0).getDate(); /* get currentMonth day */ let daylist = Array.from({length: currentMonthLength}, (value, index) => { return index + 1 }); return daylist },
这里我用了vue 的computed方法来实现,放入
yearList
monthList
dayList
hourList
minuteList
来存储基础数据,这里数据准备就先告一段落。
静态效果实现
实现滚轮静态效果有多种方式
1.视觉3D效果[加阴影]
2.实际3D效果[CSS3D]
我把实现效果大致分为上面2种,具体的大家可以自己搜索相关资料,这里展开涉及太多就带过好了
我自己实现是用的第二种采用了CSS3D
说明
首先我们看到原生ios的选择效果在进入选择范围内和选择范围外的滚轮是有差别的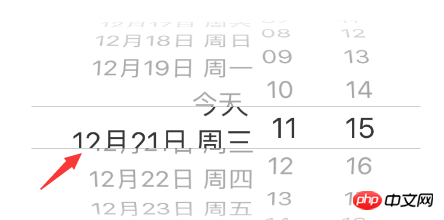
所以为了实现这个效果差别我选择用2个dom结构来实现,一个dom实现滚轮,一个dom实现黑色选中效果,这样联动的时候就有类似原生的效果差别
picker-panel
装各种选择dom,这里只给出了day的,
box-day
装天数据的一个最外层盒子,
check-line
实现选中的那2条线,
day-list
最外层黑色效果数据,
day-wheel
灰色滚轮部分
{{day.value}}
{{day.value}}
.day-wheel{ position: absolute; overflow: visible; height: px2rem(68px); font-size: px2rem(36px); top:px2rem(180px); left: 0; right: 0; color:$unchecked-date; -webkit-transform-style: preserve-3d; transform-style: preserve-3d; .wheel-p{ height: px2rem(68px); line-height: px2rem(68px); position: absolute; top:0; width: 100%; text-align: center; -webkit-backface-visibility: hidden; backface-visibility: hidden; white-space: nowrap; overflow: hidden; text-overflow: ellipsis; } }
主要涉及的css属性
transform-style: preserve-3d;
展示3D效果,
-webkit-backface-visibility: hidden;
滚轮背后部分自动隐藏
postition:absolute;
用来定位轮子
transform: rotate3d(1, 0, 0, 80deg) translate3d(0px, 0px, 2.5rem);
每个数据旋转的角度 和滚轮侧视图圆的半径
每个数据旋转的角度和构造原理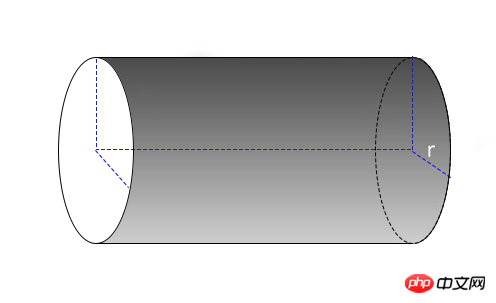
如上图
是我们滚轮的效果立体图,r 就是我们 translated3d(0px,0px,2.5rem) 这条css中的2.5rem,
如果没有这句css 那么所有的数据将汇聚在圆心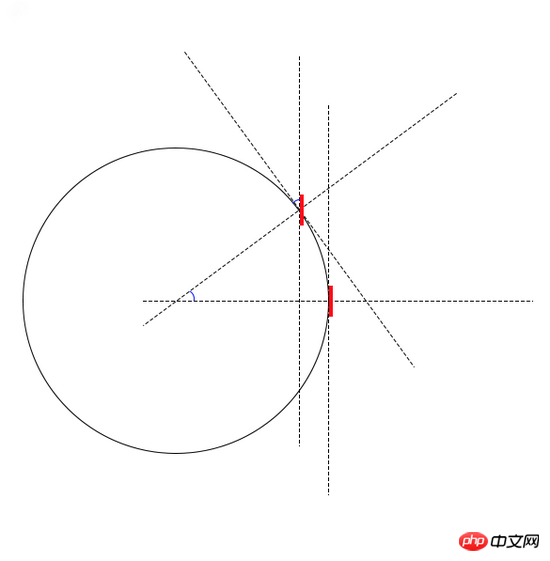
上图 不做旋转(红色代表我们看到的数据效果)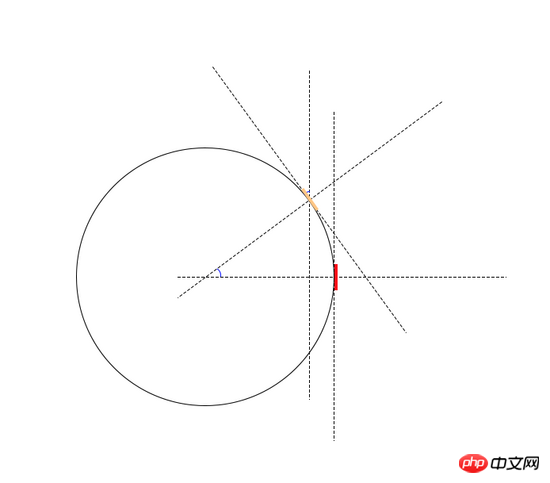
上图 做了旋转(红色 橙色代表我们看到的数据效果)
蓝色弧线表示的角度是一样的(这个涉及角的知识),也是视觉旋转角度,就是rotate3d这句css里面的80deg ,我做的是每个间隔20度,这样实际我们只用旋转x轴就顺带旋转了圆心角度,这样就把整个环给铺开了。完整一个圆可以装下360/20 个数据,而我们肉眼正能看见正面的数据,所以过了一定角度就在背后应该不能被我们看见,而-webkit-backface-visibility: hidden;这句话就起了作用。
这里我们发现轮子装不完所有数据,而且我们要实现数据循环
类似下图效果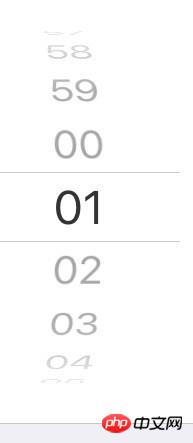
所以就有了第二次数据准备
数据准备2
这里也是用我们的dayList作为初始数据[1,2,3,4,.....,30,31]
这里我们每次取19个数据来作为渲染数据,而我们需要renderListDay初始呈现是[23,24,25,26,27,28,29,30,31,1,2,3,4,5,6,7,8,9,10]
因为这样取最中间的数刚好是第一个(仅在初始化的时候)
renderListDay(){ let list = []; for (let k = this.spin.day.head; k <= this.spin.day.last; k++) { let obj = { value: this.getData(k, 'day'), index: k, }; list.push(obj) } return list },
取数据的方法 小于0倒着取 大于0正着取,索引大于原始数据长度都用%计算来获得正常范围对应的索引,所以上面的spin 就是我们的取数据的叉子(初始是从-9到9)
getData(idx, type){ //... else if (type == 'day') { return this.dayList[idx % this.dayList.length >= 0 ? idx % this.dayList.length : idx % this.dayList.length + this.dayList.length]; } //... },
每条数据旋转的角度(上半圆是正,下半圆是负)
{{day.value}}{{day.value}}
接着需要旋转到我们需要的角度,跟我们的初始化时间对上,this.orDay-this.DayList[0] 是获取偏移量来矫正角度
this.$el.getElementsByClassName('day-wheel')[0].style.transform = 'rotate3d(1, 0, 0, ' + (this.orDay - this.dayList[0]) * 20 + 'deg)';
增加touch事件
剩下的事就很好处理了,给对应的dom绑定事件根据touchmove的距离来转换成旋转的角度 和check-list的位移这里translateY是用来记录实际移动的距离的,最后输出需要算入偏移量
{{day.value}}
{{day.value}}
惯性滚动
这个实现我是用了一个 cubic-bezier(0.19, 1, 0.22, 1)
判断手势是不是flicker 如果是flicker通过一个瞬时速度来算出位移,和时间,然后一次性设置,然后用transition做惯性滚动,
普通拖动 设置1秒
这个实际效果还是有点不好,以后来改进。
其他功能的实现
这里不做详细说明了
总结
自适应方面用了手淘的解决方案
这次实现这个组件最困难的就是实现无限滚动,和无限滚动的渲染数据的构造,接着就是惯性滚动的实现。
已知问题
1.惯性滚动不完美
2.无限滚动实现了。非无限滚动没实现,就是渲染数据就是[1,2,3,4,5,6,7,8,9,10]
3.现在选择必须 年月日 或者年月日小时分钟 不能单独选小时或者分钟
Ce qui précède est le contenu détaillé de. pour plus d'informations, suivez d'autres articles connexes sur le site Web de PHP en chinois!
 Pourquoi vue.js signale-t-il une erreur ?
 Quelles sont les utilisations des slots vue.js ?
 Comment sauter avec des paramètres dans vue.js
 Solution à l'invite d'écran noir de l'ordinateur manquant avec le système d'exploitation
 Comment trouver l'emplacement d'un téléphone Huawei perdu
 Outils d'évaluation des entretiens
 Que sont les frameworks d'intelligence artificielle Python ?
 Introduction à l'utilisation de la fonction MySQL ELT