Cet article a été initialement publié sur le blog du chantier naval.
Lorsque vous développez votre application Django et PostgreSQL, vous pensez probablement à quelques cases que vous aimeriez qu'elle coche :
L'utilisation de Docker et Docker Compose peut vous aider à préparer votre application pour chaque étape du cycle de vie de développement, du local à la production. Dans cet article, nous aborderons certaines des bases de la personnalisation d'un fichier Dockerfile et Compose pour une application Django avec une base de données Postgres.
TLDR : Shipyard maintient une application de démarrage Django / Postgres, configurée pour être construite et exécutée avec Docker et Docker Compose. Fourchette-le ici. Vous pouvez l'utiliser comme modèle de projet ou comme référence pour votre application existante.
Django est un framework Web open source basé sur Python. Il est principalement utilisé comme backend pour les applications Web. Django suit la philosophie des « batteries incluses » : il est livré avec un support de routage, un cadre de connexion, un serveur Web, des outils de base de données et bien plus encore. Django est souvent comparé à Flask et obtient des résultats plus favorables sur presque tous les fronts.
Vous utilisez les applications Django tous les jours. Spotify, Doordash, Instagram, Eventbrite et Pinterest ont tous Django dans leurs piles, ce qui en dit long sur son extension et son évolutivité.
L'exécution d'une application Django avec des conteneurs Docker ouvre plusieurs nouveaux cas d'utilisation. Dès le départ, il s'agit d'une amélioration de vos flux de travail de développement local, en rendant la configuration plus propre et plus simple.
Si vous souhaitez héberger votre projet dans le cloud, vous en aurez généralement besoin en conteneur. L’avantage des conteneurs Docker est qu’ils peuvent être utilisés à chaque étape du développement, du local à la production. Vous pouvez également distribuer votre image Docker afin que d'autres puissent l'exécuter instantanément sans aucune installation ni création.
À tout le moins, si vous incluez un fichier Dockerfile à votre projet, vous pouvez vous assurer qu'il se construit et s'exécute de manière identique à chaque fois, sur chaque système.
Notre application Python a besoin d'un gestionnaire de packages pour suivre, versionner et installer ses dépendances. Cela nous aide à gérer les inits/mises à jour des dépendances, au lieu de les exécuter individuellement, et à conserver les versions des packages sur toutes les machines.
Pip et Poetry sont tous deux des gestionnaires de dépendances populaires pour Python, bien qu'il y en ait quelques autres qui circulent (par exemple uv, Conda, Rye).
Pip est incroyablement simple. Les utilisateurs peuvent répertorier leurs packages dans un fichier Requirements.txt avec leurs versions respectives et exécuter pip install pour les configurer. Les utilisateurs peuvent capturer les dépendances existantes et leurs versions en exécutant pip freeze > Requirements.txt à la racine d'un projet.
Poetry est un gestionnaire de packages très performant pour les applications de toute échelle, mais il est légèrement moins simple à configurer que Pip (il utilise un fichier TOML avec des tables, des métadonnées et des scripts). Poetry utilise également un fichier de verrouillage (poetry.lock) pour « verrouiller » les dépendances à leurs versions actuelles (et leurs dépendances par version). De cette façon, si votre projet fonctionne à un moment donné sur une machine particulière, cet état sera conservé. L'exécution de poésie init propose aux utilisateurs une série d'options pour générer un fichier pyproject.toml.
Pour Dockeriser votre application Django, vous suivrez la structure Dockerfile classique (définir l'image de base, définir le répertoire de travail, etc.), puis la modifier avec les instructions d'installation spécifiques au projet, probablement trouvées dans le README.
Nous pouvons choisir une image Python légère pour servir de base à ce Dockerfile. Pour parcourir les versions par balise, consultez la page Python sur Docker Hub. J'ai choisi Alpine ici car cela gardera notre image petite :
FROM python:3.8.8-alpine3.13
Ici, nous définirons le répertoire de travail dans le conteneur Docker. Tous les chemins mentionnés après seront relatifs à cela.
WORKDIR /srv
Il y a quelques bibliothèques que nous devons ajouter avant de pouvoir configurer Poetry :
RUN apk add --update --no-cache \
  gcc \
  libc-dev \
  libffi-dev \
  openssl-dev \
  bash \
  git \
  libtool \
  m4 \
  g++ \
  autoconf \
  automake \
  build-base \
  postgresql-dev
Ensuite, nous veillerons à utiliser la dernière version de Pip, puis nous l'utiliserons pour installer Poetry dans notre conteneur :
RUN pip install --upgrade pip
RUN pip install poetry
This app’s dependencies are defined in our pyproject.toml and poetry.lock files. Let’s bring them over to the container’s working directory, and then install from their declarations:
ADD pyproject.toml poetry.lock ./
RUN poetry install
Now, we’ll copy over the rest of the project, and install the Django project itself within the container:
ADD src ./src
RUN poetry install
Finally, we’ll run our project’s start command. In this particular app, it’ll be the command that uses Poetry to start the Django development server:
CMD ["poetry", "run", "python", "src/manage.py", "runserver", "0:8080"]
When we combine the snippets from above, we’ll get this Dockerfile:
FROM python:3.8.8-alpine3.13

WORKDIR /srv

RUN apk add --update --no-cache \
  gcc \
  libc-dev \
  libffi-dev \
  openssl-dev \
  bash \
  git \
  libtool \
  m4 \
  g++ \
  autoconf \
  automake \
  build-base \
  postgresql-dev

RUN pip install --upgrade pip
RUN pip install poetry

ADD pyproject.toml poetry.lock ./
RUN poetry install

ADD src ./src
RUN poetry install

CMD ["poetry", "run", "python", "src/manage.py", "runserver", "0:8080"]
We’re going to split this app into two services: django and postgres. Our django service will be built from our Dockerfile, containing all of our app’s local files.
For this app, we want to build the django service from our single Dockerfile and use the entire root directory as our build context path. We can set our build label accordingly:
django:
  build: .
We can map port 8080 on our host machine to 8080 within the container. This will also be the port we use to access our Django app — which will soon be live at http://localhost:8080.
ports:
  - '8080:8080'
Since our Django app is connecting to a database, we want to instruct Compose to spin up our database container (postgres) first. We’ll use the depends_on label to make sure that service is ready and running before our django service starts:
depends_on:
  - postgres
Since we’ll be sharing files between our host and this container, we can define a bind mount by using the volumes label. To set the volume, we’ll provide a local path, followed by a colon, followed by a path within the container. The ro flag gives the container read-only permissions for these files:
volumes:
  - './src:/srv/src:ro'
Combining all the options/configurations from above, our django service should look like this:
django:
  build: .
  ports:
    - '8080:8080'
  depends_on:
    - postgres
  volumes:
    - './src:/srv/src:ro'
Our Django app is configured to connect to a PostgreSQL database. This is defined in our settings.py:
DATABASES = {
    'default': {
        'ENGINE': 'django.db.backends.postgresql',
        'NAME': 'app',
        'USER': 'obscure-user',
        'PASSWORD': 'obscure-password',
        'HOST': 'postgres',
        'PORT': 5432,
    }
}
We can migrate our existing database to its own Docker container to isolate it from the base Django app. First, let’s define a postgres service in our Compose file and pull the latest lightweight Postgres image from Docker Hub:
postgres:
  image: 'postgres:14.13-alpine3.20'
To configure our PostgreSQL database, we can pass in a few environment variables to set credentials and paths. You may want to consider using a Secrets Manager for this.
environment:
  - POSTGRES_DB=app
  - POSTGRES_USER=obscure-user
  - POSTGRES_PASSWORD=obscure-password
  - PGDATA=/var/lib/postgresql/data/pgdata
We can expose our container port by setting it to the default Postgres port: 5432. For this service, we’re only specifying a single port, which means that the host port will be randomized. This avoids collisions if you’re running multiple Postgres instances.
ports:
  - '5432'
In our postgres definition, we can add a named volume. This is different from the bind mount that we created for the django service. This will persist our data after the Postgres container spins down.
volumes:
  - 'postgres:/var/lib/postgresql/data'
Outside of the service definitions and at the bottom of the Compose file, we’ll declare the named postgres volume again. By doing so, we can reference it from our other services if needed.
volumes:
  postgres:
And here’s the resulting PostgreSQL definition in our Compose file:
  postgres:
    image: 'postgres:14.13-alpine3.20'
    environment:
      - POSTGRES_DB=app
      - POSTGRES_USER=obscure-user
      - POSTGRES_PASSWORD=obscure-password
      - PGDATA=/var/lib/postgresql/data/pgdata
    ports:
      - '5432'
    volumes:
      - 'postgres:/var/lib/postgresql/data'

volumes:
  postgres:
We can get our app production-ready by deploying it in a Shipyard application — this means we’ll get an ephemeral environment for our base branch, as well as environments for every PR we open.

Shipyard transpiles Compose files to Kubernetes manifests, so we’ll add some labels to make it Kubernetes-compatible.
Under our django service, we can add two custom Shipyard labels:
labels:
  shipyard.init: 'poetry run python src/manage.py migrate'
  shipyard.route: '/'
Next, you can go to your Shipyard dashboard. If you haven’t already, sign up for a 30-day free trial.
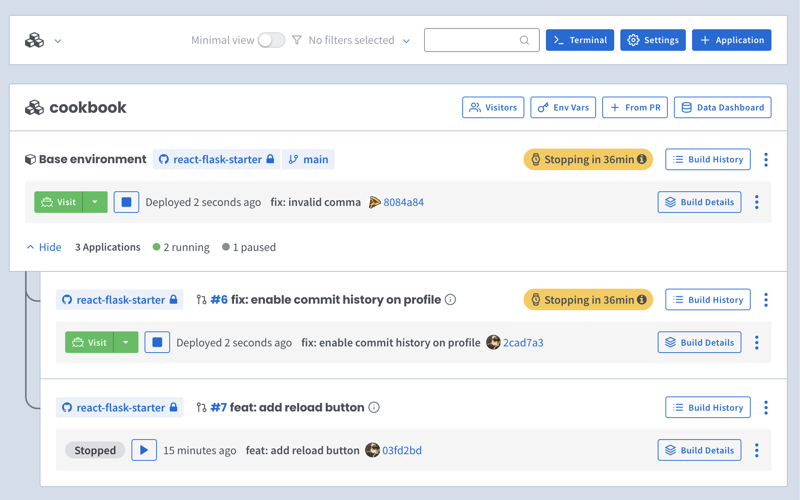
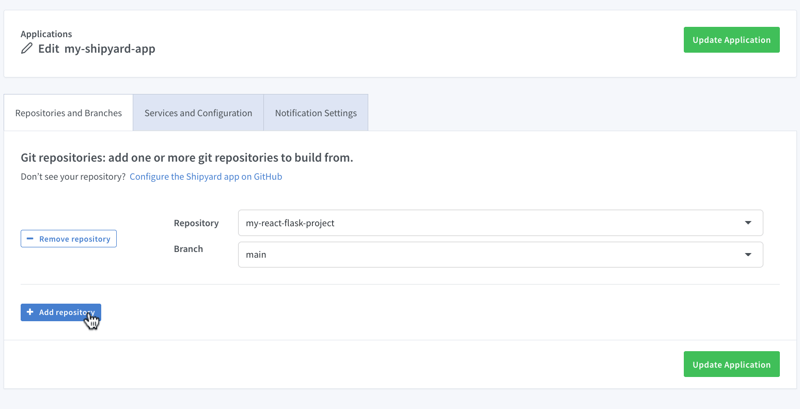
Click the + Application button, then select your repo, services, and import your env vars.

Once it finishes building, you can click the green Visit button to access your short-lived ephemeral environment. What comes next?
Now you have a fully containerized Django app with a database! You can run it locally with Docker Compose, preview and test it in an ephemeral environment, and iterate until it’s production-ready.
Want to Dockerize a Yarn app next? Check out our guide!
Ce qui précède est le contenu détaillé de. pour plus d'informations, suivez d'autres articles connexes sur le site Web de PHP en chinois!