
L'authentification d'une application est quelque chose de très important dans le système, mais aussi de très sensible, il y a diverses implémentations, sécurité, validation à considérer.
J'ai décidé de faire un article présentant Cognito, un très bel outil d'AWS qui peut vous aider dans l'authentification et la validation de l'utilisateur pour les applications Web et mobiles que beaucoup de gens ne connaissent pas.
Cognito est une plateforme AWS chargée de créer et de valider les données d'accès des utilisateurs, ainsi que de pouvoir enregistrer les utilisateurs et stocker leurs informations, en plus de générer des jetons OAuth, et Cognito peut également fournir toutes les validations des utilisateurs.
Nous pouvons créer certaines données utilisateur telles que : email, nom, téléphone, date de naissance, pseudo, sexe, site Web et bien d'autres, nous pouvons également placer des champs personnalisés.
Cognito nous permet toujours de travailler avec des « fournisseurs fédérés », dits social logins, comme Google, Facebook et GitHub, nous n'aborderons pas ce post, mais il est possible de le faire avec cognito.
Nous allons créer quelques points de terminaison pour montrer comment fonctionne cognito, nous allons créer un utilisateur, confirmer l'e-mail, nous connecter, rechercher un utilisateur en utilisant le jeton fourni par cognito, mettre à jour les informations.
Nous allons faire quelque chose de très simple, nous n'allons pas nous soucier du projet père, nous voulons aborder uniquement l'utilisation des connaissances.
Pour créer les points de terminaison, nous allons utiliser gin.
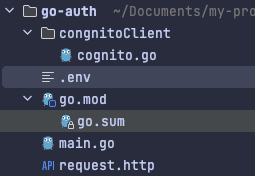
Créons les fichiers suivants :
Le point d'entrée de notre application main.go à la racine du projet
.env Pour enregistrer les informations d'identification cognitives
Une pâte appelée cognitoClient et à l'intérieur d'un fichier appelé cognito.go
Il existe un fichier appelé request.http, pour compléter vos demandes.
La structure sera la suivante :
Avant de démarrer le code, nous allons configurer le cognito dans AWS, pour accéder au panel et effectuer une recherche par cognito, après avoir créé notre pool, sélectionnez l'option Ajouter des répertoires d'utilisateurs à votre application.
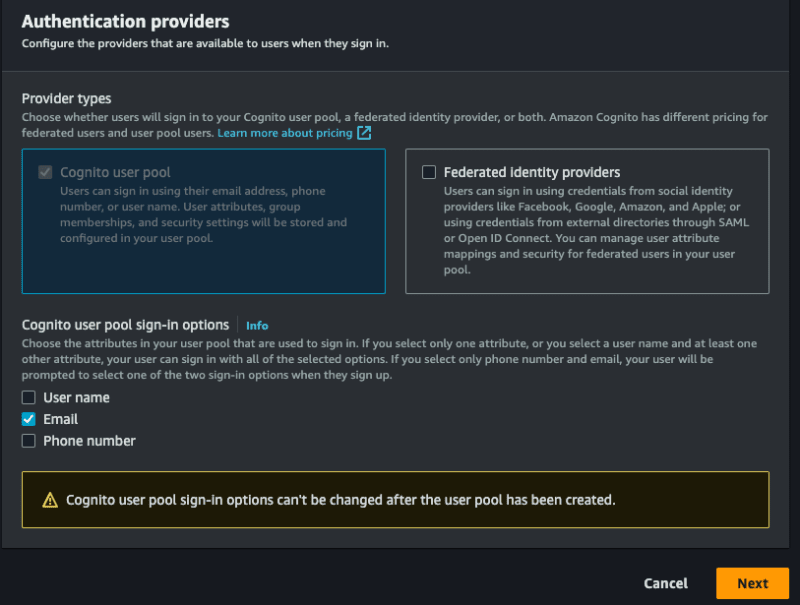
Pour les Types de fournisseurs, sélectionnez l'option Groupe d'utilisateurs Cognito, vous pouvez choisir d'autoriser la connexion par e-mail, nom d'utilisateur et téléphone, vous pouvez uniquement opter pour l'e-mail, sélectionnez ce que vous préférez, sélectionnez assim à la première étape :
Je dois configurer encore quelques choses, allons-y !
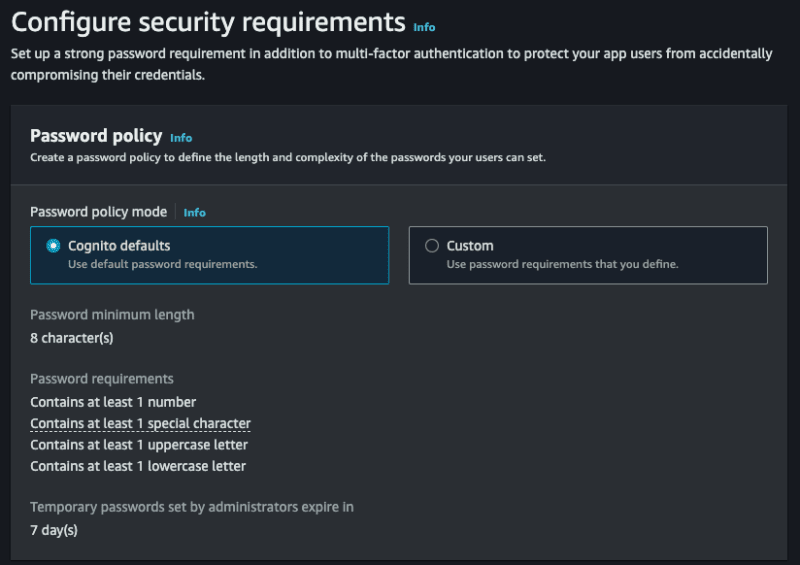
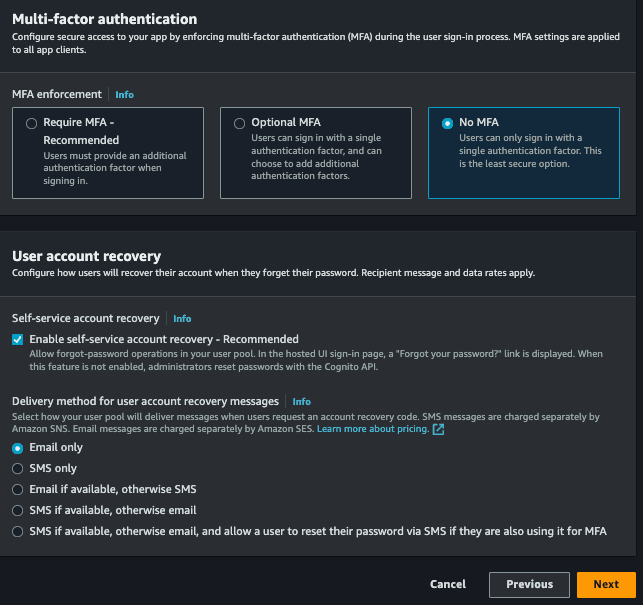
Étape suivante :
Cette étape s'est également produite :
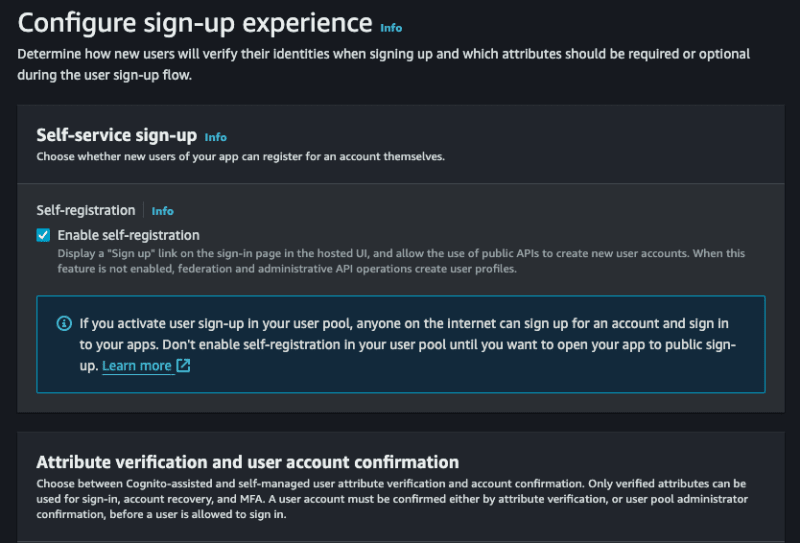
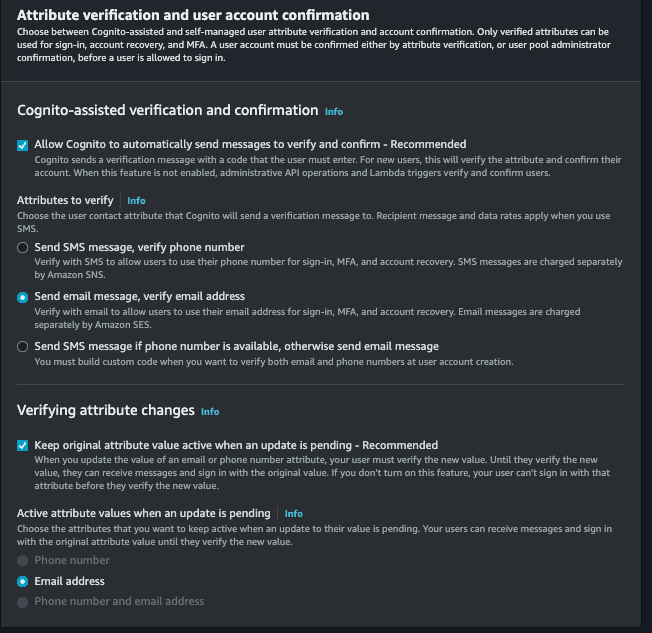
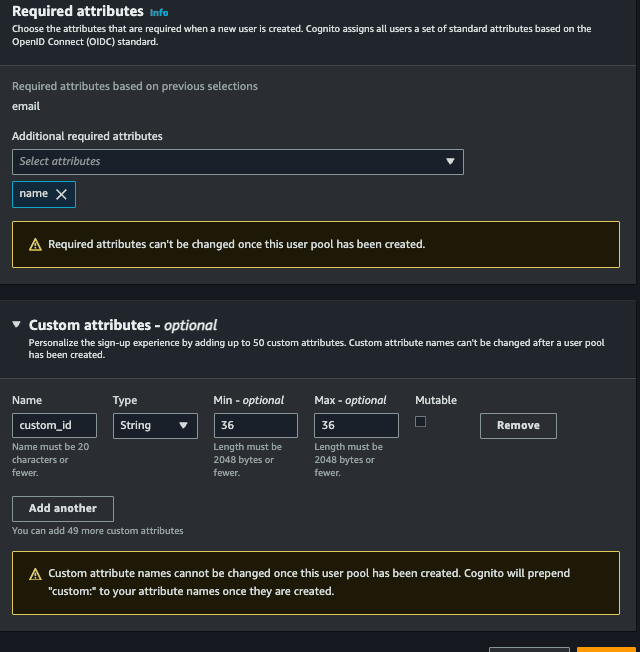
Ensuite, sélectionnez l'option Envoyer un e-mail avec Cognito, nous n'avons donc pas besoin de configurer quoi que ce soit pour déclencher les e-mails.
À l'étape suivante, dans Nom du pool d'utilisateurs, mettez le nom souhaité dans Nom du client de l'application, mettez également le nom souhaité et continuez.
Dans la dernière étape, nous n'aurons rien besoin de modifier, il suffit de terminer et de créer le pool d'utilisateurs.
Avec tout, accès ou cognito > Pools d'utilisateurs, sélectionnez le pool que vous venez de créer, cette partie listera tous les utilisateurs de votre application, et il est possible de révoquer le token de l'utilisateur, de le désactiver, de vérifier entre autres fonctionnalités.
Nous allons préciser l'identifiant du pool, pour pouvoir utiliser le SDK Go pour aws, pour accéder au pool créé Intégration d'application > Liste des clients de l'application et consultez notre ID client :

Enregistrons cet identifiant dans notre fichier .env :
COGNITO_CLIENT_ID=client_id
N'oubliez pas que vous devez toujours disposer des informations d'identification AWS, généralement situées dans le répertoire /Users/votre-utilisateur/.aws, si vous ne l'avez pas encore configuré, voyez ici comment procéder.
Séparons la partie cognito dans un autre fichier.
Dans le fichier cognito.go, nous allons initialiser notre cognito et créer notre interface :
  package congnitoClient

  import (
    "github.com/aws/aws-sdk-go/aws"
    "github.com/aws/aws-sdk-go/aws/session"
    cognito "github.com/aws/aws-sdk-go/service/cognitoidentityprovider"
    "github.com/google/uuid"
  )

  type User struct {
    Name     string `json:"name" binding:"required"`
    Email    string `json:"email" binding:"required,email"`
    Password string `json:"password" binding:"required"`
  }

  type CognitoInterface interface {
    SignUp(user *User) error
  }

  type cognitoClient struct {
    cognitoClient *cognito.CognitoIdentityProvider
    appClientID   string
  }

  func NewCognitoClient(appClientId string) CognitoInterface {
    config := &aws.Config{Region: aws.String("us-east-1")}
    sess, err := session.NewSession(config)
    if err != nil {
      panic(err)
    }
    client := cognito.New(sess)

    return &cognitoClient{
      cognitoClient: client,
      appClientID:   appClientId,
    }
  }

  func (c *cognitoClient) SignUp(user *User) error {
    return nil
  }
Nous créons d'abord une structure appelée User, cette structure contiendra les champs utilisateur que nous devons enregistrer dans cognito.
Ensuite nous créons une interface appelée CognitoInterface, nous aurons les méthodes que nous utiliserons, d'abord nous n'aurons que SignUp qui recevra un pointeur vers la structure User.
Ensuite, nous aurons une autre structure appelée cognitoClient qui contiendra notre instance pour NewCognitoClient qui sera notre constructeur.
Comme mentionné, NewCognitoClient sera comme notre constructeur, c'est là que nous allons créer la session avec AWS et renvoyer cette connexion. Cette connexion pourrait être une variable globale, dans notre cas nous ne ferons pas cela, c'est à vous de vérifier quelle est la meilleure approche pour votre cas d'utilisation.
Mettez maintenant en œuvre l'inscription :
  func (c *cognitoClient) SignUp(user *User) error {
    userCognito := &cognito.SignUpInput{
      ClientId: aws.String(c.appClientID),
      Username: aws.String(user.Email),
      Password: aws.String(user.Password),
      UserAttributes: []*cognito.AttributeType{
        {
          Name:  aws.String("name"),
          Value: aws.String(user.Name),
        },
        {
          Name:  aws.String("email"),
          Value: aws.String(user.Email),
        },
        {
          Name:  aws.String("custom:custom_id"),
          Value: aws.String(uuid.NewString()),
        },
      },
    }
    _, err := c.cognitoClient.SignUp(userCognito)
    if err != nil {
      return err
    }
    return nil
  }
Nous utiliserons l'AttributeType de Cognito pour assembler les paramètres que nous enverrons à l'inscription du SDK AWS, notez que le custom_id qui est notre champ personnalisé, doit être placé personnalisé avant, sans cela il ne sera pas accepté , nous venons de créer un uuid avec le package Google, ce champ sert juste à montrer comment utiliser les attributs personnalisés.
Le champ ClientId fait référence au COGNITO_CLIENT_ID de notre env, nous le transmettrons au démarrage de main.go.
C'est ce dont nous avons besoin pour sauver l'utilisateur, simple n'est-ce pas ?
N'oubliez pas de démarrer le projet avec :
go mod init <your project name>
Et installez les packages nécessaires :
go mod tidy
Créons une autre fonction pour vérifier le compte de l'utilisateur par e-mail. Pour vérifier le compte, l'utilisateur devra saisir le code envoyé par e-mail. Créons une nouvelle structure et ajoutons la nouvelle méthode ConfirmAccount à l'interface :
  type UserConfirmation struct {
    Email string `json:"email" binding:"required,email"`
    Code  string `json:"code" binding:"required"`
  }
  type CognitoInterface interface {
    SignUp(user *User) error
    ConfirmAccount(user *UserConfirmation) error
  }
Maintenant, mettons en œuvre :
  func (c *cognitoClient) ConfirmAccount(user *UserConfirmation) error {
    confirmationInput := &cognito.ConfirmSignUpInput{
      Username:         aws.String(user.Email),
      ConfirmationCode: aws.String(user.Code),
      ClientId:         aws.String(c.appClientID),
    }
    _, err := c.cognitoClient.ConfirmSignUp(confirmationInput)
    if err != nil {
      return err
    }
    return nil
  }
C'est très simple, nous utiliserons le ConfirmSignUpInput du package cognito pour assembler les paramètres, en rappelant que le Nom d'utilisateur est l'email de l'utilisateur. Enfin, nous appellerons ConfirmSignUp en passant le confirmationInput.
En vous rappelant que nous n'avons renvoyé que l'erreur, vous pouvez améliorer et vérifier les types de messages d'erreur.
Cela devrait être la fonctionnalité qui sera la plus utilisée, créons une méthode appelée SignIn et une struct :
  type UserLogin struct {
    Email    string `json:"email" binding:"required,email"`
    Password string `json:"password" binding:"required"`
  }
  type CognitoInterface interface {
    SignUp(user *User) error
    ConfirmAccount(user *UserConfirmation) error
    SignIn(user *UserLogin) (string, error)
  }
Notre connexion recevra un identifiant d'utilisateur.
Mettez en œuvre :
  func (c *cognitoClient) SignIn(user *UserLogin) (string, error) {
    authInput := &cognito.InitiateAuthInput{
      AuthFlow: aws.String("USER_PASSWORD_AUTH"),
      AuthParameters: aws.StringMap(map[string]string{
        "USERNAME": user.Email,
        "PASSWORD": user.Password,
      }),
      ClientId: aws.String(c.appClientID),
    }
    result, err := c.cognitoClient.InitiateAuth(authInput)
    if err != nil {
      return "", err
    }
    return *result.AuthenticationResult.AccessToken, nil
  }
Nous utiliserons la fonction InitiateAuth du package aws cognito, nous devons transmettre le nom d'utilisateur (e-mail de l'utilisateur), le mot de passe et l'AuthFlow, ce champ fait référence au type d'accès que nous autoriserons, dans notre cas USER_PASSWORD_AUTH.
Si vous recevez une erreur comme celle-ci :
Vous avez fait confiance à tous les proxys, ce n'est PAS sûr. Nous vous recommandons de définir une valeur
Il faudra activer le flux ALLOW_USER_PASSWORD_AUTH, pour le configurer accéder à cognito sur le panneau aws, rendez-vous sur :
Groupes d'utilisateurs > Selecione seu pool> Intégration d'applications > Liste des clients de l'application > Sélectionner un client, ouvrira cet écran :
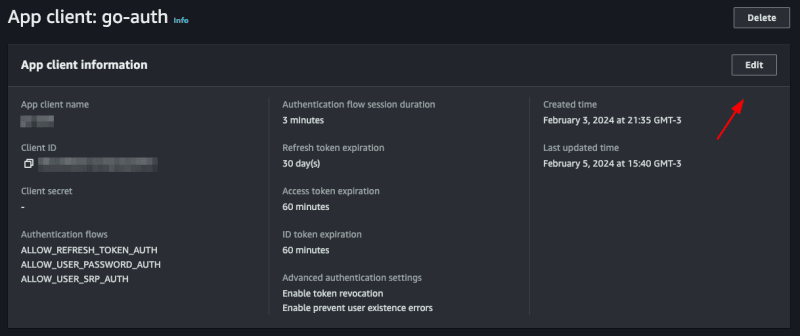
Click on edit and in Authentication flows select the option ALLOW_USER_PASSWORD_AUTH then save, with this you can now log in with the user's password and email.
Para mostrar como utilizar o token jwt fornecido pelo cognito vamos criar um endpoint que mostra os dados do usuário salvos no cognito apenas com o token.
Let's create another function called GetUserByToken that will receive a token and return a struct of type GetUserOutput that we will get from the cognito package.
  type CognitoInterface interface {
    SignUp(user *User) error
    ConfirmAccount(user *UserConfirmation) error
    SignIn(user *UserLogin) (string, error)
    GetUserByToken(token string) (*cognito.GetUserOutput, error)
  }
If you click on GetUserOutput you will see what is inside this struct
  type GetUserOutput struct {
    _ struct{} `type:"structure"`
    MFAOptions []*MFAOptionType `type:"list"`
    PreferredMfaSetting *string `type:"string"`
    UserAttributes []*AttributeType `type:"list" required:"true"`
    UserMFASettingList []*string `type:"list"`
    Username *string `min:"1" type:"string" required:"true" sensitive:"true"`
  }
inside the _ struct{} there are custom attributes that we created for our user, in our case the custom_id.
Let's implement:
  func (c *cognitoClient) GetUserByToken(token string) (*cognito.GetUserOutput, error) {
    input := &cognito.GetUserInput{
      AccessToken: aws.String(token),
    }
    result, err := c.cognitoClient.GetUser(input)
    if err != nil {
      return nil, err
    }
    return result, nil
  }
We use GetUser from the cognito package, it only needs an AccessToken which is the token provided by cognito itself.
Finally, we will update the user's password. To do this, we will need the email address and the new password. We already have the UserLogin struct with the fields we need. We will reuse it. If you wish, create a new one just for this function. Let's create the UpdatePassword function:
  type CognitoInterface interface {
    SignUp(user *User) error
    ConfirmAccount(user *UserConfirmation) error
    SignIn(user *UserLogin) (string, error)
    GetUserByToken(token string) (*cognito.GetUserOutput, error)
    UpdatePassword(user *UserLogin) error
  }
Let's implement:
  func (c *cognitoClient) UpdatePassword(user *UserLogin) error {
    input := &cognito.AdminSetUserPasswordInput{
      UserPoolId: aws.String(os.Getenv("COGNITO_USER_POOL_ID")),
      Username:   aws.String(user.Email),
      Password:   aws.String(user.Password),
      Permanent:  aws.Bool(true),
    }
    _, err := c.cognitoClient.AdminSetUserPassword(input)
    if err != nil {
      return err
    }
    return nil
  }
We will use the AdminSetUserPassword function from the cognito package, we need to pass the user's email and the new password, in addition we have to pass the UserPoolId, we will put the COGNITO_USER_POOL_ID in the .env file, to search in aws just access your pool and copy the User pool ID

We will also pass Permanent, informing that it is a permanent password, you could pass false, so Cognito would create a temporary password for the user, this will depend on the strategy you will use in your application.
Let's create our main.go, this will be the file where we will start cognito and create our routes.
  func main() {
    err := godotenv.Load()
    if err != nil {
      panic(err)
    }
    cognitoClient := congnitoClient.NewCognitoClient(os.Getenv("COGNITO_CLIENT_ID"))
    r := gin.Default()

    fmt.Println("Server is running on port 8080")
    err = r.Run(":8080")
    if err != nil {
      panic(err)
    }
  }
First we will load our envs with the godotenv package, then we start our cognito client, passing the COGNITO_CLIENT_ID, which we got earlier, then we start gin and create a server, that's enough.
Let's create a function inside the main.go file itself, let's call it CreateUser:
  func CreateUser(c *gin.Context, cognito congnitoClient.CognitoInterface) error {
    var user congnitoClient.User
    if err := c.ShouldBindJSON(&user); err != nil {
      return errors.New("invalid json")
    }
    err := cognito.SignUp(&user)
    if err != nil {
      return errors.New("could not create use")
    }
    return nil
  }
Something simple, we just convert what we receive in the body to our struct using gin's ShouldBindJSON, then we call the SignUp that we created in cognito.go.
Now let's create the endpoint inside the main.go function:
  r.POST("user", func(context *gin.Context) {
        err := CreateUser(context, cognitoClient)
        if err != nil {
            context.JSON(http.StatusBadRequest, gin.H{"error": err.Error()})
            return
        }
        context.JSON(http.StatusCreated, gin.H{"message": "user created"})
    })
We call the function we just created CreateUser, if there is an error we throw a StatusBadRequest, if it is successful a StatusCreated, let's test.
Let's do a go mod tidy downloading all the packages, then we'll run the application with go run main.go
Now we can create a call in the request.http file and execute:
POST http://localhost:8080/user HTTP/1.1
content-type: application/json

{
  "Name": "John Doe",
  "email": "wivobi1159@bitofee.com",
  "password": "Pass@1234"
}
If everything is correct we will receive the message:
{
  "message": "user created"
}
Now entering the Cognito panel on AWS, and accessing the pool then the users, we will have our user there:

Note that the user we created above is not confirmed, let's confirm it!
Create a function called ConfirmAccount in the main.go file:
  func ConfirmAccount(c *gin.Context, cognito congnitoClient.CognitoInterface) error {
    var user congnitoClient.UserConfirmation
    if err := c.ShouldBindJSON(&user); err != nil {
      return errors.New("invalid json")
    }
    err := cognito.ConfirmAccount(&user)
    if err != nil {
      return errors.New("could not confirm user")
    }
    return nil
  }
Same concept we used before, let's convert the body to the UserConfirmation struct and pass it to ConfirmAccount in cognito.go.
Let's create the endpoint:
  r.POST("user/confirmation", func(context *gin.Context) {
        err := ConfirmAccount(context, cognitoClient)
        if err != nil {
            context.JSON(http.StatusBadRequest, gin.H{"error": err.Error()})
            return
        }
        context.JSON(http.StatusCreated, gin.H{"message": "user confirmed"})
    })
It's also simple, we just handle the error and return a message, let's create our call and test it:
POST http://localhost:8080/user/confirmation HTTP/1.1
content-type: application/json

{
  "email": "wivobi1159@bitofee.com",
  "code": "363284"
}
We will receive the message:
{
  "message": "user confirmed"
}
Now accessing Cognito again on the AWS panel, notice that the user is confirmed, remembering that you need to enter a valid email, you can use a temporary email to play around, but it needs to be valid, as Cognito will send the confirmation code and it needs to be a valid code to confirm successfully.

Now let's create our token, to do this in the main.go file create a function called SignIn, this function will return an error and a token.
  func SignIn(c *gin.Context, cognito congnitoClient.CognitoInterface) (string, error) {
    var user congnitoClient.UserLogin
    if err := c.ShouldBindJSON(&user); err != nil {
      return "", errors.New("invalid json")
    }
    token, err := cognito.SignIn(&user)
    if err != nil {
      return "", errors.New("could not sign in")
    }
    return token, nil
  }
Same pattern as the other functions, we convert the body to the UserLogin struct and pass it to SignIn of cognito.go.
Let's create the endpoint:
  r.POST("user/login", func(context *gin.Context) {
        token, err := SignIn(context, cognitoClient)
        if err != nil {
            context.JSON(http.StatusBadRequest, gin.H{"error": err.Error()})
            return
        }
        context.JSON(http.StatusCreated, gin.H{"token": token})
    })
Now we return a token to the user, let's create the call and test:
POST http://localhost:8080/user/login HTTP/1.1
content-type: application/json

{
  "email": "wivobi1159@bitofee.com",
  "password": "Pass@1234"
}
When making the call we will receive our jwt token:
{
  "token": "token_here"
}
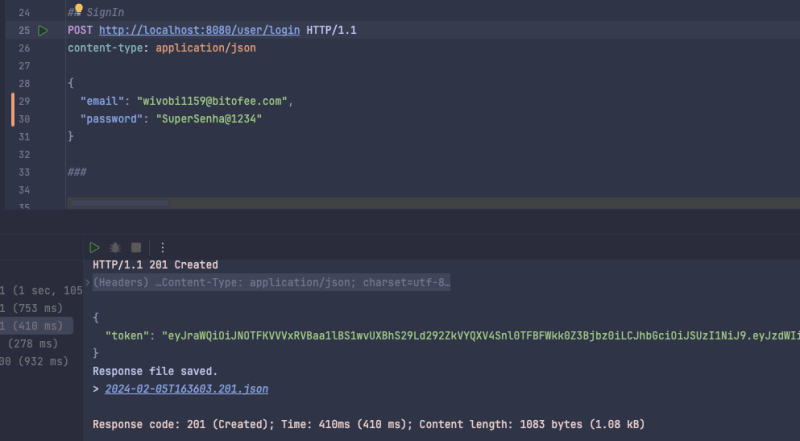
If we get the jwt token we can see what's inside, using the website jwt.io.
Now we will list the user data saved in cognito using only the token, to do this create a function called GetUserByToken in main.go and we will need a struct to represent the response that we will return to the user, we will create it in main as well:
  type UserResponse struct {
    ID            string `json:"id"`
    Name          string `json:"name"`
    Email         string `json:"email"`
    CustomID      string `json:"custom_id"`
    EmailVerified bool   `json:"email_verified"`
  }

  func main() {}
Now the function:
  func GetUserByToken(c *gin.Context, cognito congnitoClient.CognitoInterface) (*UserResponse, error) {
    token := strings.TrimPrefix(c.GetHeader("Authorization"), "Bearer ")
    if token == "" {
      return nil, errors.New("token not found")
    }
    cognitoUser, err := cognito.GetUserByToken(token)
    if err != nil {
      return nil, errors.New("could not get user")
    }
    user := &UserResponse{}
    for _, attribute := range cognitoUser.UserAttributes {
      switch *attribute.Name {
      case "sub":
        user.ID = *attribute.Value
      case "name":
        user.Name = *attribute.Value
      case "email":
        user.Email = *attribute.Value
      case "custom:custom_id":
        user.CustomID = *attribute.Value
      case "email_verified":
        emailVerified, err := strconv.ParseBool(*attribute.Value)
        if err == nil {
          user.EmailVerified = emailVerified
        }
      }
    }
    return user, nil
  }
This will be the biggest function, we need to map what we receive from Cognito to our UserResponse struct, we do this with a for and a switch, of course we could improve it, but for the sake of example we will keep it like this. Also to map custom attributes we need to put custom before, like custom:custom_id.
We also check if the user passed the token in the header, if not we return an error.
Let's create the endpoint:
  r.GET("user", func(context *gin.Context) {
        user, err := GetUserByToken(context, cognitoClient)
        if err != nil {
            if err.Error() == "token not found" {
                context.JSON(http.StatusUnauthorized, gin.H{"error": "token not found"})
                return
            }
            context.JSON(http.StatusBadRequest, gin.H{"error": err.Error()})
            return
        }
        context.JSON(http.StatusOK, gin.H{"user": user})
    })
We perform the same validation as the other endpoints, but now we check the error type and if it is of the token not found type we return a StatusUnauthorized.
Let's test:
GET http://localhost:8080/user HTTP/1.1
content-type: application/json
Authorization: Bearer token_jwt
Let's receive the user:
{
  "user": {
    "id": "50601dc9-7234-419a-8427-2a4bda92d33f",
    "name": "John Doe",
    "email": "wivobi1159@bitofee.com",
    "custom_id": "cb748d09-40de-457a-af23-ed9483d69f8d",
    "email_verified": true
  }
}
Finally, let's create the UpdatePassword function that will update the user's password:
  func UpdatePassword(c *gin.Context, cognito congnitoClient.CognitoInterface) error {
    token := strings.TrimPrefix(c.GetHeader("Authorization"), "Bearer ")
    if token == "" {
      return errors.New("token not found")
    }
    var user congnitoClient.UserLogin
    if err := c.ShouldBindJSON(&user); err != nil {
      return errors.New("invalid json")
    }
    err := cognito.UpdatePassword(&user)
    if err != nil {
      return errors.New("could not update password")
    }
    return nil
  }
We also make it mandatory to inform the token in the header, the rest of the function is what we have already done previously.
Let's create the last endpoint:
  r.PATCH("user/password", func(context *gin.Context) {
        err := UpdatePassword(context, cognitoClient)
        if err != nil {
            if err.Error() == "token not found" {
                context.JSON(http.StatusUnauthorized, gin.H{"error": "token not found"})
                return
            }
            context.JSON(http.StatusBadRequest, gin.H{"error": err.Error()})
            return
        }
        context.JSON(http.StatusOK, gin.H{"message": "password updated"})
    })
Let's make the call:
PATCH http://localhost:8080/user/password HTTP/1.1
content-type: application/json
Authorization: Bearer token_jwt

{
  "email": "wivobi1159@bitofee.com",
  "password": "NovaSenha2@2222"
}
Now when you update your password and try to log in you will receive an error, and if you use the new password, everything will work.
In this post we talk a little about Cognito, one of the many AWS services that many people don't know about but that helps a lot in the evolution of your system.
Cognito's practicality goes beyond what I've discussed. Making a basic login is simple, but Cognito stands out for already providing you with an account verification system "ready", a login option with social networks (which can be quite annoying to implement without Coginito), two-factor authentication, among others, and it also has AWS security to protect user data.
Cognito has more functionality, it's worth seeing all of them in the documentation.
Project repository
See the post on my blog here
Subscribe and receive notification of new posts, participate
Ce qui précède est le contenu détaillé de. pour plus d'informations, suivez d'autres articles connexes sur le site Web de PHP en chinois!
 La différence entre une pression sur une touche et une touche enfoncée
 Que dois-je faire si mon lecteur C devient rouge ?
 Comment ouvrir le registre
 Utilisation composée
 Sur quelle touche appuyez-vous pour récupérer lorsque votre ordinateur tombe en panne ?
 Comment implémenter un saut de ligne dans l'alerte
 Modifier le nom du fichier sous Linux
 Comment réparer le système Win7 s'il est endommagé et ne peut pas être démarré